




Shop Floor Control
| Lines of Code | 13094 |
| Technical name | viin_mrp_workorder |
| License | OPL-1 |
| Website | https://viindoo.com/apps/modules/18.0/viin_mrp_workorder |
| Read description for | v 10.0 v 11.0 v 12.0 v 13.0 v 14.0 v 15.0 v 16.0 v 17.0 |
| Required Apps | Manufacturing (mrp) Discuss (mail) Inventory (stock) Employees (hr) |
| Included Dependencies | Viindoo Manufacturing Web Gantt |
| Extensions | Shop Floor Control - Quality Shop Floor Control - Backdate Shop Floor Control - Maintenance MRP Barcode IoT Shop Floor Shop Floor Control - Accounting |
Run every work order from a tablet at the machine
For manufacturers that run work orders at the machine and cost labour per person
Output, materials and machine stops recorded as they happen, and labour cost credited to the person who did the work.
Odoo 18.0 · Odoo Community, Viindoo Cloud · OPL-1
What changes for your team
Output and materials are recorded when they happen
Quantities are noted on paper and typed in at the end of the shift.
→ Operators tap the quantity made and the components actually used, by lot or serial number. Each recording is its own entry, and a retry never records twice.
Labour cost follows the person who worked
Labour is costed per work center, at one average rate.
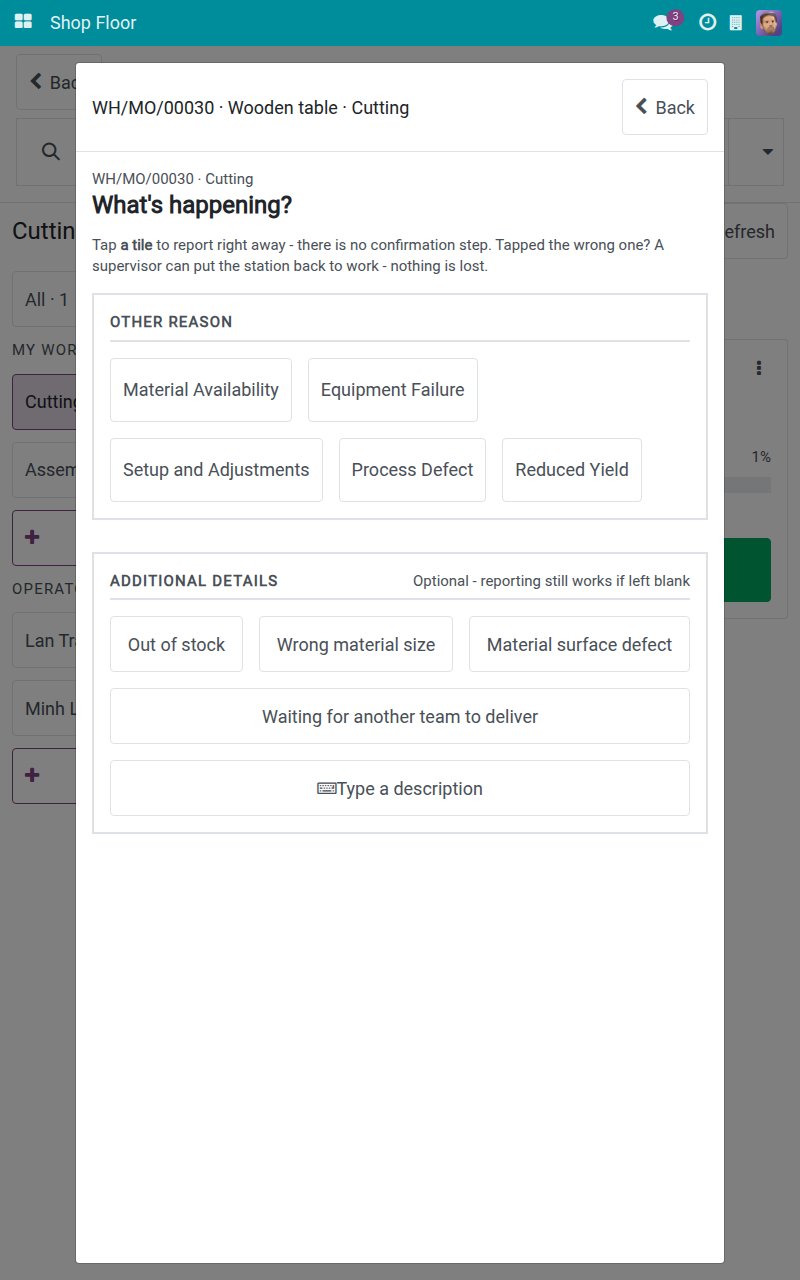
→ Each time line names the credited employee and freezes that employee's hourly cost when it closes; without one, the work center's per-employee rate applies. A manager can record on behalf of a colleague.
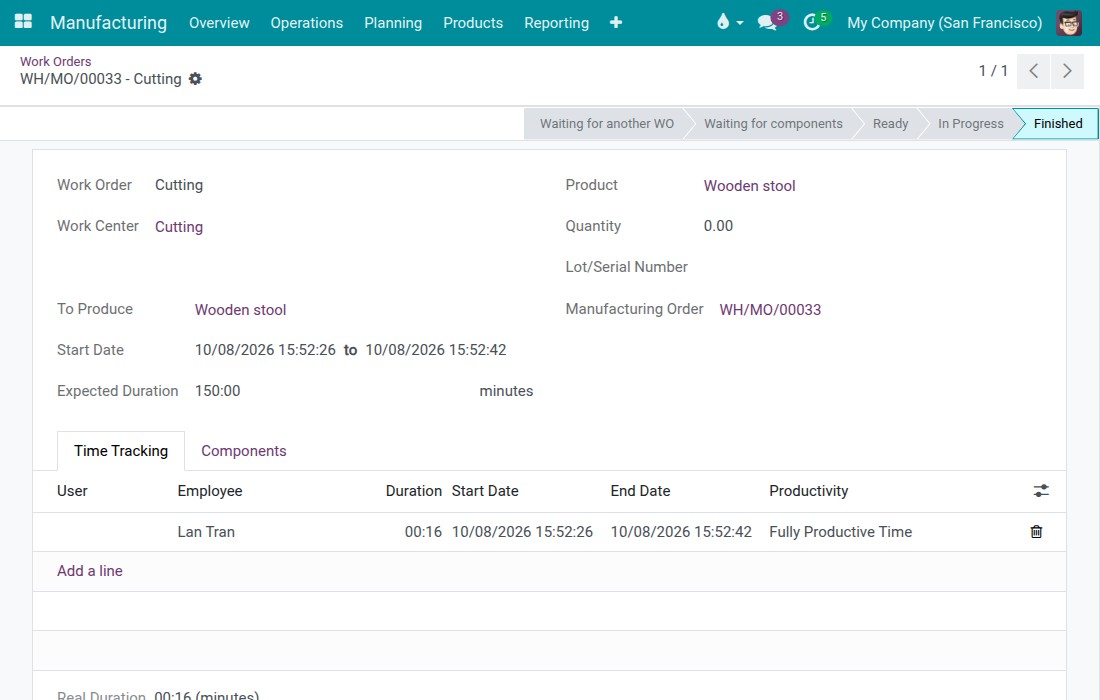
Every stop is measured, with its reason
A breakdown is remembered at the end of the shift, or not at all.
→ One tap on a reason tile stops the work center and times the stop. Breakdowns stay out of product cost, and only a Manufacturing Manager restarts the station.
Before the first shift
People and access
Give operators Manufacturing / User and production leads Manufacturing / Administrator, and link each account to an employee.
Labour rates
Enter each employee's hourly cost. Set the per-employee rate on the work center for employees without one.
What is included
On its own the module covers the job board, output and materials with undo, scrap, order closing, Shop Floor Entries, Post Consumption, the planning views and planned labour in the MO Overview BoM Cost.
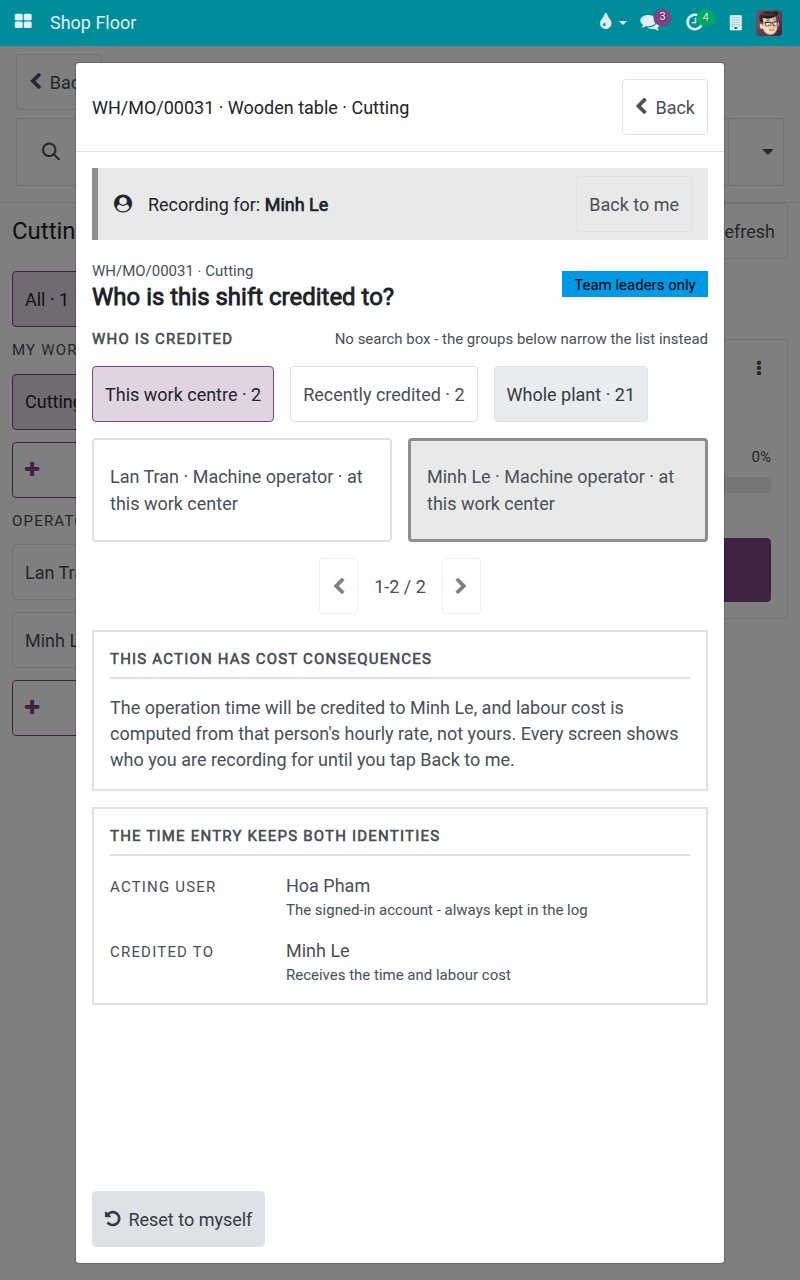
Who is this operation credited to?
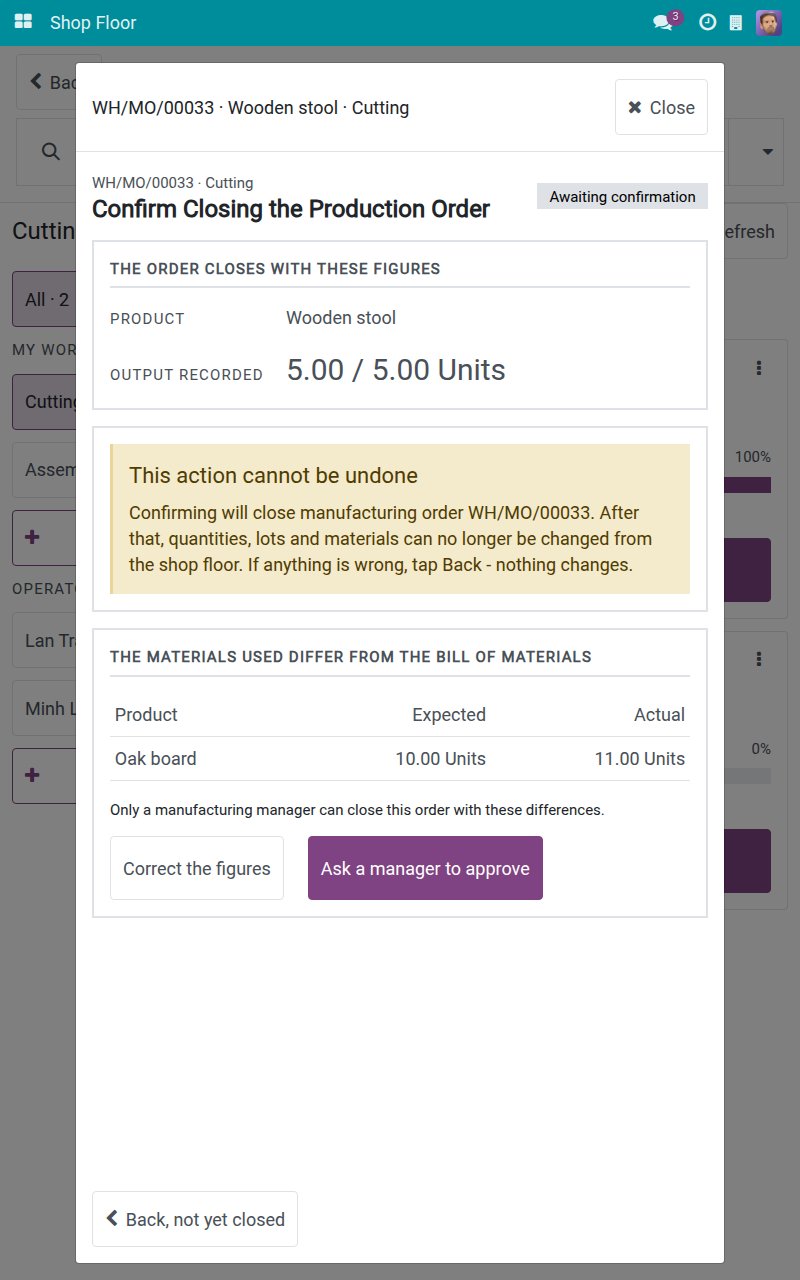
Approve differences
Audit trail
Optional extensions
Shop Floor Control - Accounting
Books the labour, work in progress and analytic entries of the shop floor in accounting. It installs itself with Advanced MRP Accounting; Shop Floor Control carries no accounting.
Shop Floor Control - Quality
Pass, Fail, measurements, photos and quality alerts on the tablet.
Shop Floor Control - Maintenance
One tap on the tablet stops the work center and calls a technician.
Shop Floor Control - Backdate
Users with the back-date right run the tablet with the real time of every tap.
Before you decide
Does every operator need a user account?
Yes. Work is recorded under a user account linked to an employee, because time and labour cost are credited to that employee. Each account keeps its own stations, so a shared tablet never mixes choices.
Who can change what?
Operators run work orders and undo their own recordings while the order is open. A Manufacturing Manager restarts stations, records on behalf and sees every entry. Scrap cannot be undone from the shop floor.
What if the connection drops while recording?
The screen says what went wrong and offers Retry. A retried recording is applied once.
Does the tablet bypass our manufacturing rules?
No. Closing an order runs the standard manufacturing close, so every installed rule still applies.
How is labour cost counted?
From the credited employee's hourly cost, frozen when the time line closes, so a later pay rise never re-prices finished work. Stops stay out of product cost.
Try it, then ask us
The Documentation tab holds the user guide by role. Live demo: https://v18demo-int.viindoo.com.
Pre-sales & partnership
https://viindoo.com/contactusTechnical support
https://viindoo.com/ticketTechnical requirements
- Odoo version: 18.0
- Editions: Community, Viindoo Cloud
- Required modules: Viindoo Manufacturing, Employee Hourly Wage, Barcode
- License: OPL-1
- Languages: English, Vietnamese
Shop Floor Control
Shop Floor Control puts the work orders of your plant on one touch screen at the machine. Operators open their jobs from a tablet, record the quantity they have just made and the materials they really used, report machine stops with their reason and close the manufacturing order on screen. The labour cost is credited to the employee who did the work.
The application is called Shop Floor on the apps menu. This guide is organized by the person who uses it:
- Machine operators work on a tablet at the work center. See "Tasks for machine operators".
- Production leads (Manufacturing Administrators) restart stopped stations, approve consumption differences, record work on behalf of someone else and audit what was recorded. See "Tasks for production leads".
The accounting side of the shop floor belongs to the module Shop Floor Control - Accounting, which has its own guide. See "Accounting" under "Installation".
The screenshots show a sample plant: Alex Morgan is the machine operator, Sam Taylor is the production lead and Jamie Brooks is another operator whose hourly cost is used for the labour cost when Sam records work on Jamie's behalf.
Installation
- Open Apps.
- Search for Shop Floor Control.
- Click Install.
The apps it needs are installed automatically: Manufacturing and Employee Hourly Wage. When the installation is done, the Shop Floor app appears on the apps menu, and Shop Floor Entries appears in the Manufacturing reports.
You can also install it from Manufacturing ‣ Configuration ‣ Settings, in the row Shop Floor Control.
Accounting
Shop Floor Control does not install accounting. Booking the labour and the work in progress of the shop floor in accounting is the job of the module Shop Floor Control - Accounting, which is documented with that module. It installs itself whenever Advanced MRP Accounting is installed.
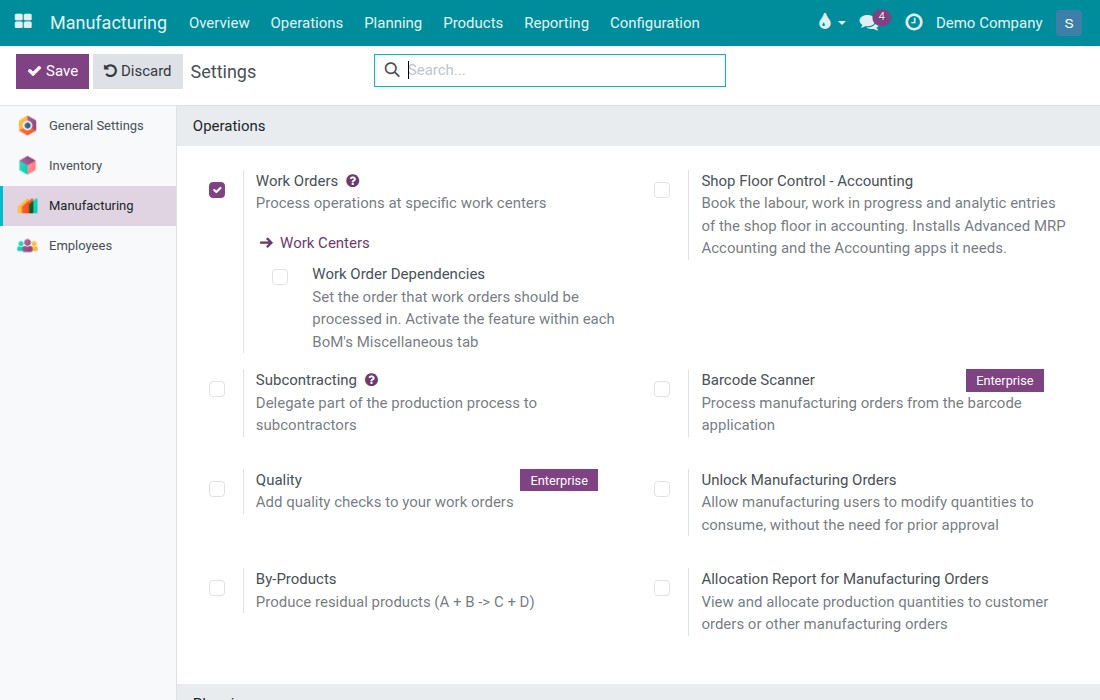
To turn it on yourself, open Manufacturing ‣ Configuration ‣ Settings. Under Operations, right after Work Orders, the row Shop Floor Control - Accounting reads "Book the labour, work in progress and analytic entries of the shop floor in accounting. Installs Advanced MRP Accounting and the Accounting apps it needs." Tick its checkbox and click Save. When the module is not available on your server, the row offers the link Download or Learn more instead of the checkbox.
Configuration
Access rights
- Give each operator the access right Manufacturing / User. Operators see the Shop Floor app and their own lines in Shop Floor Entries.
- Give each production lead the access right Manufacturing / Administrator. Only they can restart a stopped station, record work on behalf of someone else, approve consumption differences and see all lines in Shop Floor Entries.
- Link the user of each operator to an employee (field Related User of the employee). The work and the labour cost are credited to that employee.
Hourly cost of each employee
The labour cost of a job is the time worked multiplied by the hourly cost of the credited employee. You need access to the employee settings to enter it.
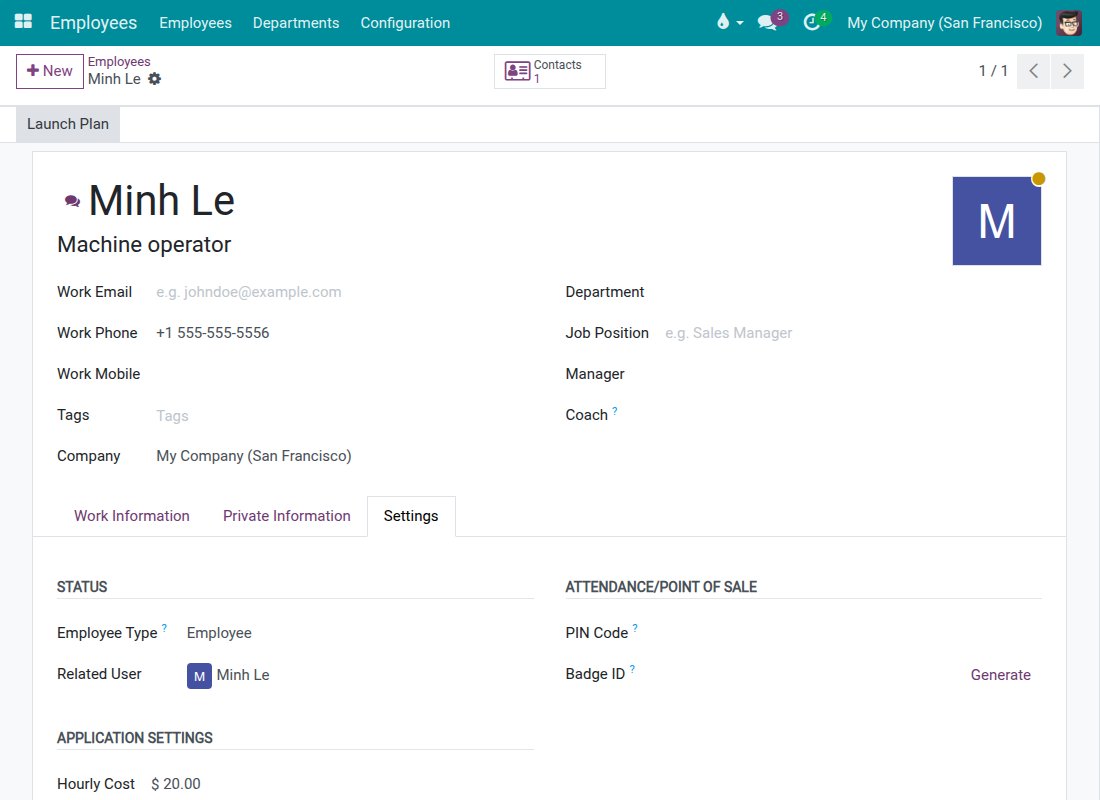
Open the employee in the Employees app and click the Settings tab.
Check that Related User is the operator's user, and enter the Hourly Cost under APPLICATION SETTINGS.
Work centers and operations
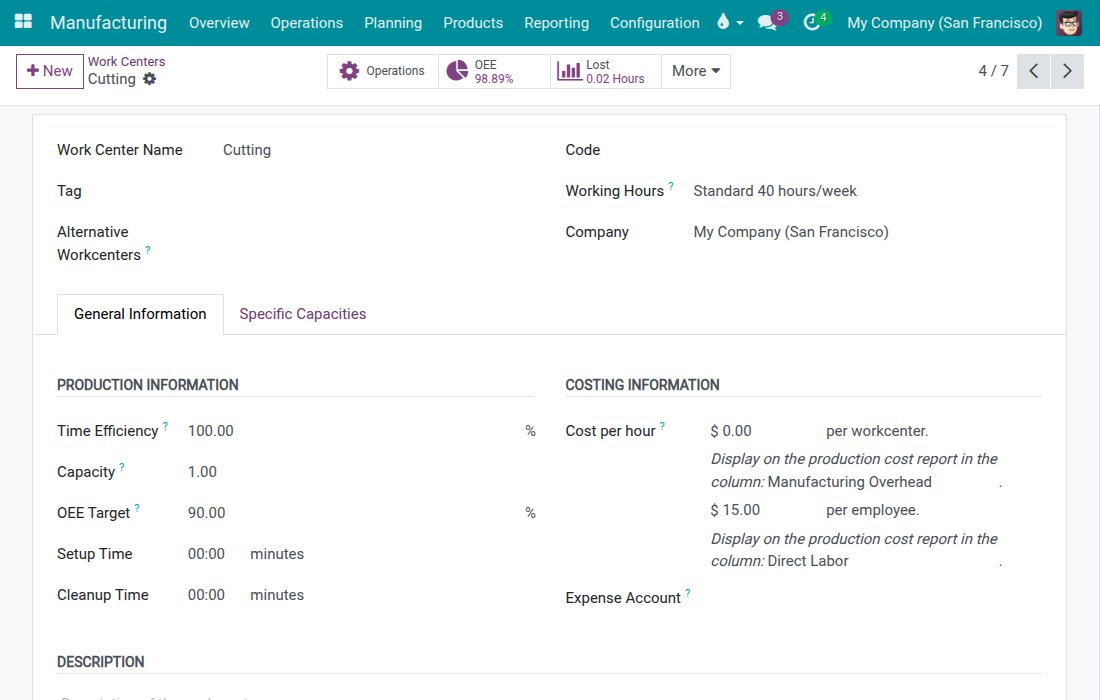
Open Manufacturing ‣ Configuration ‣ Work Centers and open a work center.
Under COSTING INFORMATION, two lines hold the rates. Cost per hour, ending in per workcenter, is the cost of running the work center. Employee Hourly Cost, ending in per employee, is the hourly cost of one employee at this work center: it is used for an employee who has no hourly cost of their own, and it plans the expected labour of an operation (duration x the Employee Capacity of the operation x this rate).
Open Manufacturing ‣ Configuration ‣ Operations and open an operation. In Employee Capacity, enter how many employees the operation plans for. It budgets the expected labour cost only; the actual labour cost follows the time each employee records.
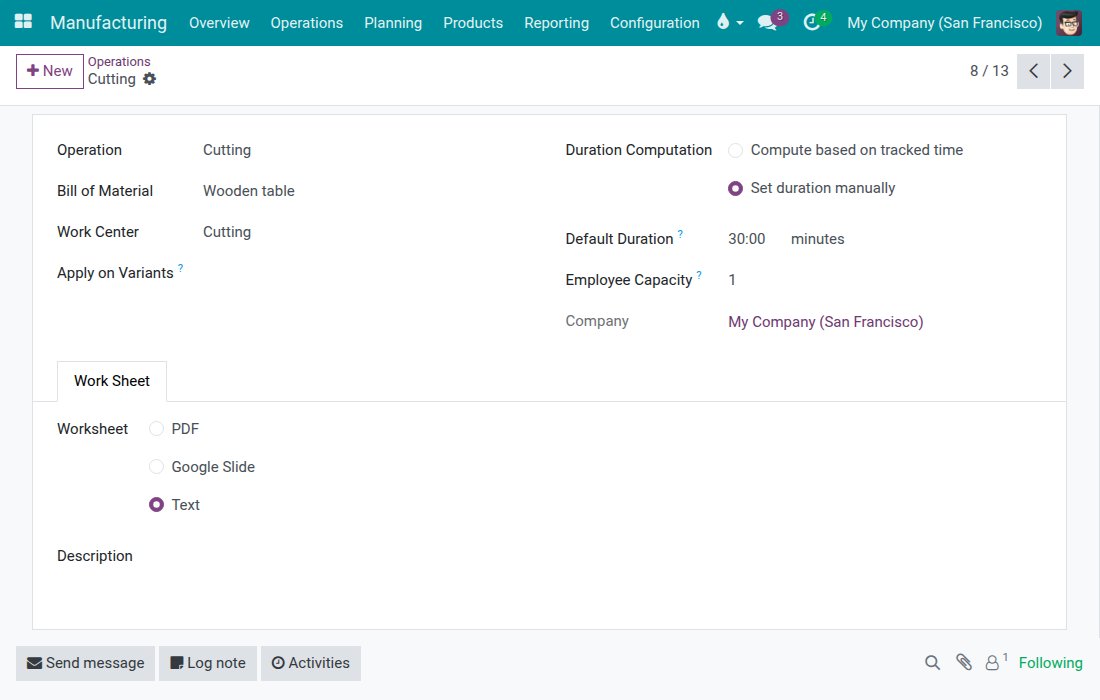
How the labour cost is built
- Each time line of a work order names the employee it is credited to. When the line closes, it freezes that employee's hourly cost. When the employee has no hourly cost, the line keeps the Employee Hourly Cost of the work center (the per-employee rate) instead. A later pay rise never re-prices finished work.
- Time lost to a stop, such as a breakdown, is not part of the labour cost.
- An operation that is not finished budgets the Employee Capacity of the operation in its expected cost. A finished operation keeps the figure it had when it was completed.
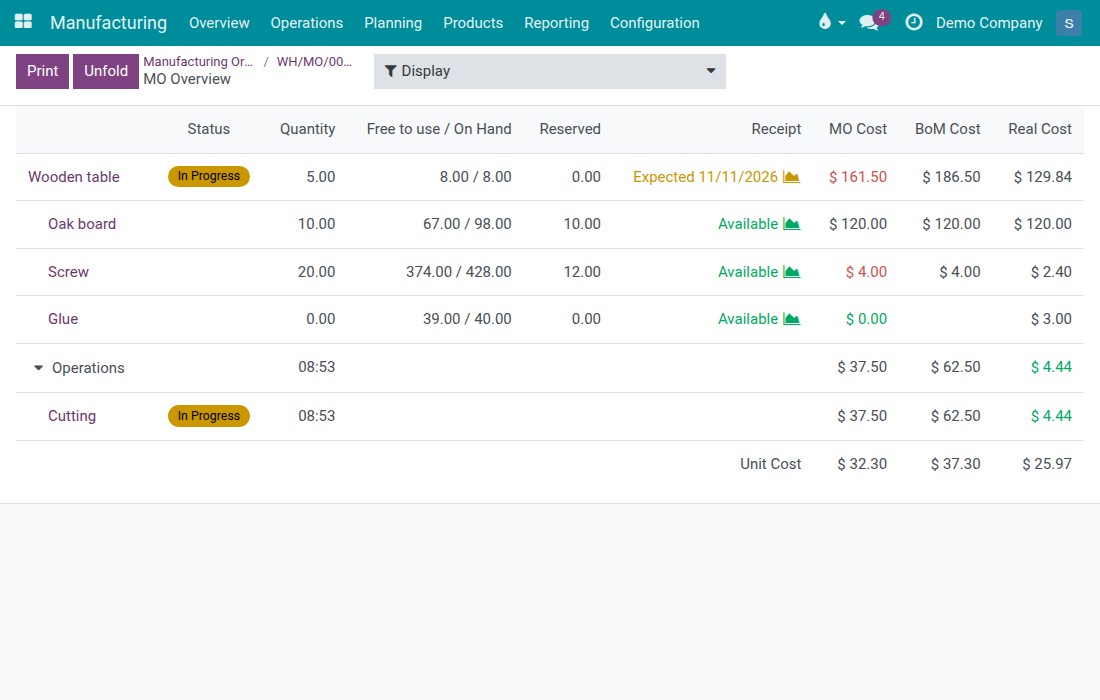
- In the overview of a manufacturing order, Display ‣ BoM Costs adds the column BoM Cost. For an order that is not done, it includes the planned labour.
To see it, open Manufacturing ‣ Operations ‣ Manufacturing Orders, open an order and click Overview, then choose Display ‣ BoM Costs.
The tablet
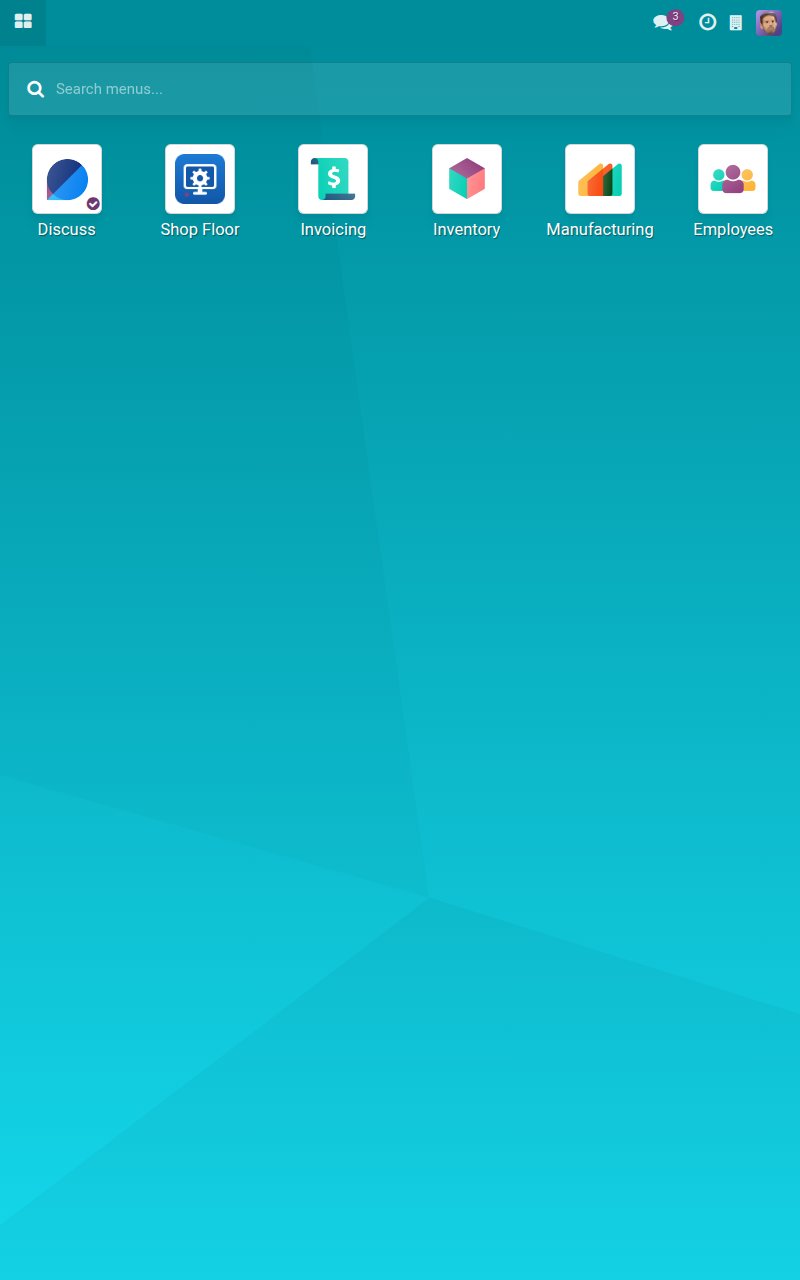
Each operator signs in on the tablet with their own account. The work centers and the operators that you choose are remembered per account and per company, so people who share a tablet never overwrite each other's choice. The controls are large so that they can be used with gloves on.
Usage
Tasks for machine operators
Choose your work centers and open the job board
Open the apps menu and tap Shop Floor. If you have not chosen any work center yet, the selection screen opens.
Tap the card of the work center you work at, for example Cutting. The card shows its counts, such as 4 ready to start, and adds the jobs that are waiting, running or stopped when there are some. The card is highlighted.
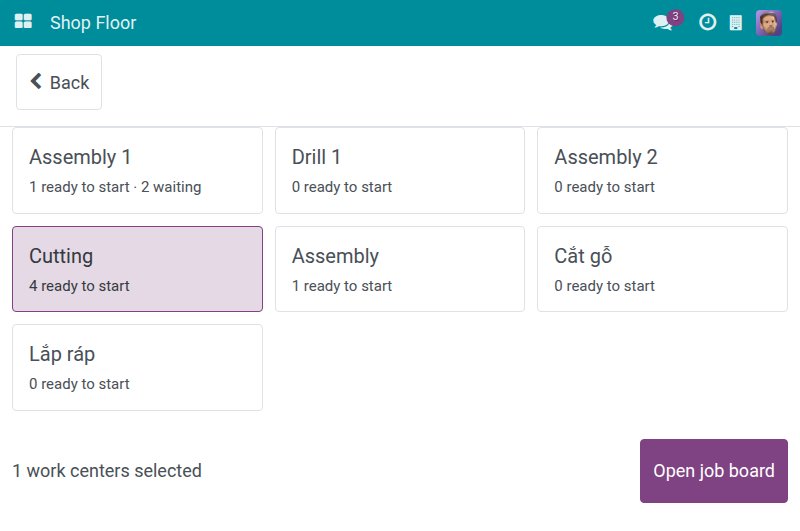
If you work at another station too, tap its card as well, for example Assembly. The counter at the bottom reads 2 work centers selected.
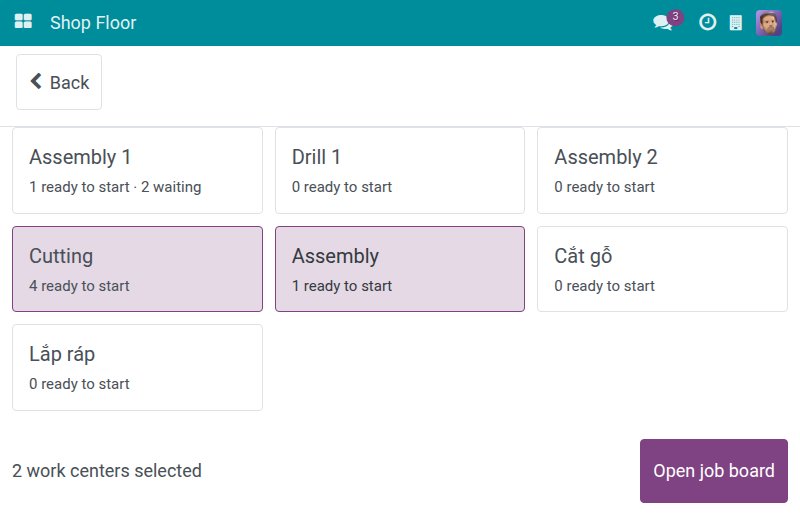
Tap Open job board. Your choice is saved for your account and company, so the next shift opens straight on the board.
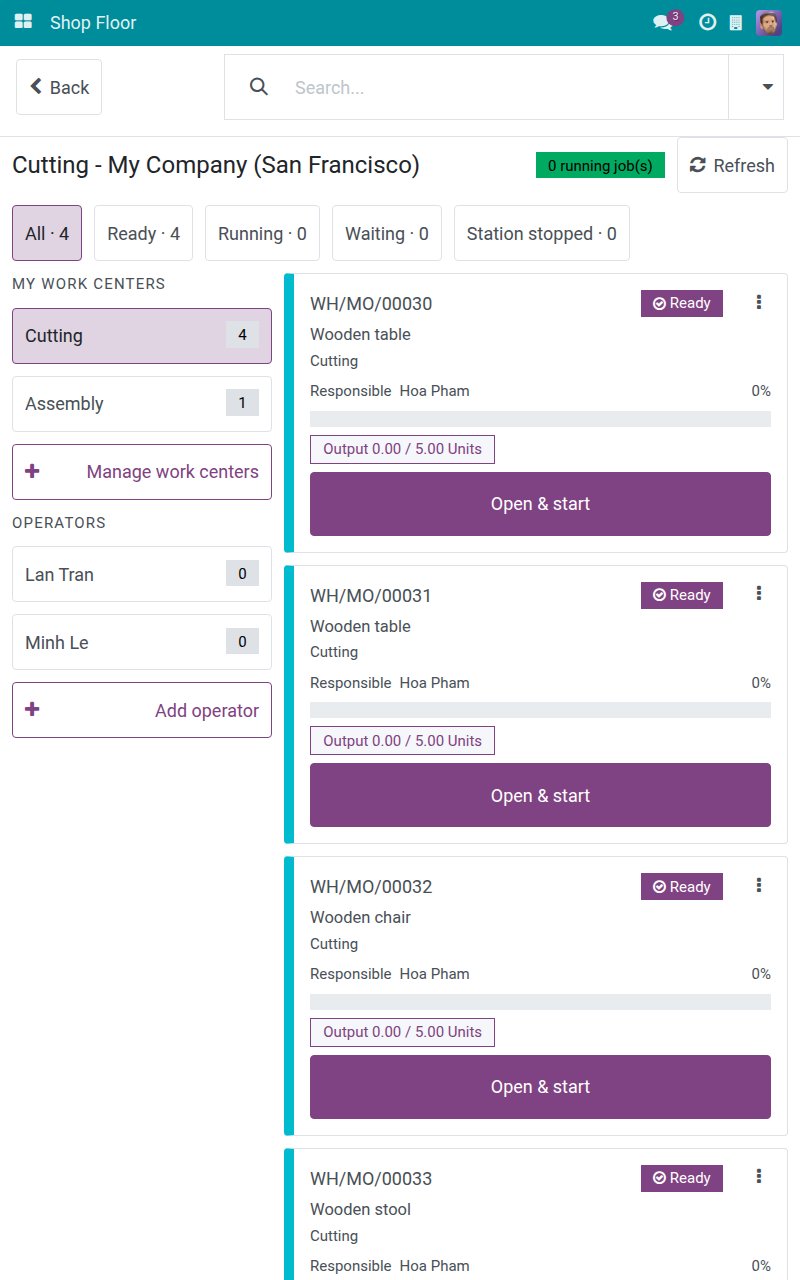
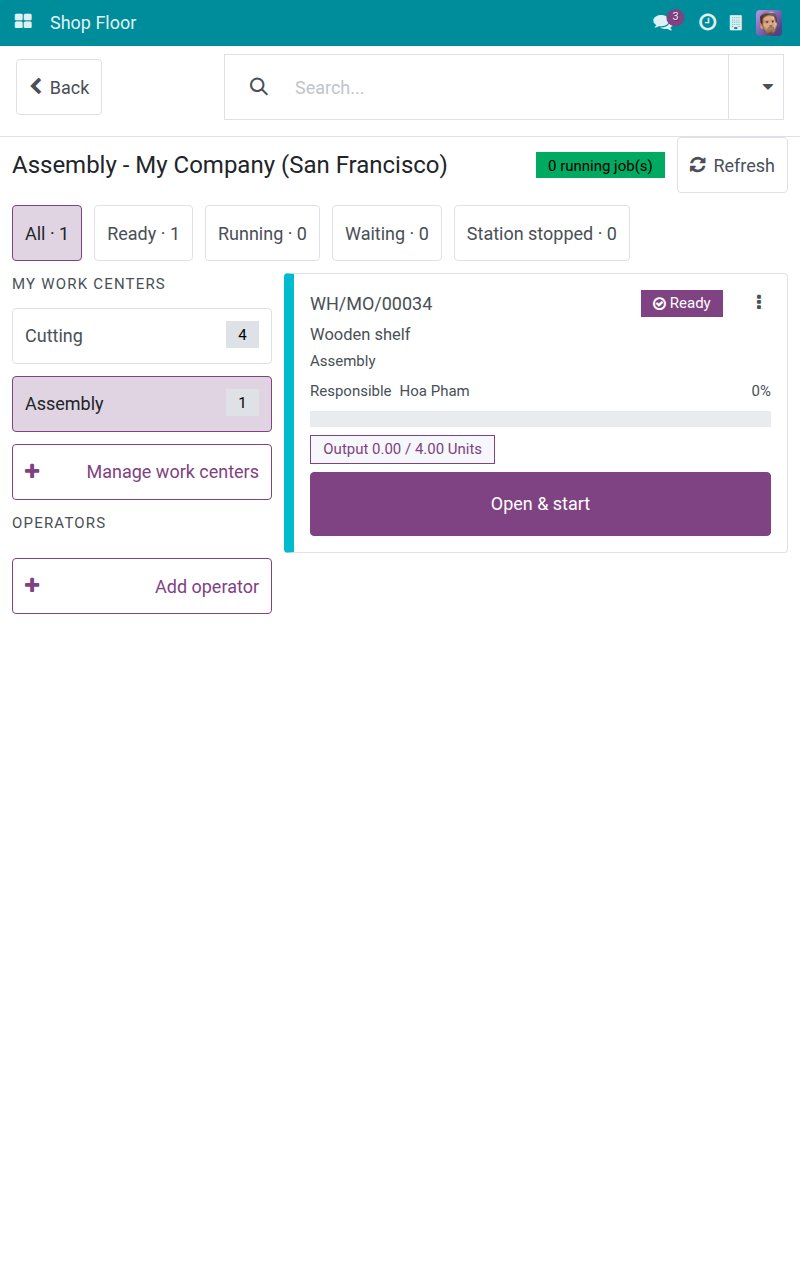
To look at another station you chose, tap its name under MY WORK CENTERS. Each name carries its number of jobs.
Tap Manage work centers to add or drop stations without leaving the board. The cards carry the same counts as the tabs of the job board, and the counter at the bottom reads 2 work centers selected.
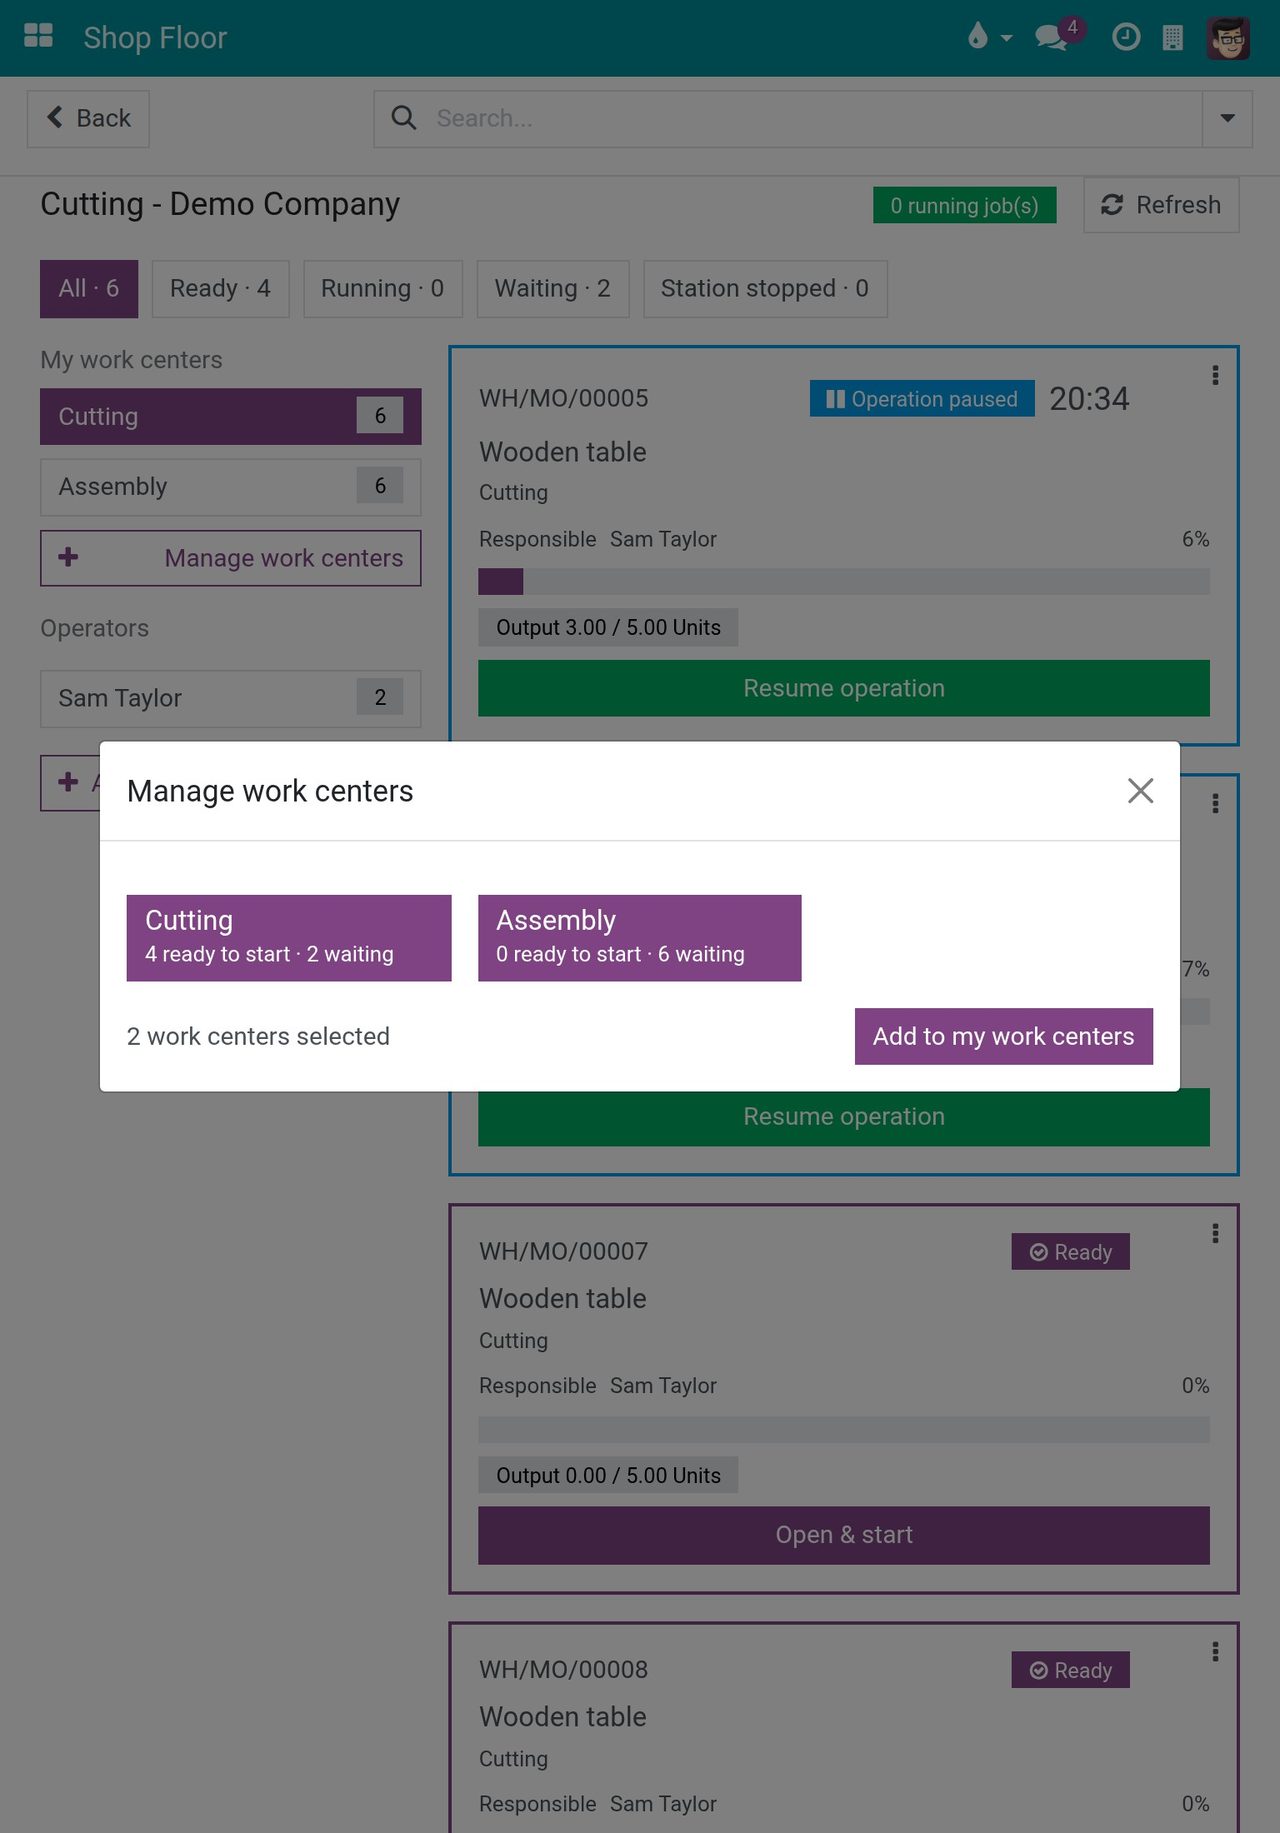
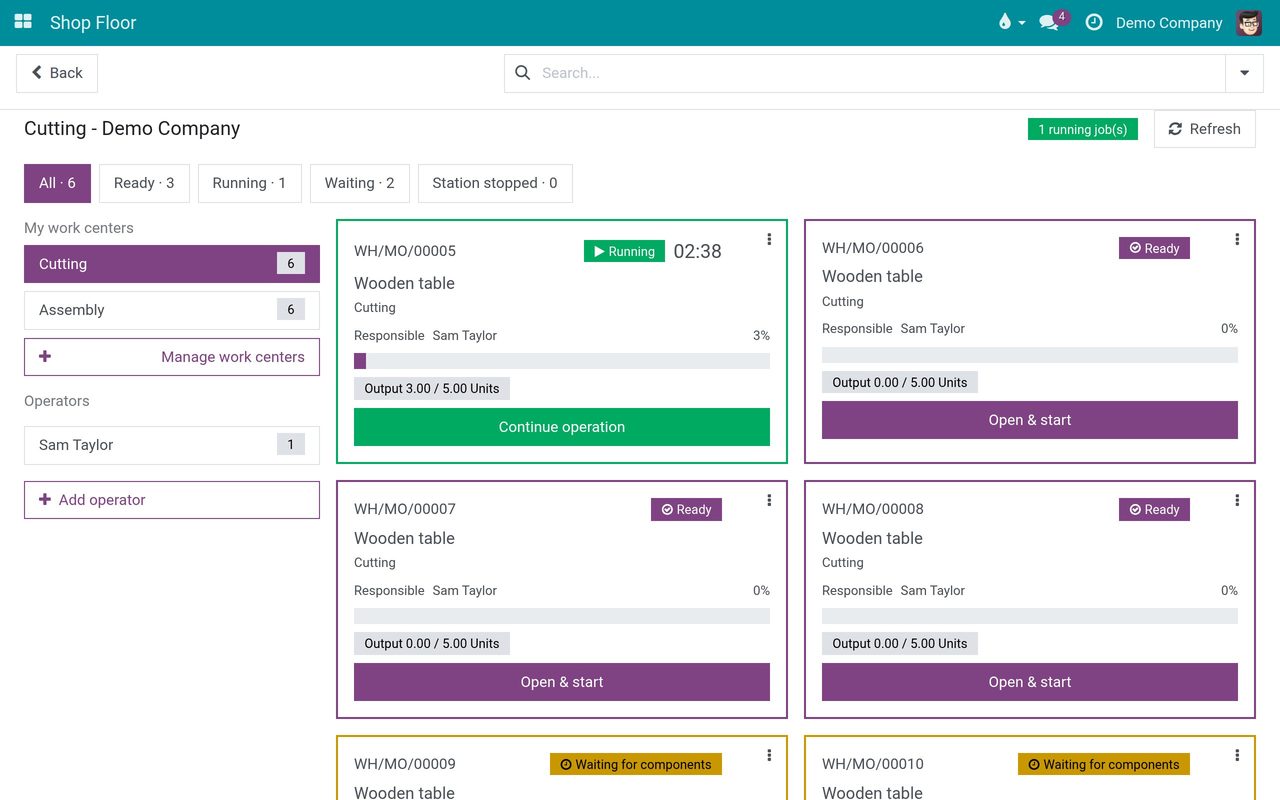
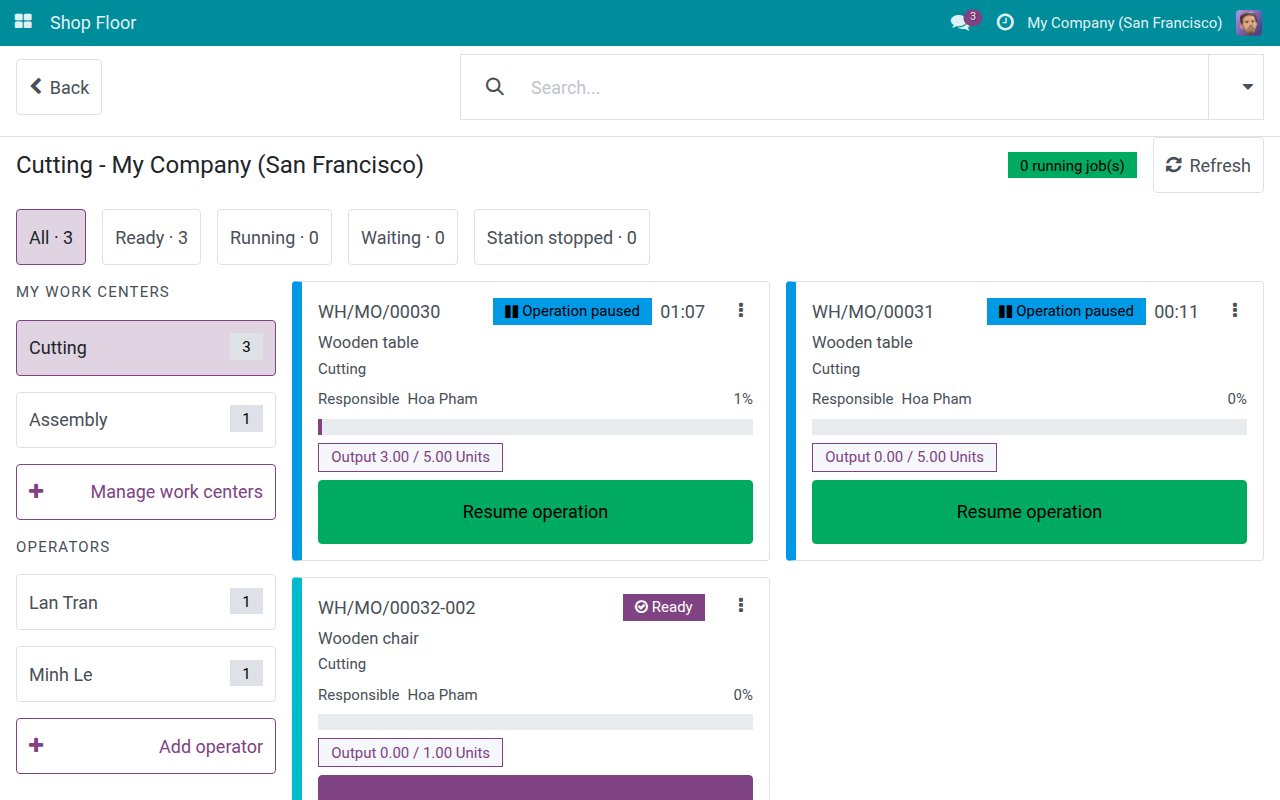
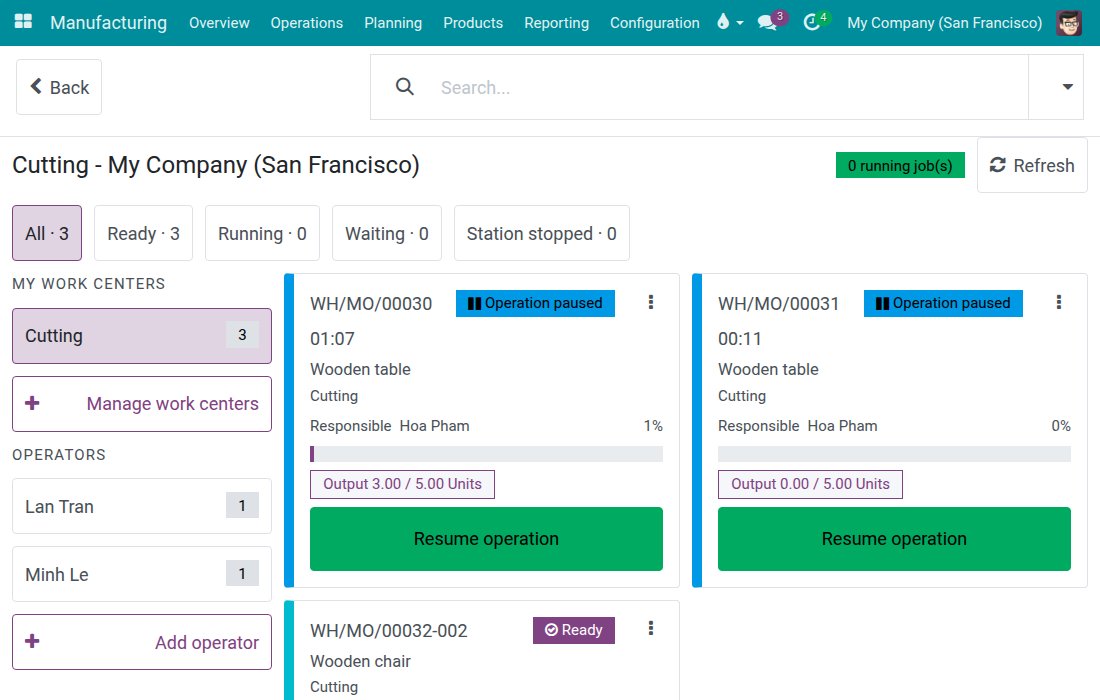
The board shows one card per work order: the manufacturing order, the product, the operation, a state badge, the person responsible, a progress bar and the output recorded so far. The tabs All, Ready, Running, Waiting and Station stopped each show a live count; Ready also lists the paused jobs. Use the search bar to narrow the cards by order reference. On a landscape tablet the board looks like this:
Find a job, start it, pause it and resume it
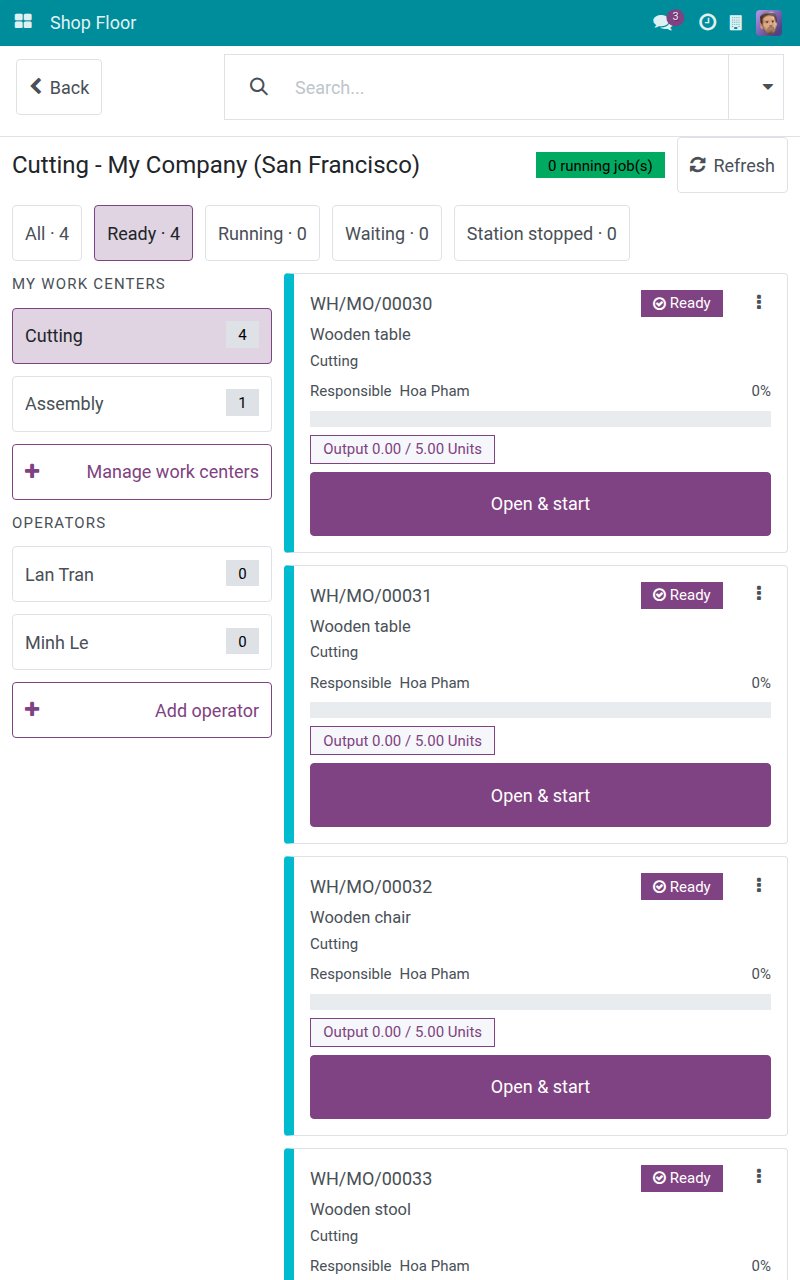
Tap the Ready tab to see the jobs that can be started.
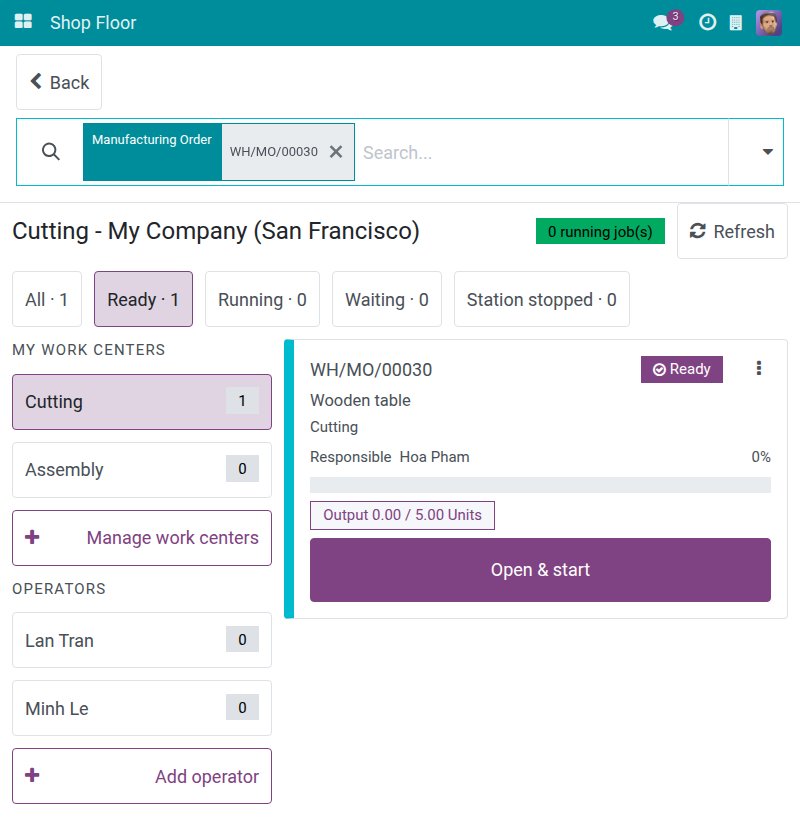
Type part of the order reference in the search bar, for example WH/MO/00005, and press Enter. Only the matching cards remain.
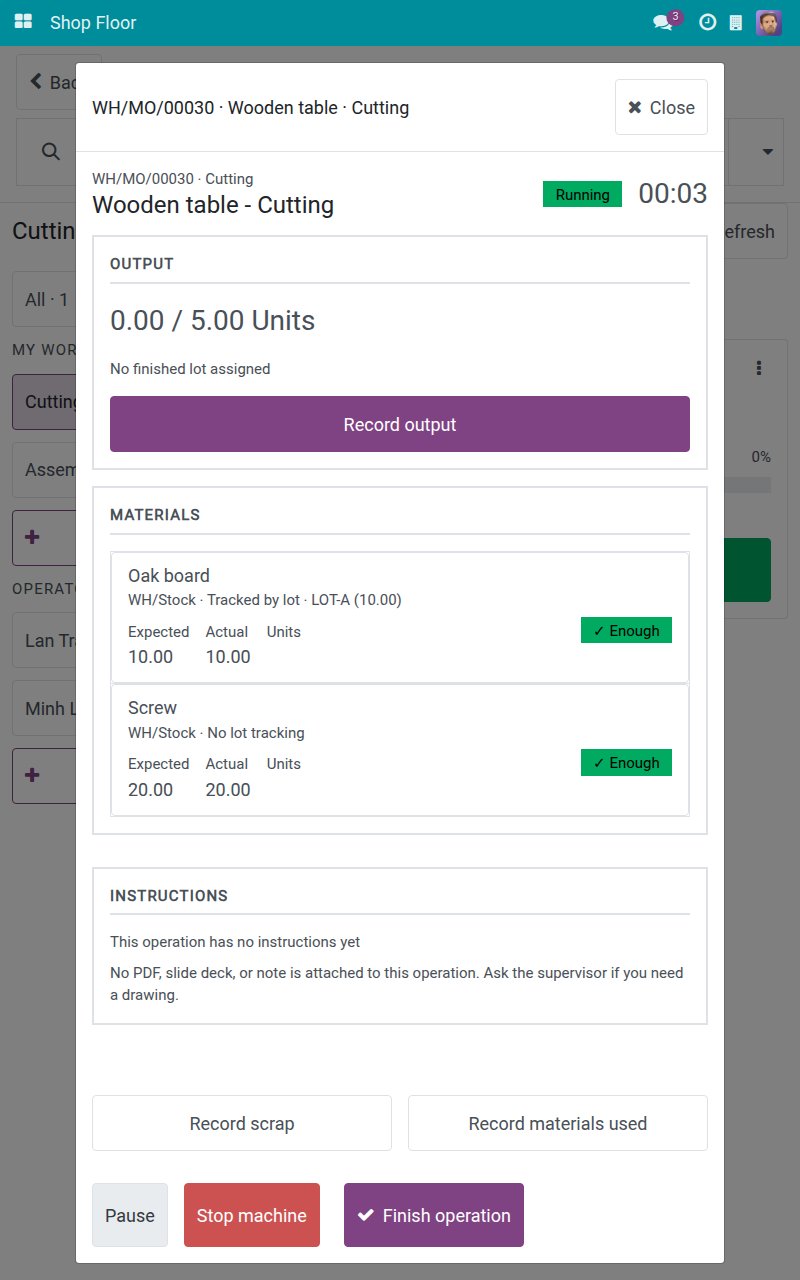
Tap Open & start on the card. It opens the operation and starts the clock. The state turns to Running and the timer counts. Tapping anywhere else on the card only opens the job; it never starts the clock.
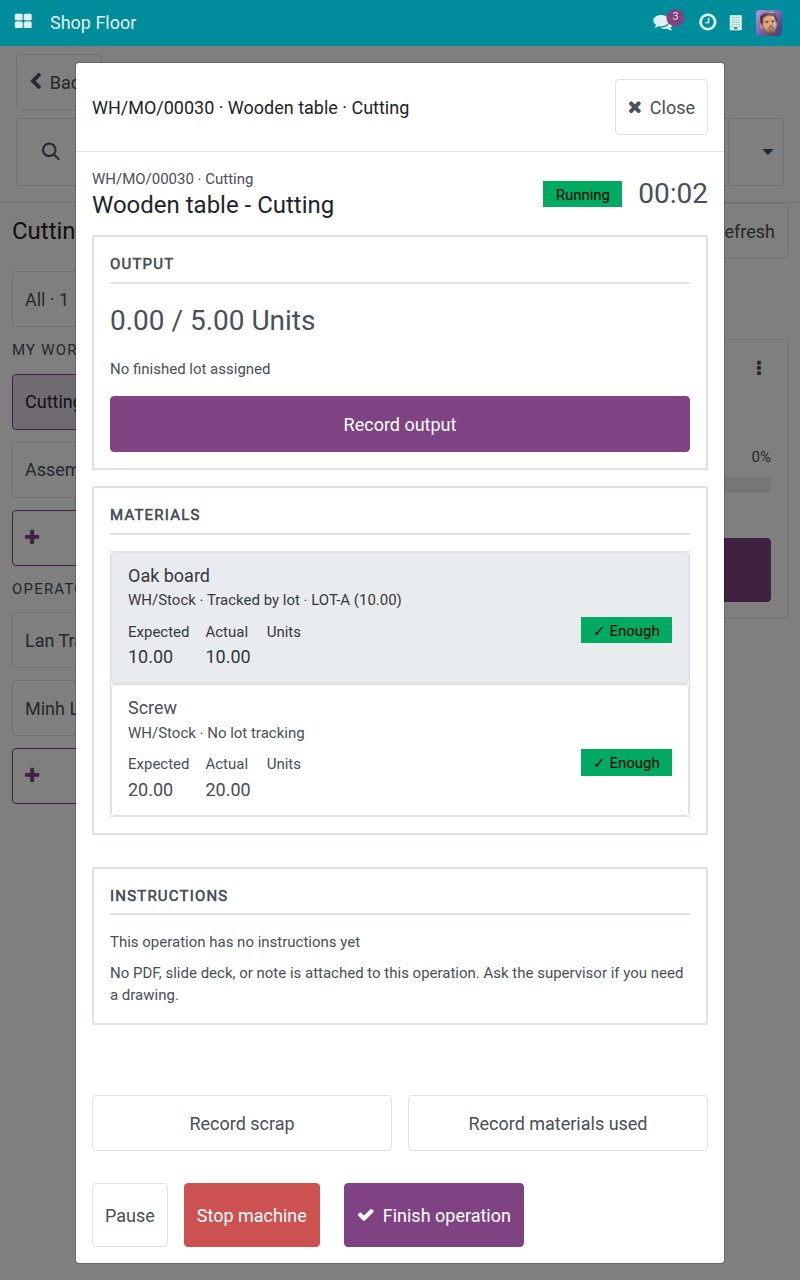
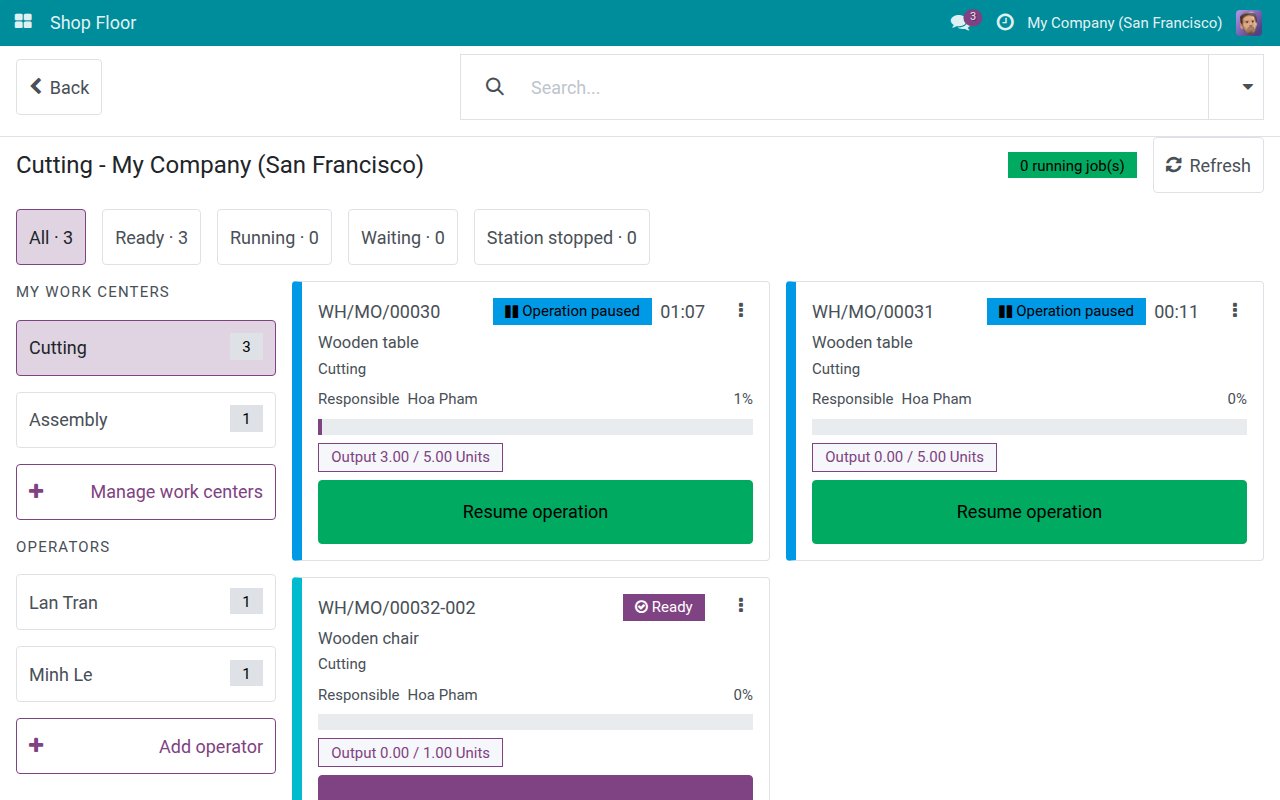
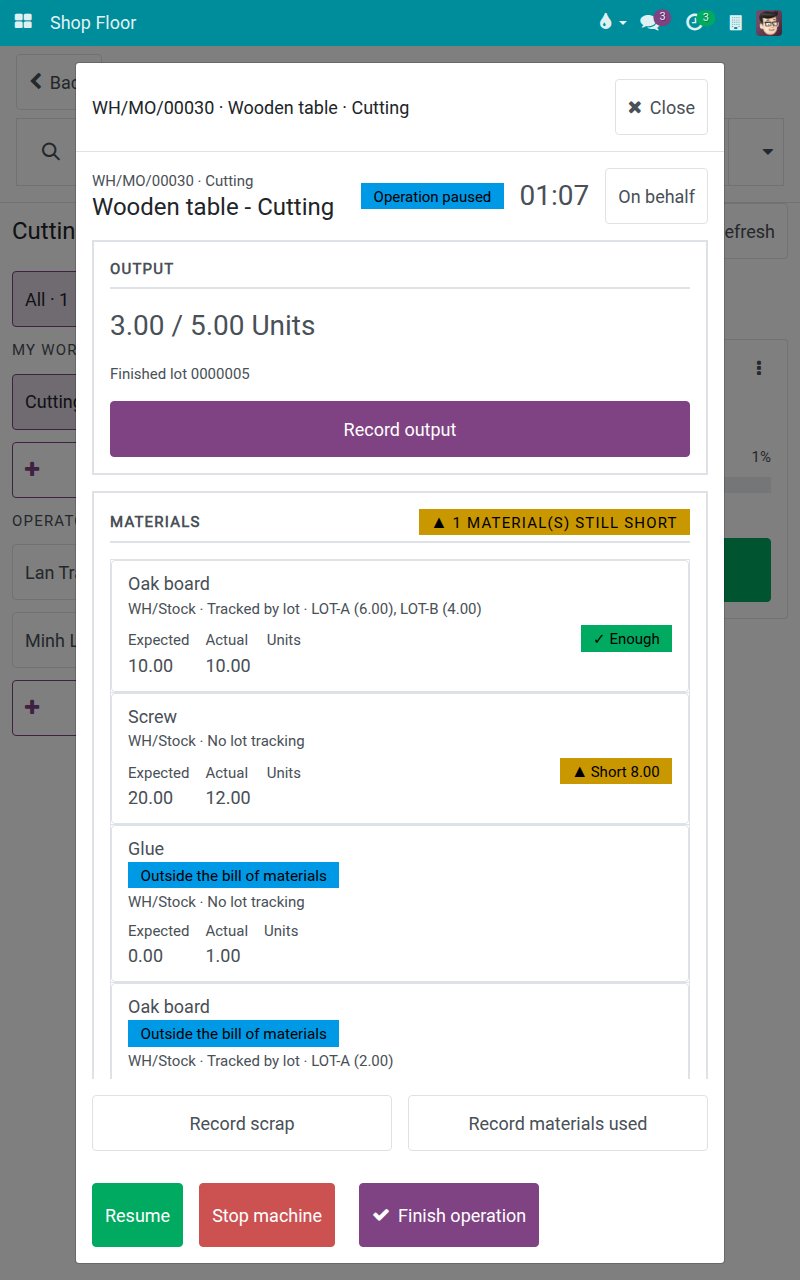
To take a break, tap Pause. The state becomes Operation paused and the button becomes Resume.
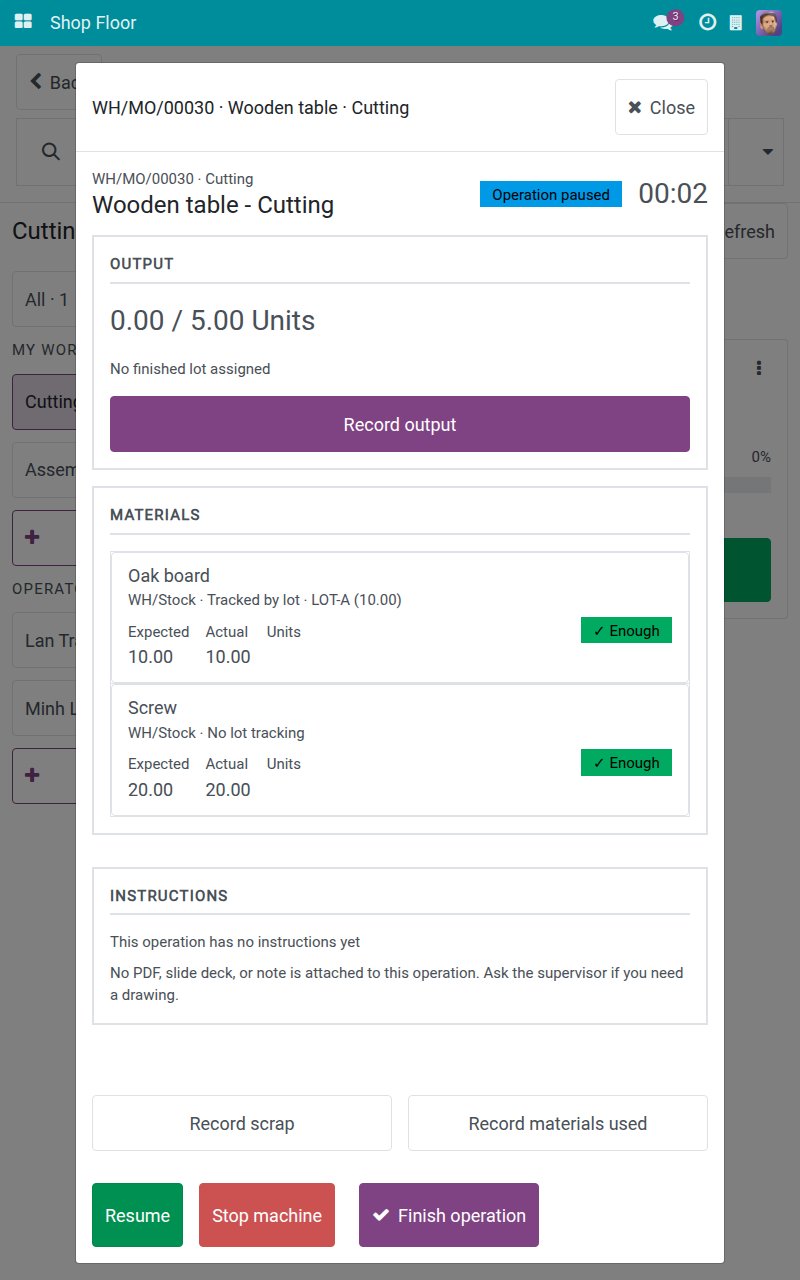
Tap Resume when you are back. The clock starts again for you.
Note
On the board, the card of a running job offers Continue operation and the card of a paused job offers Resume operation. When the previous operation of the order is not finished yet, the card says so and you can still start.
Record the quantity you have just made
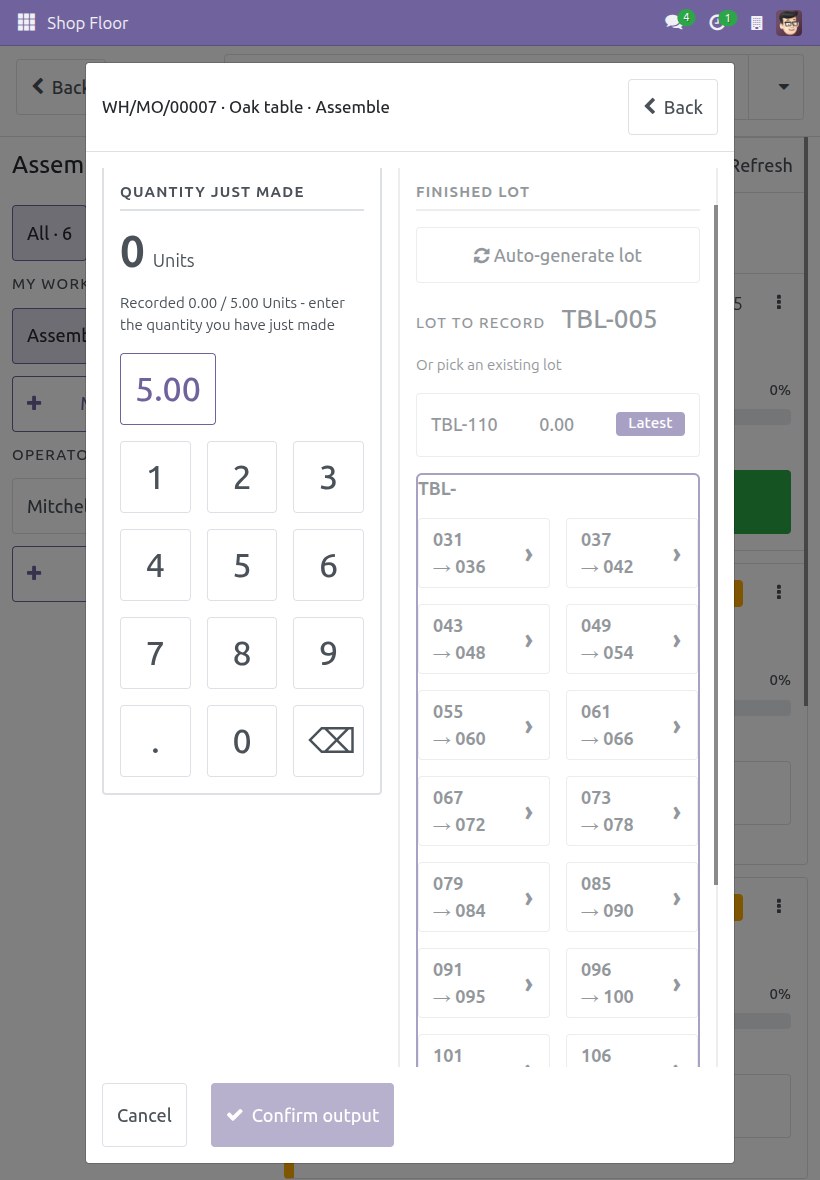
On the operation screen, tap Record output. The screen reads "Recorded 0.00 / 5.00 Units - enter the quantity you have just made". When the finished product is tracked by lot, the screen first asks for the FINISHED LOT.
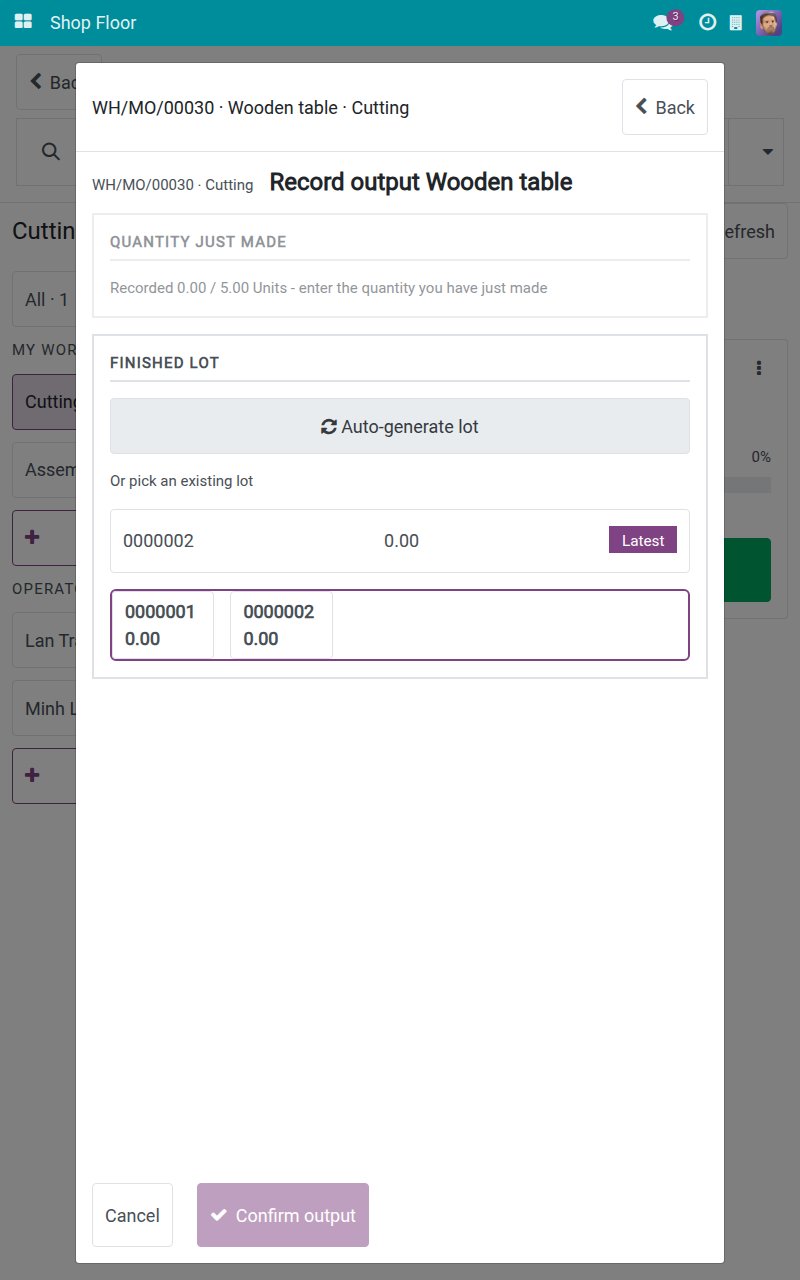
Tap Auto-generate lot. The lot appears under ASSIGNED LOT and the number pad opens. You can also pick an existing lot from the list; Latest marks the newest one.
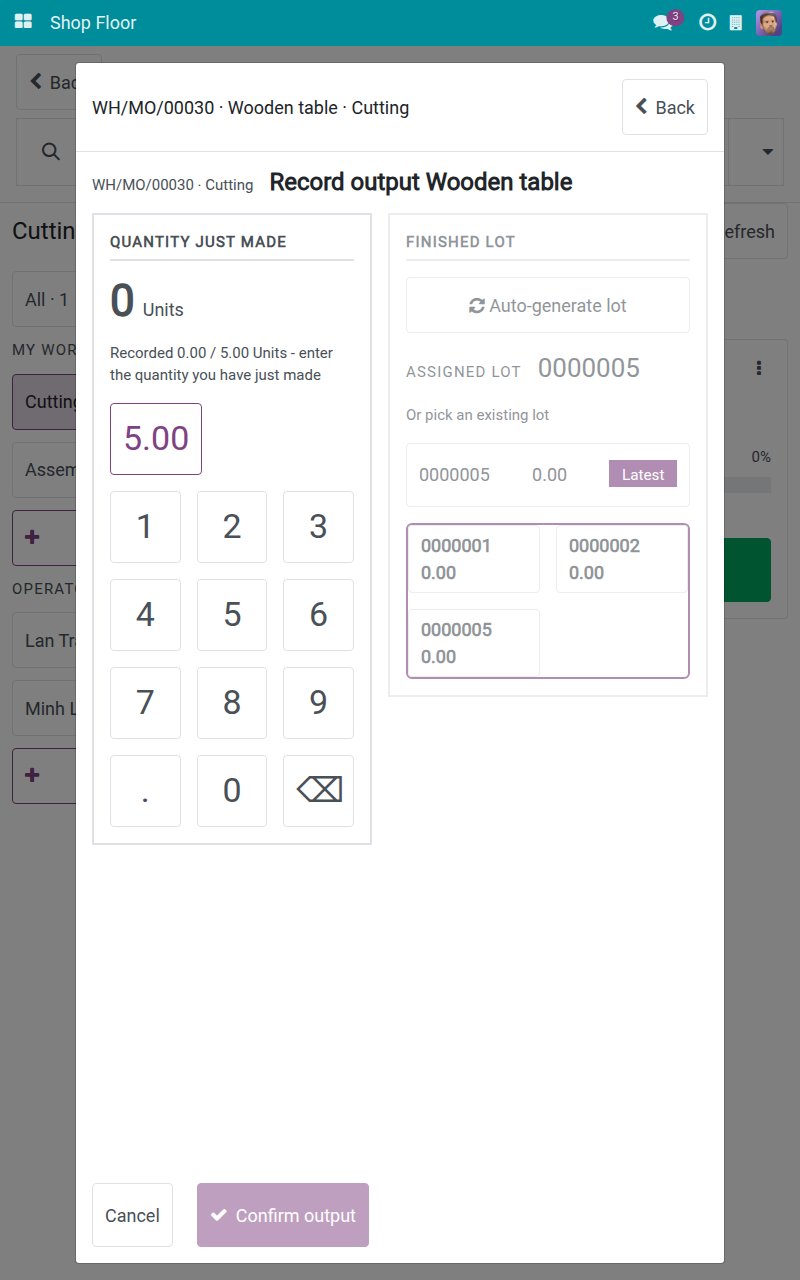
Tap the digits of the quantity you have just made, for example 3. No keyboard opens. The pad states "After this recording: 3.00 / 5.00 Units".
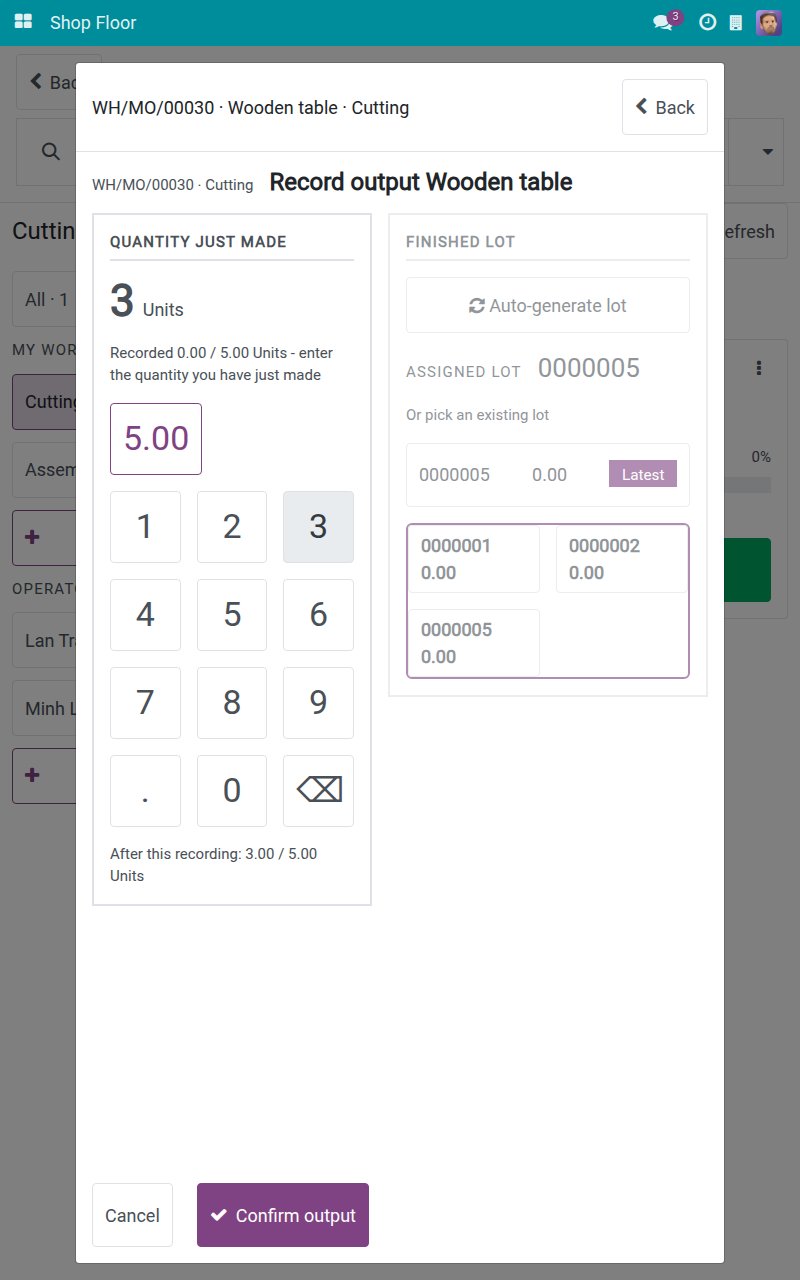
Tap Confirm output. The quantity is added to the order as its own recording and the screen reads "Recorded 3.00 / 5.00 Units".
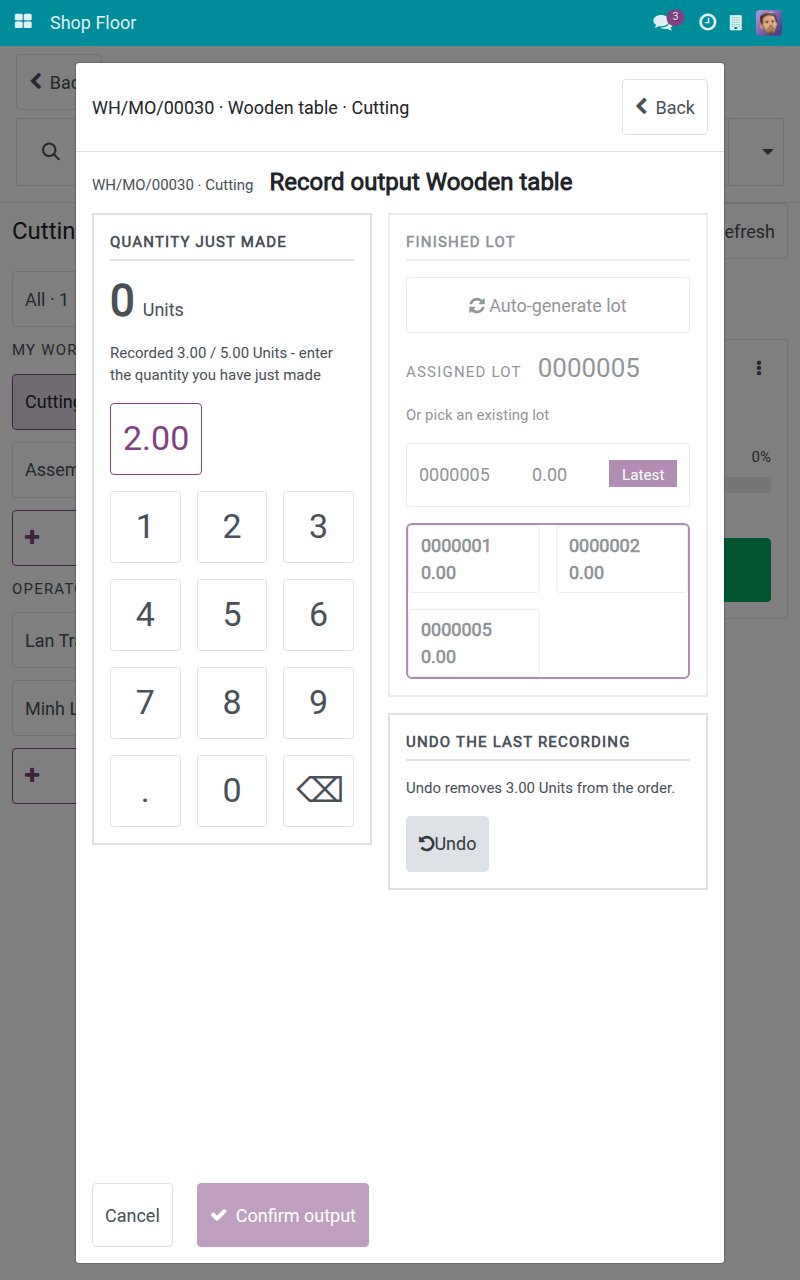
Next time, enter only what you made since then, for example 2, and confirm. The new figure is always added on top of the earlier ones, never a new total. The order reads 5.00 / 5.00.
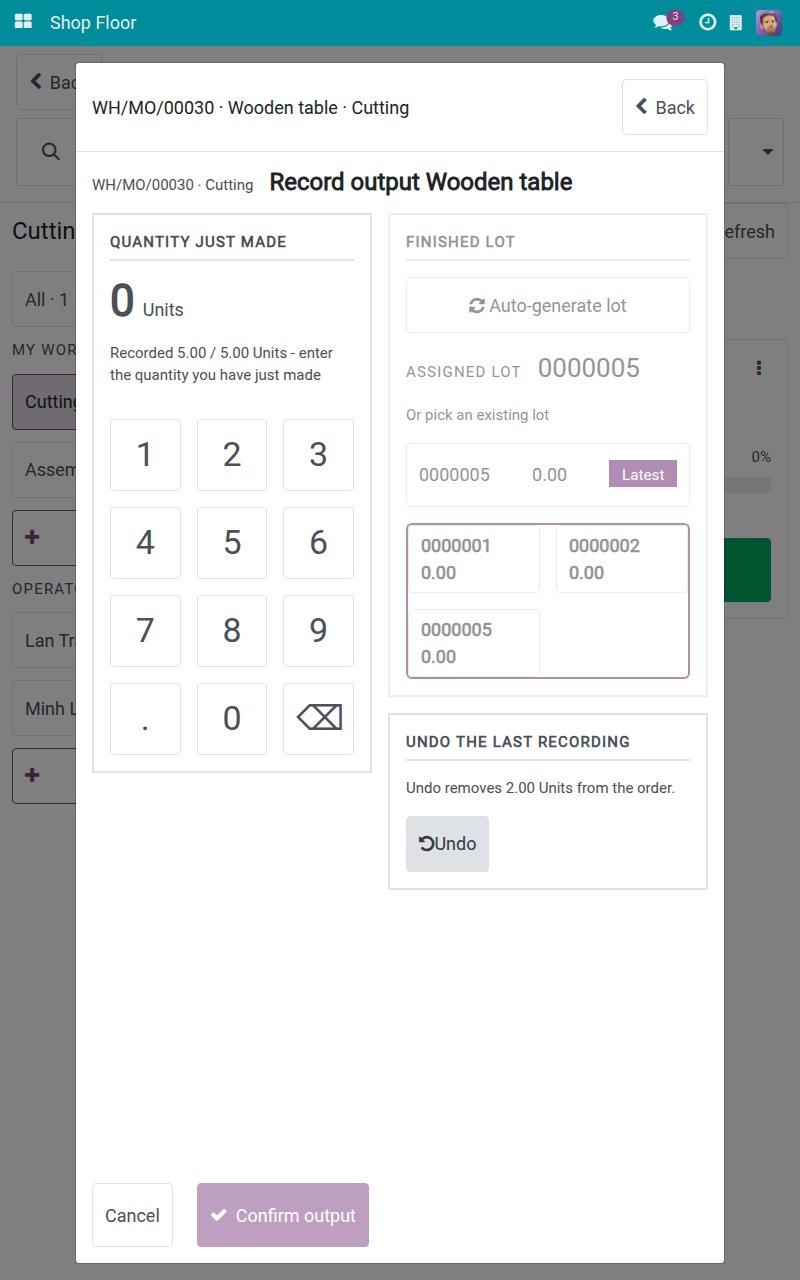
Made a mistake? Under UNDO THE LAST RECORDING, tap Undo. It takes back exactly the latest recording, without a confirmation. The earlier recording and its lot are untouched.
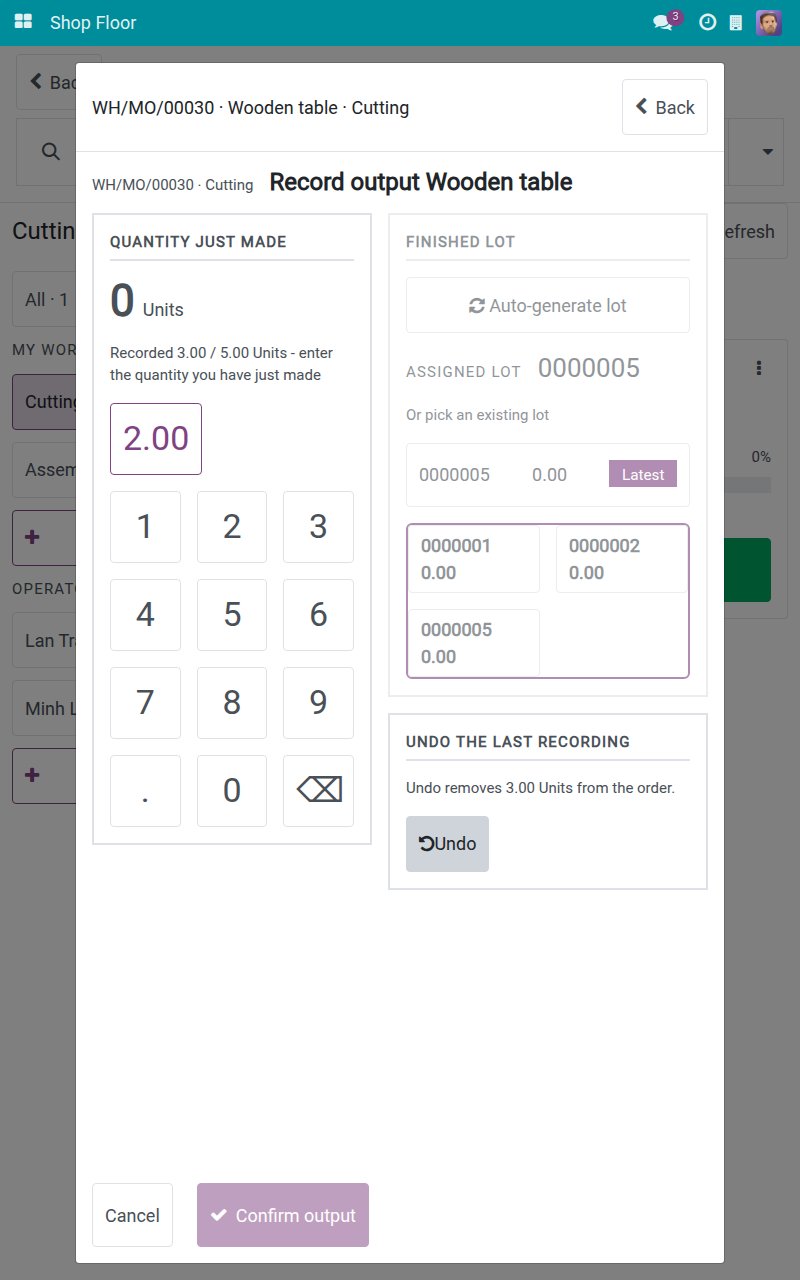
Tap Back. The OUTPUT panel of the operation screen shows the recorded quantity and the finished lot.
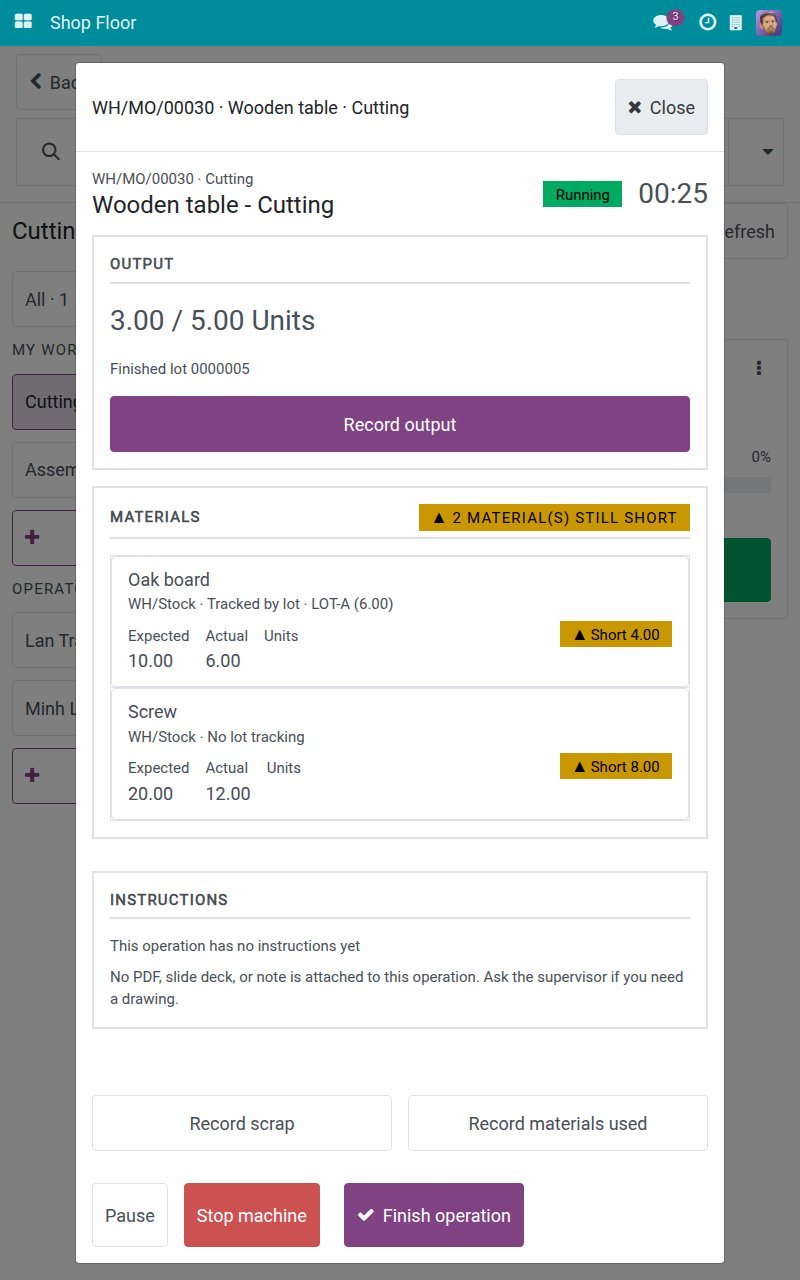
Note
You can undo only your own recordings, and only while the operation and the order are still open. A Manufacturing Administrator can undo anyone's recording. For a product that is not tracked by lot, the lot area does not appear and the number pad opens directly.
Choose, search or change the finished lot
When the finished product is tracked by lot, the FINISHED LOT area of Record output works as follows.
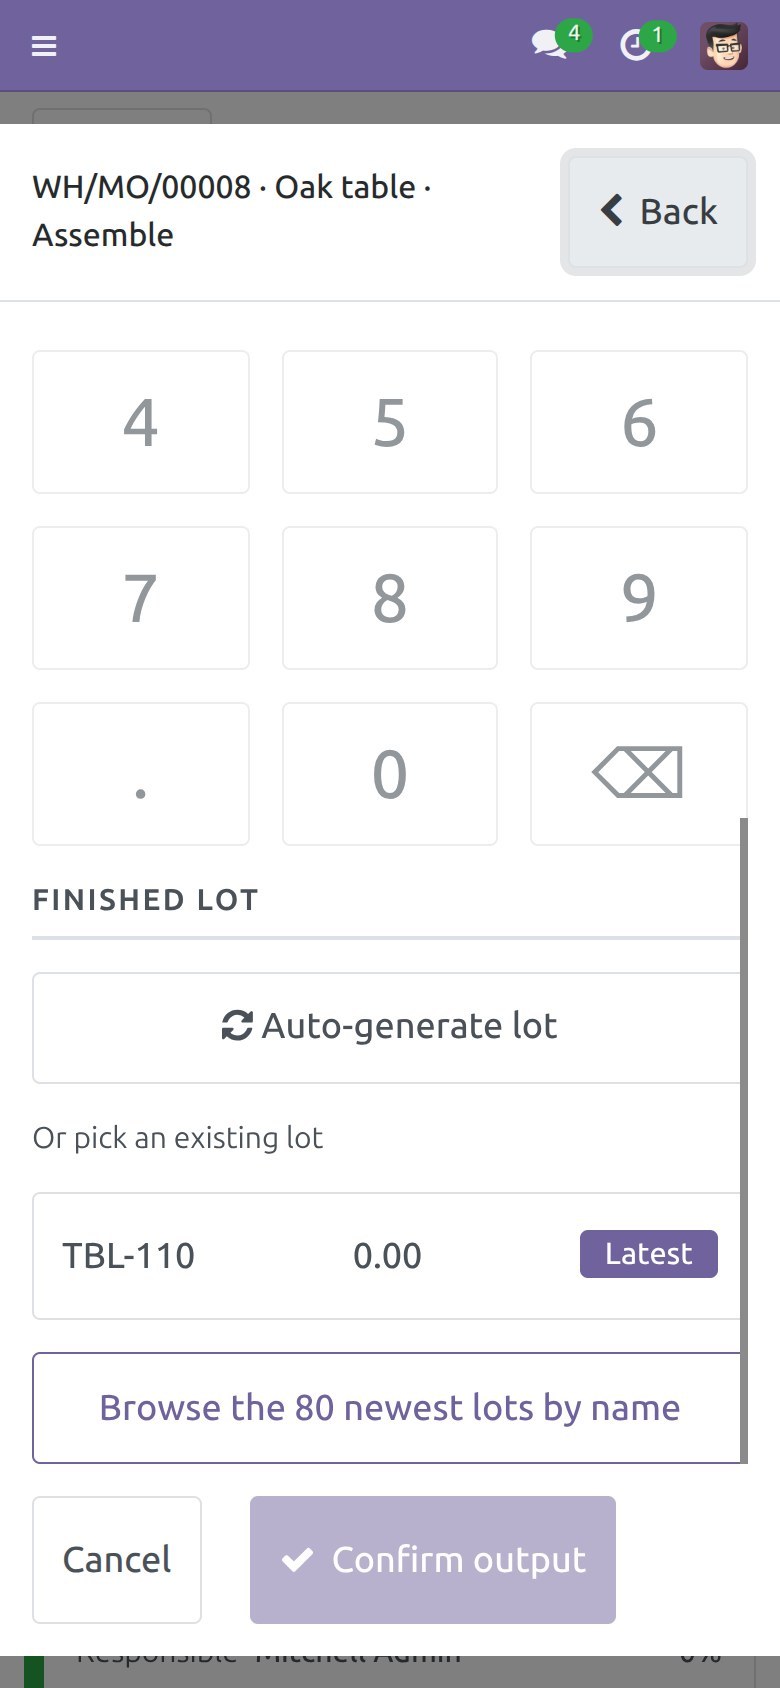
Auto-generate lot is offered only when the operation type of the manufacturing order lets you create new lots (the Create New Lots/Serial Numbers setting in Inventory ‣ Configuration ‣ Warehouse Management ‣ Operations Types). When the operation type does not allow it, the button is not shown: pick an existing lot from the list or find it by name. The button is also refused on an order that is already closed.
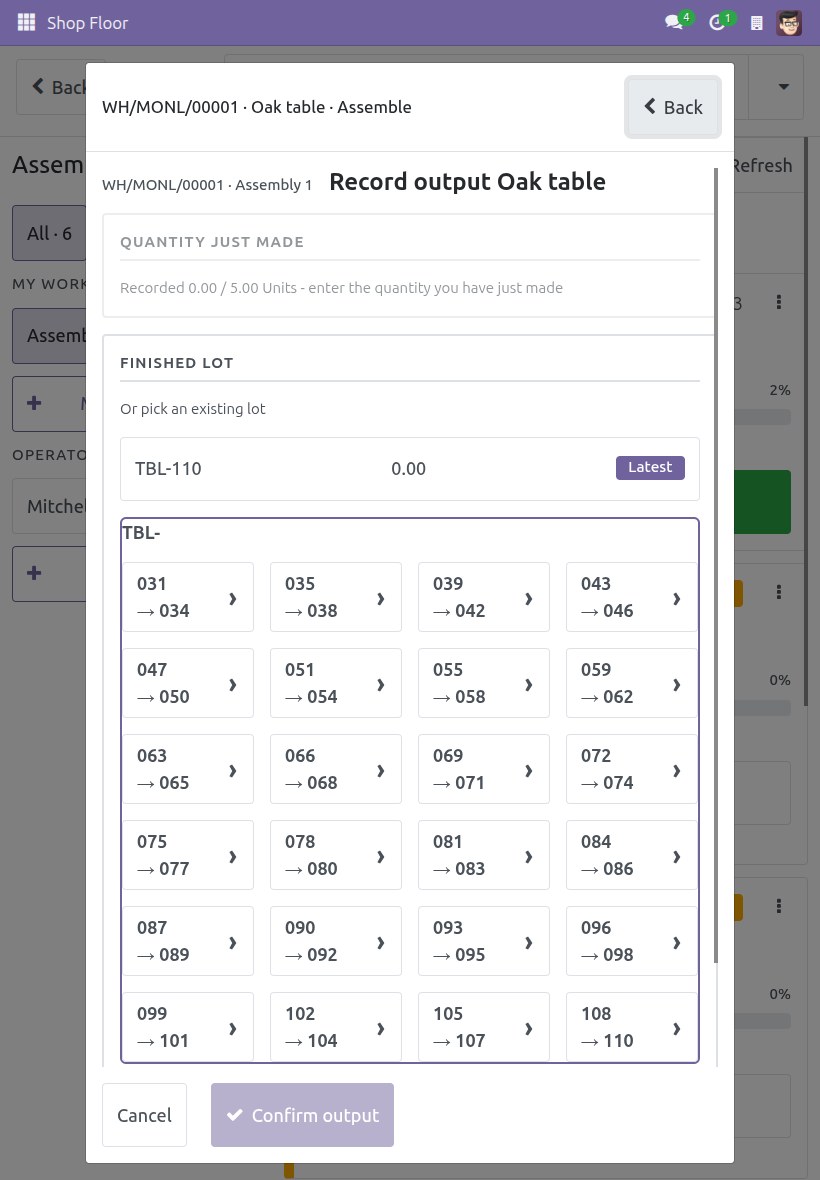
On a phone, tap Browse the 80 newest lots by name to open the lot picker. While the picker is open, the picker takes the whole screen and the Confirm output, Undo and Auto-generate lot controls are hidden: only Close picker and the picker's own controls remain. Pick a lot, or tap Close picker to get the controls back.
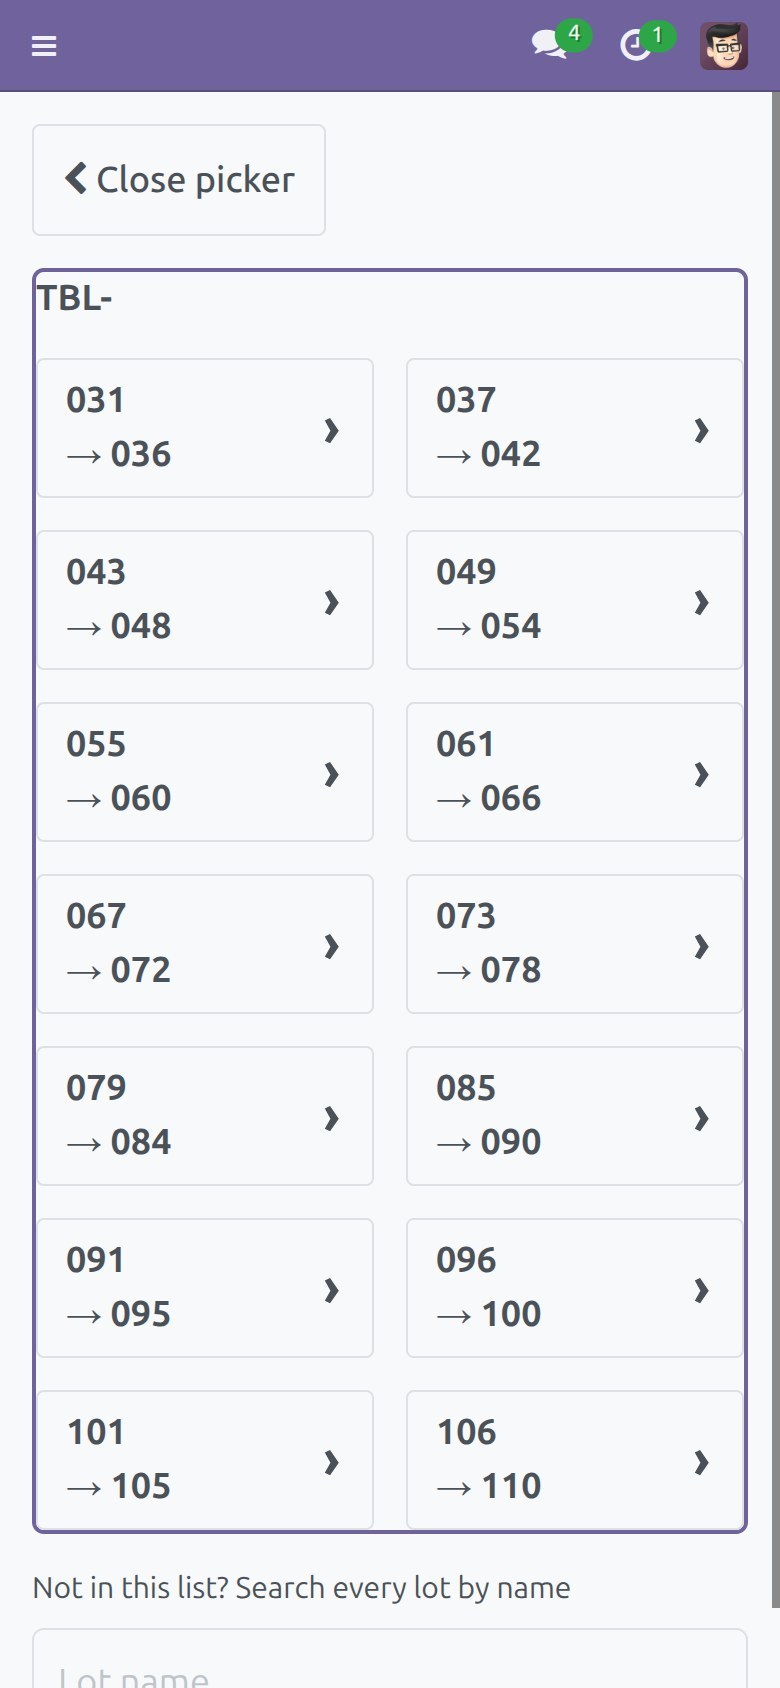
When the lot you need is not in the list, type its full name under Not in this list? Search every lot by name, for example TBL-005, and press Enter. If exactly one lot has that exact name, it is selected at once and shown as LOT TO RECORD, ready for the quantity. If the name is only part of a lot name, or several lots match, Enter simply keeps searching and you tap the lot you want in the results.
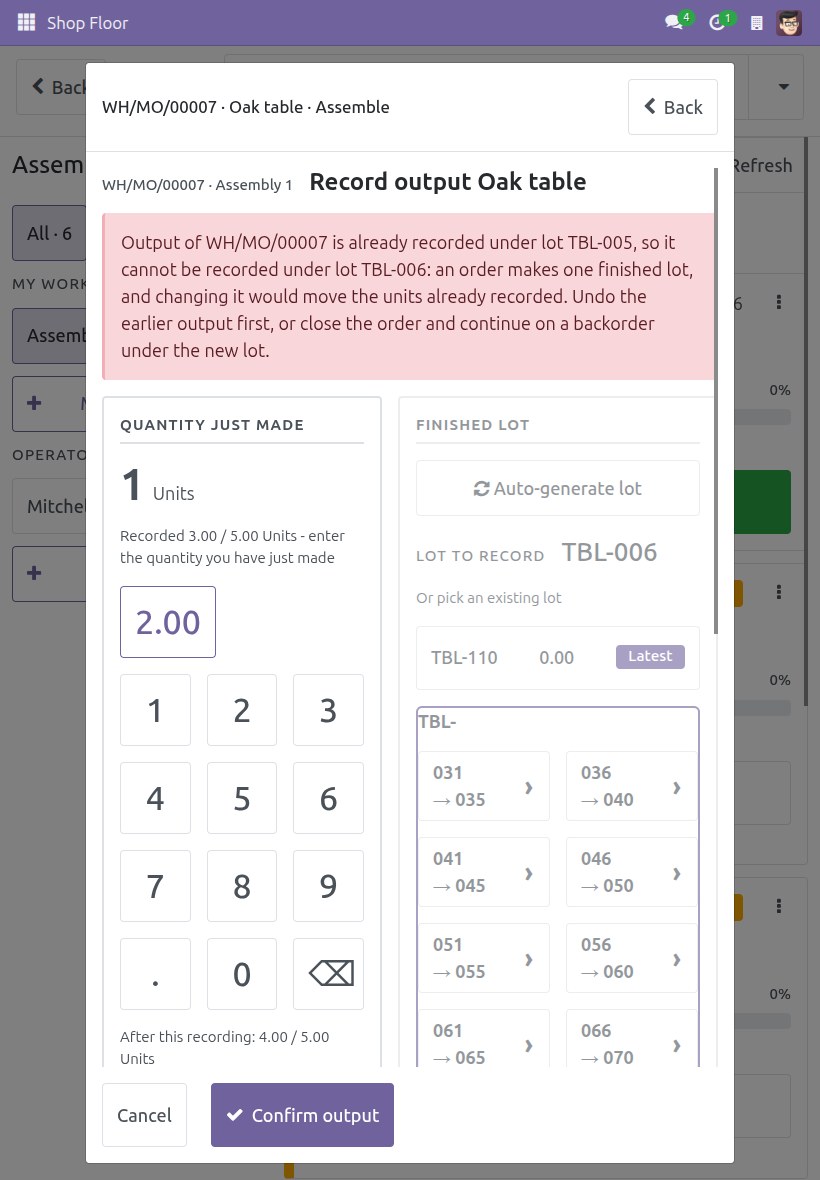
An order makes one finished lot. Once output is recorded under a lot, recording under another lot is refused, and so is Auto-generate lot. The red message names both lots, for example "Output of WH/MO/00006 is already recorded under lot TBL-005, so it cannot be recorded under lot TBL-006", and gives the way forward: undo the earlier output first, or close the order and continue on a backorder under the new lot. Repeating the same action would only repeat the refusal, so this message has no Retry button. A lost connection or other refusals still offer Retry.
Record the materials you really used
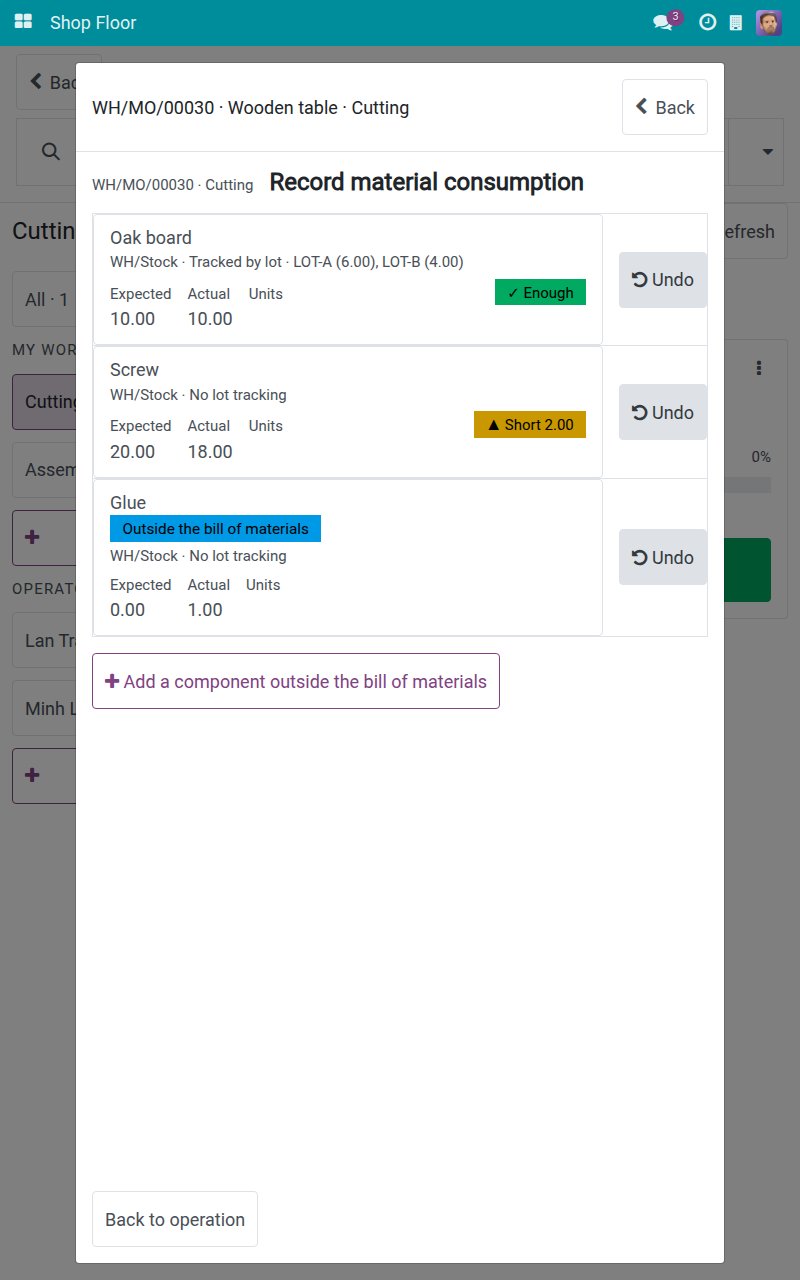
On the operation screen, tap Record materials used. Every component is a row with the Expected and Actual quantities and a chip such as Short or Enough.
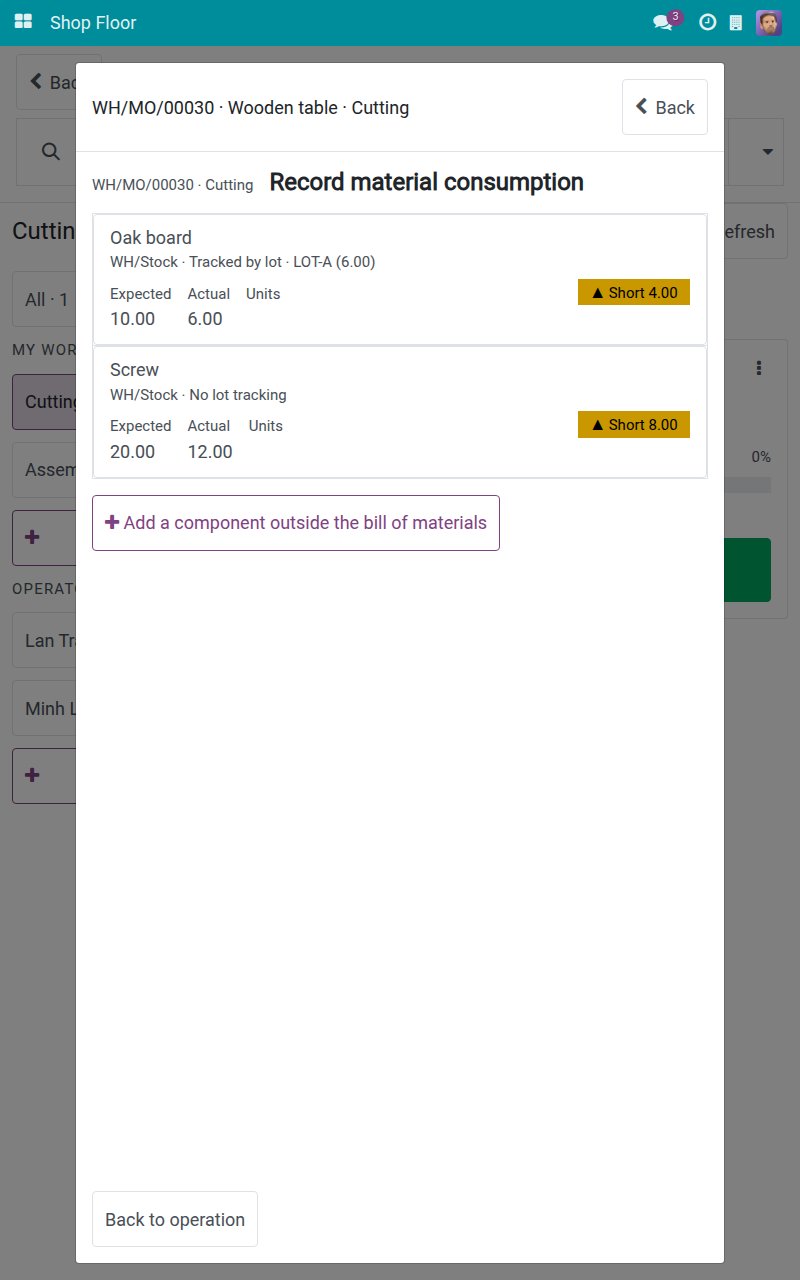
Tap a component tracked by lot, for example Oak board. The list of lot and quantity pairs shows what is already recorded.
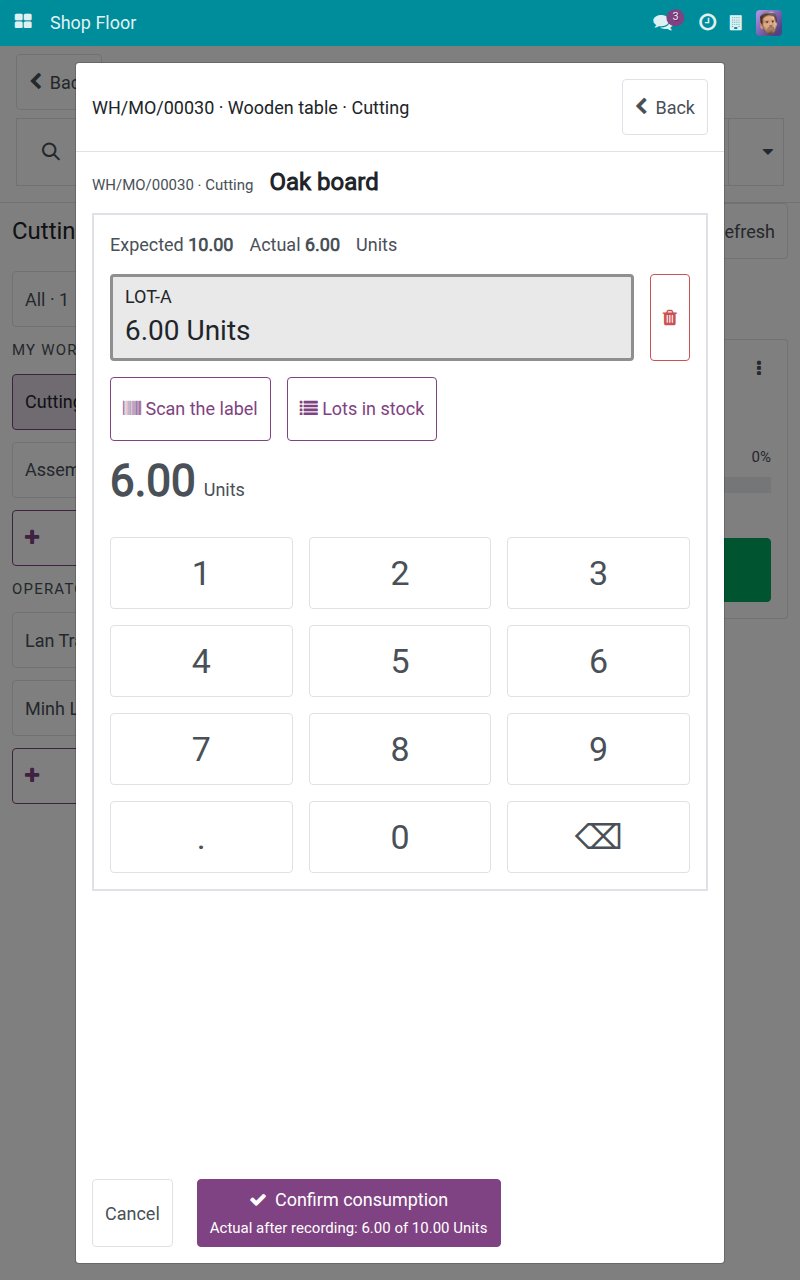
Tap Lots in stock to see the lots with their quantity on hand. Where the device can scan, Scan the label adds a lot from its label.
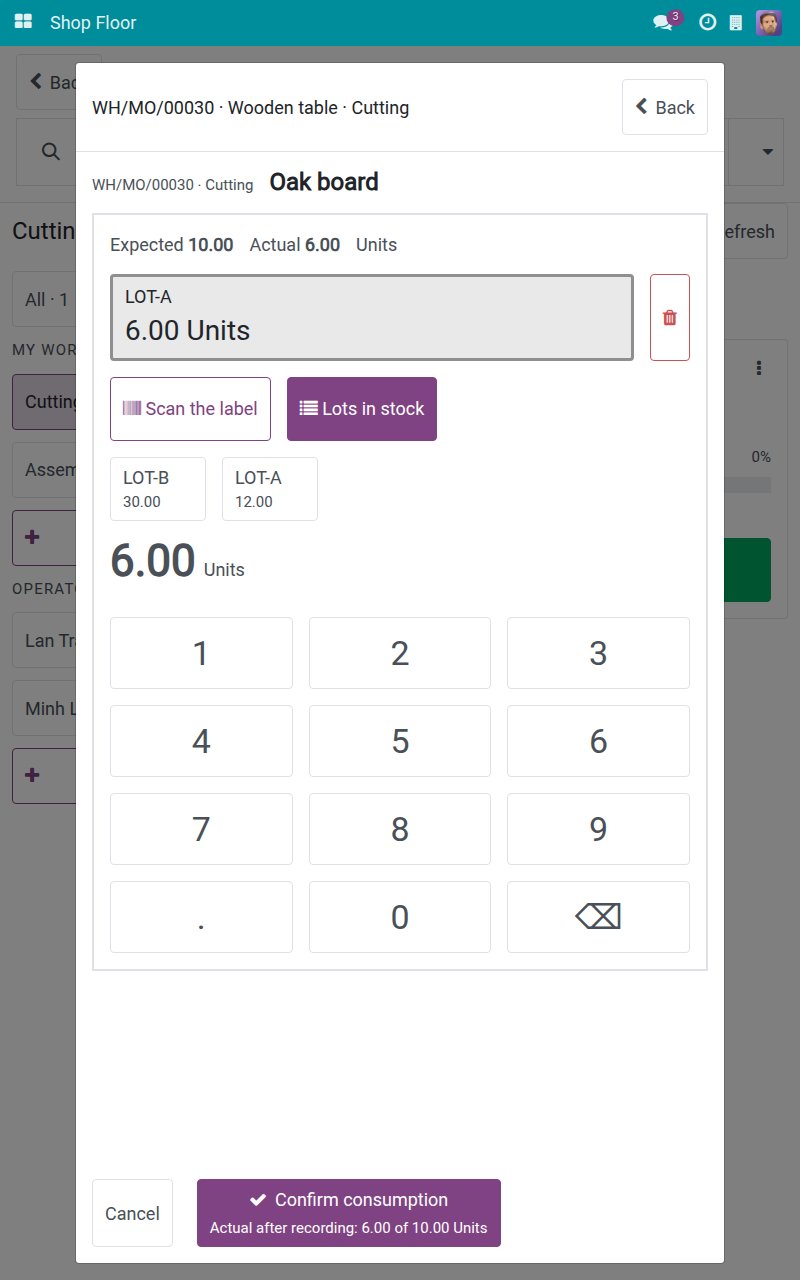
Tap the lot you used, for example LOT-B, and tap the digits of the quantity used from that lot. Under the Confirm consumption button, the screen shows the resulting "Actual after recording".
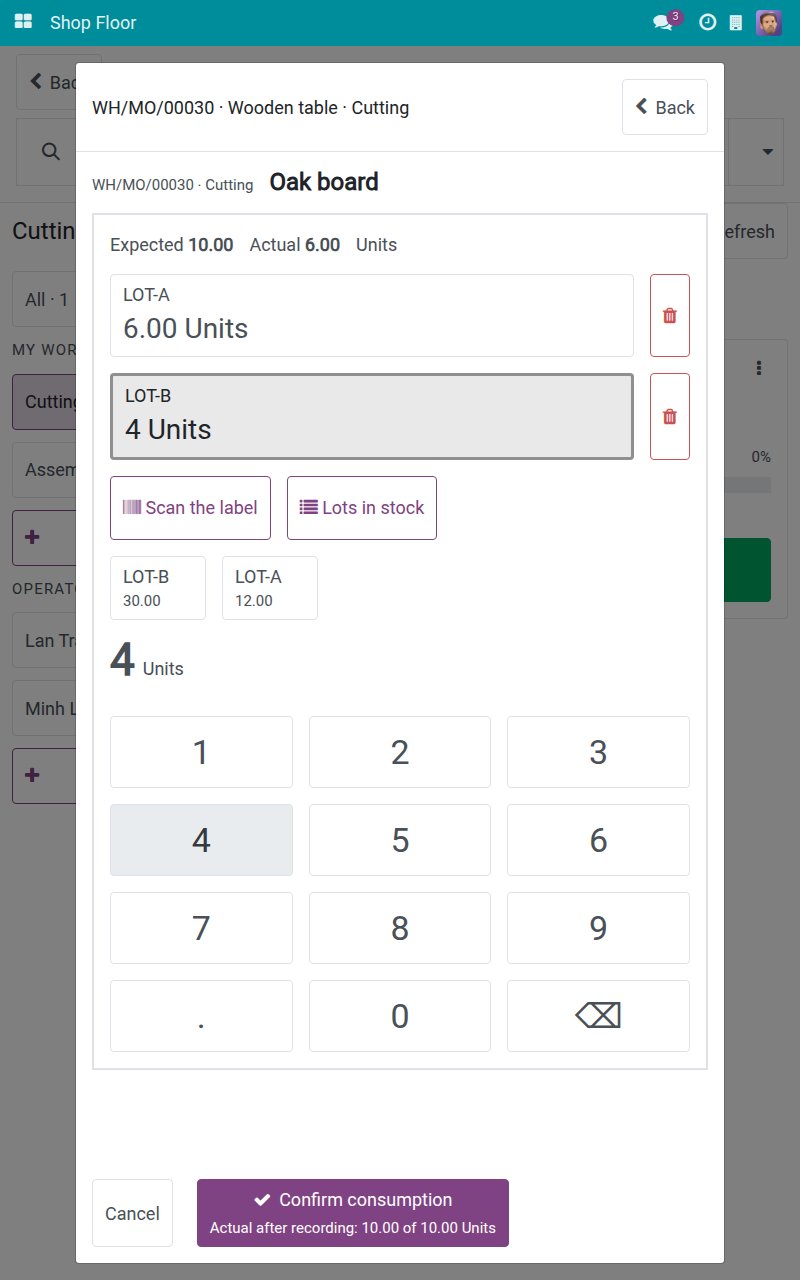
Tap Confirm consumption. The row shows the new Actual quantity, the lots used and an Undo button.
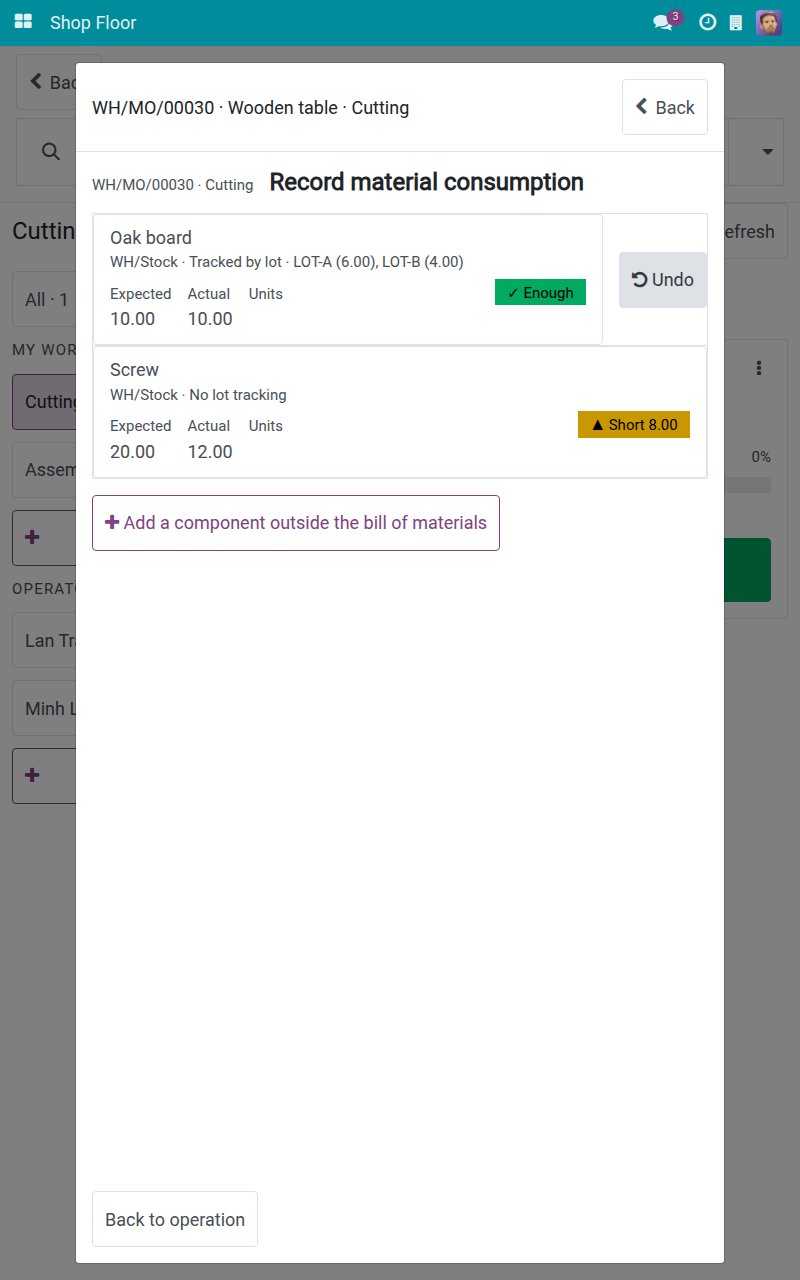
For a component without lots, for example Screw, tap its row, tap the digits of the quantity used and confirm. Zero is allowed, and As expected fills in the planned quantity with one tap.
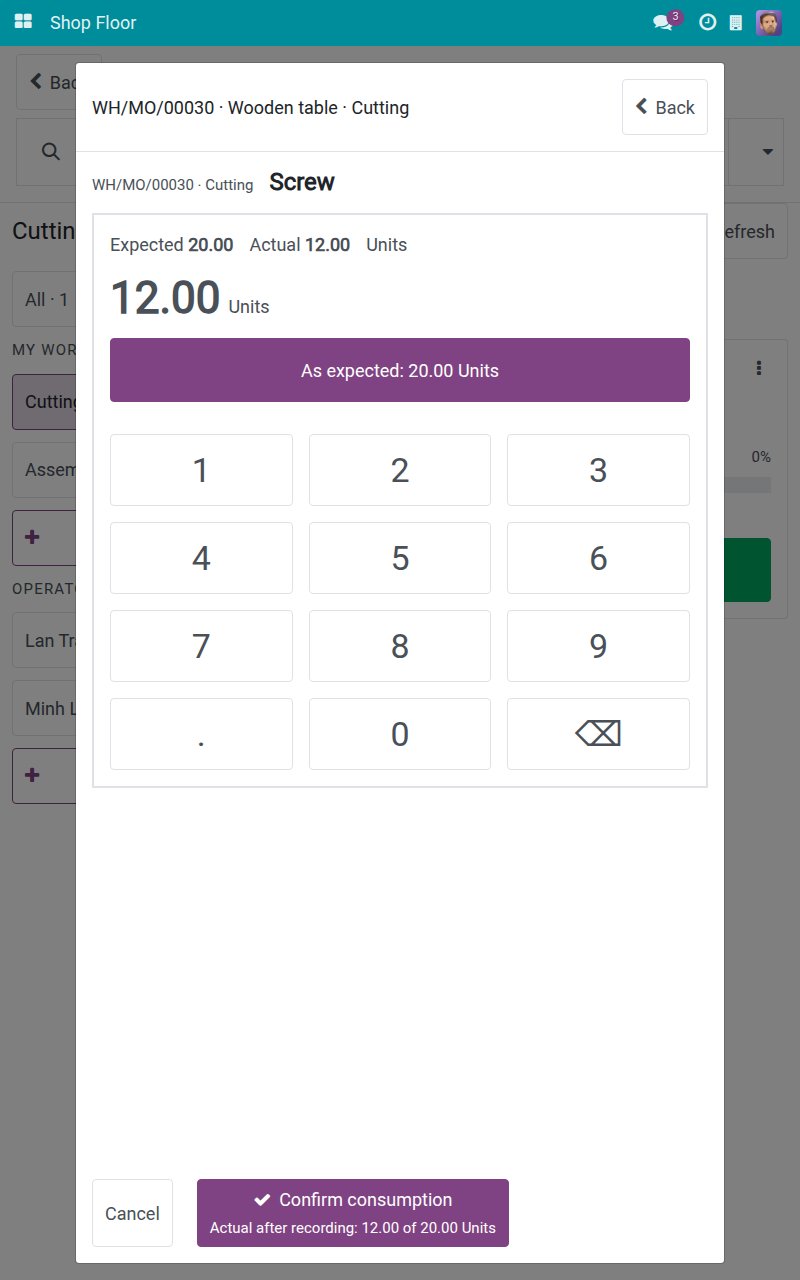
After confirming, the row shows the quantity you entered. Later output recordings do not rescale it.
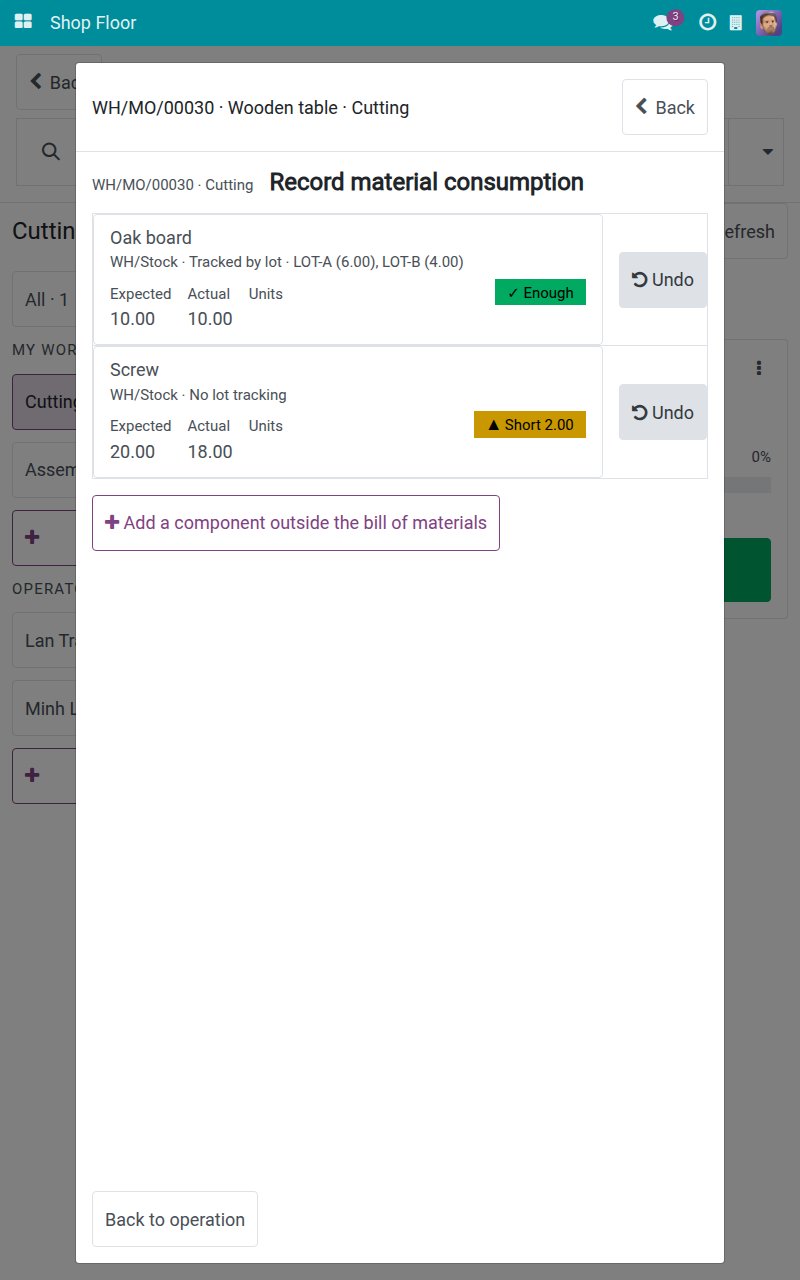
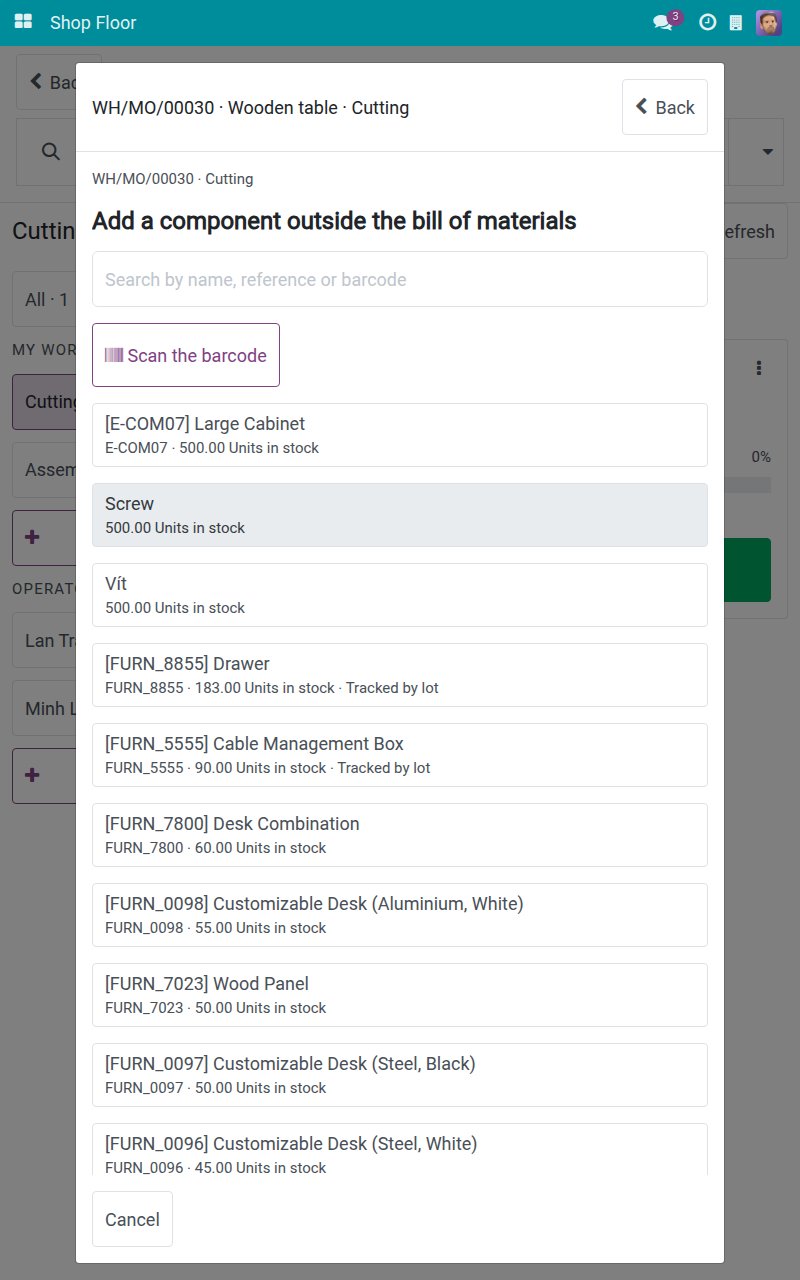
If you used something that is not in the bill of materials, tap Add a component outside the bill of materials. Search by name, reference or barcode and tap the product.
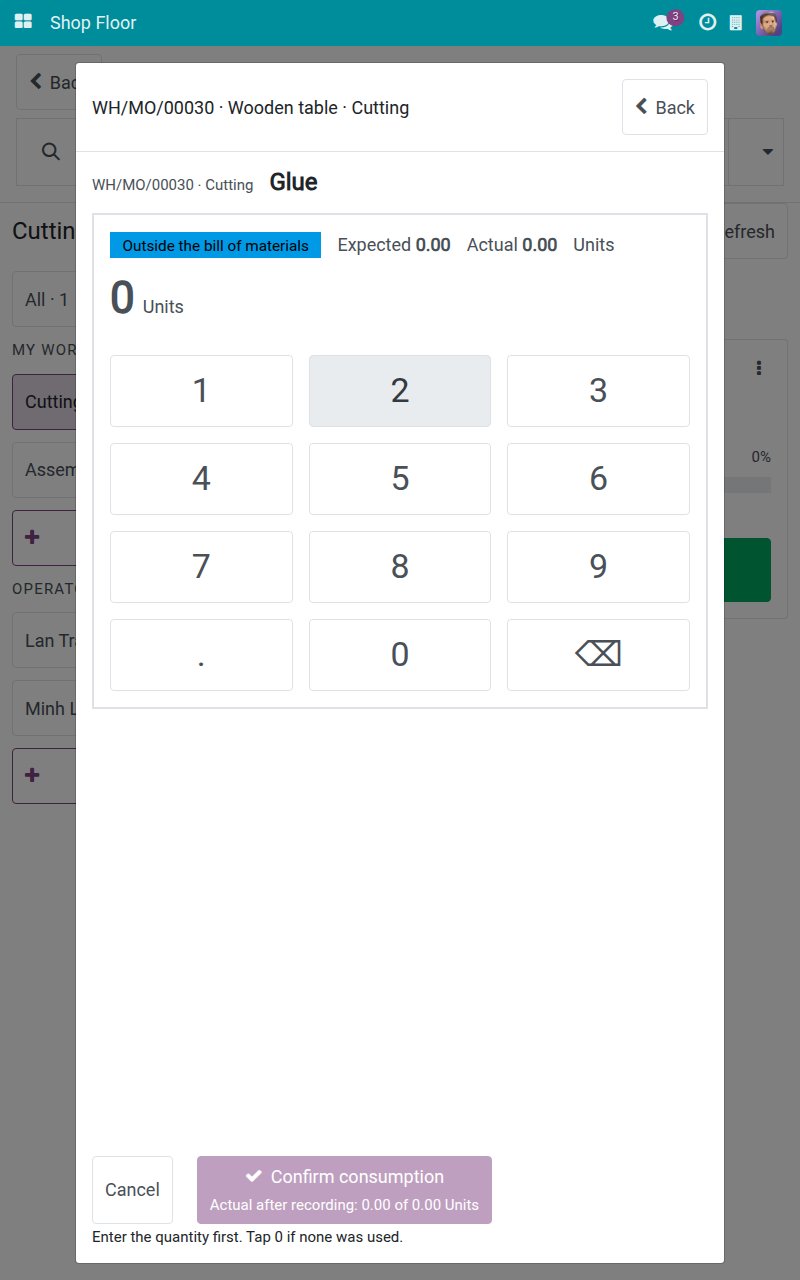
The product opens with the badge Outside the bill of materials. Tap the digits of the quantity used, for example 1, and confirm.
The list includes the extra component. Tap Undo on a row to restore its earlier figures. Only the latest standing entry of a row can be undone, by its author or by a Manufacturing Administrator.
After an undo, the row returns to its earlier figures.
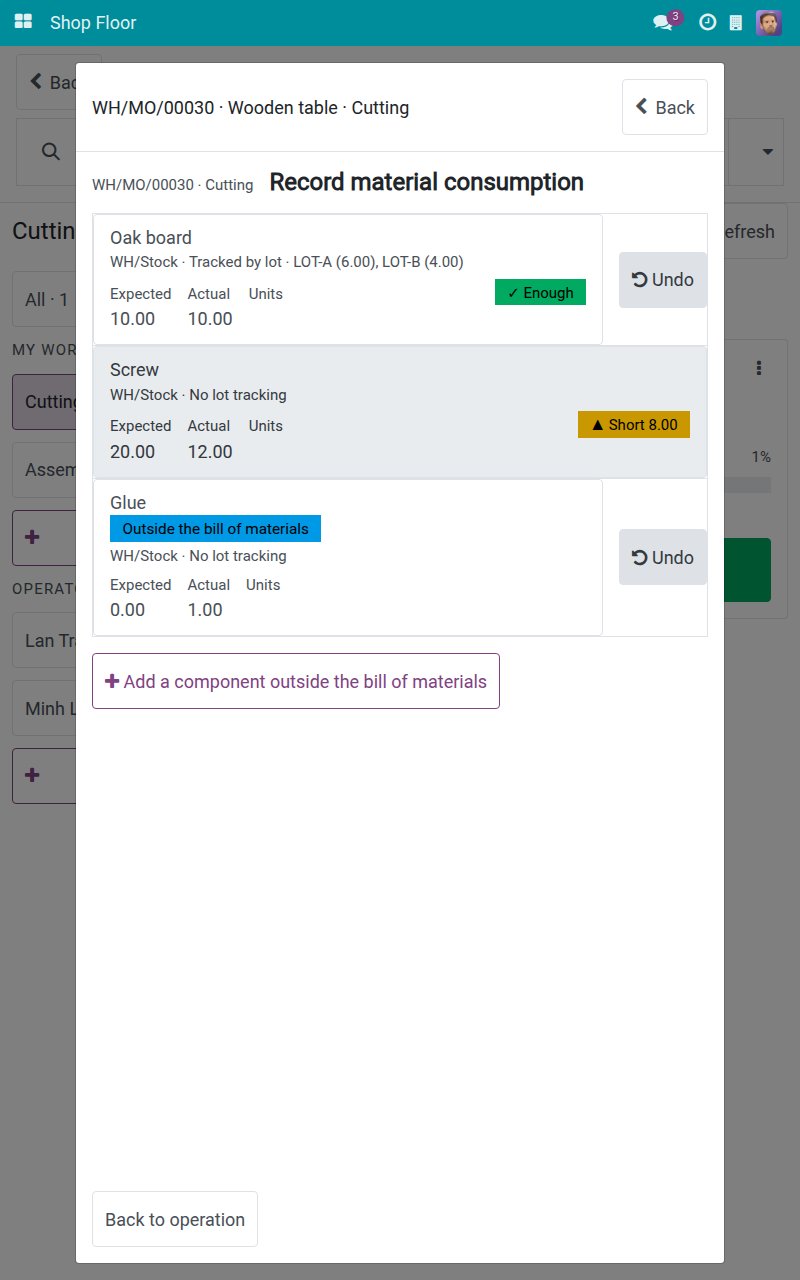
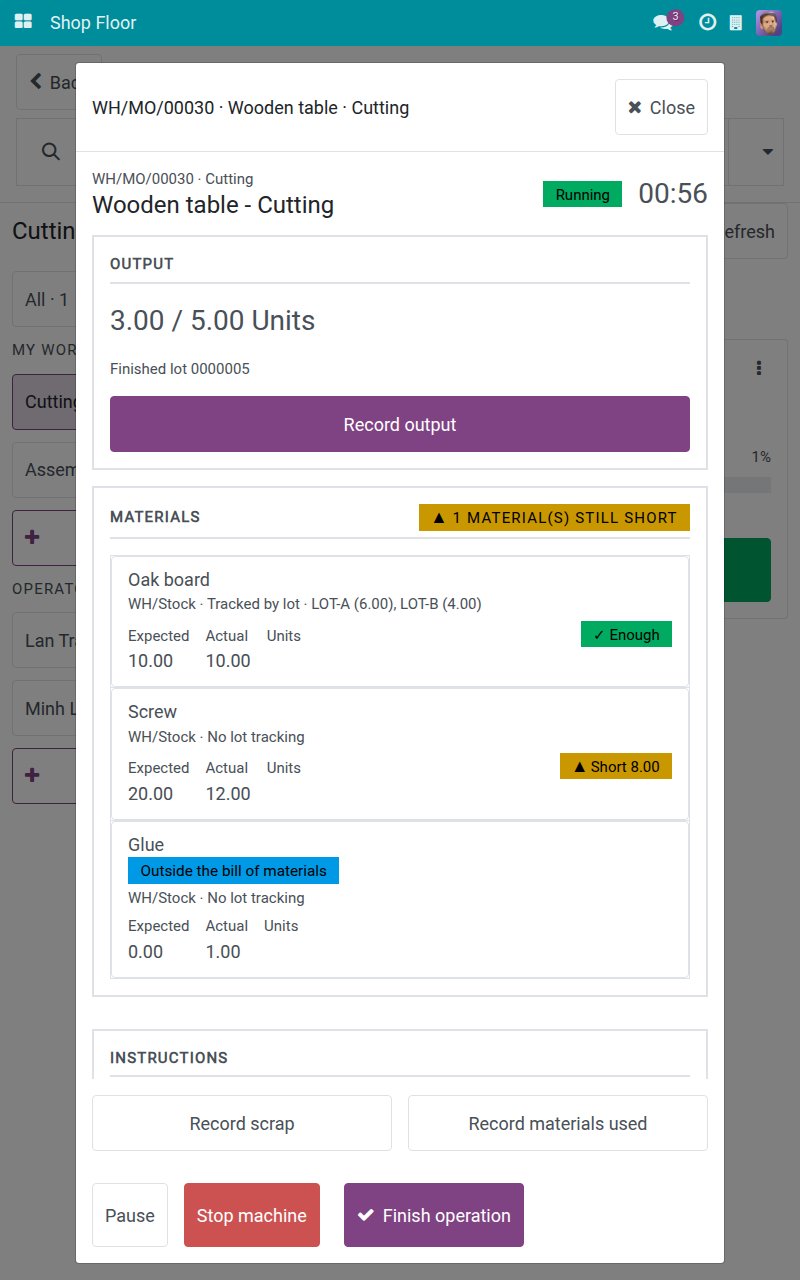
Tap Back to operation. The MATERIALS panel counts only the components that are still short.
Note
Until you enter a figure yourself, Actual is an estimate based on the reserved quantity that follows the output you record. Once you confirm a figure, it stays as you entered it.
Note
The lots you name for a component on the shop floor are created when the manufacturing order is closed, wherever it is closed: from the shop floor, from the manufacturing order form on the desktop, or by Post Consumption. This happens only when the operation type of the order has Create New Lots/Serial Numbers for Components switched on. If it does not, naming a lot that does not exist is refused with "does not allow creating lots for components. Ask the warehouse to receive the lot first."
Record scrap
From the bottom of the operation screen, tap Record scrap. Tap the product that was spoilt, for example Oak board.
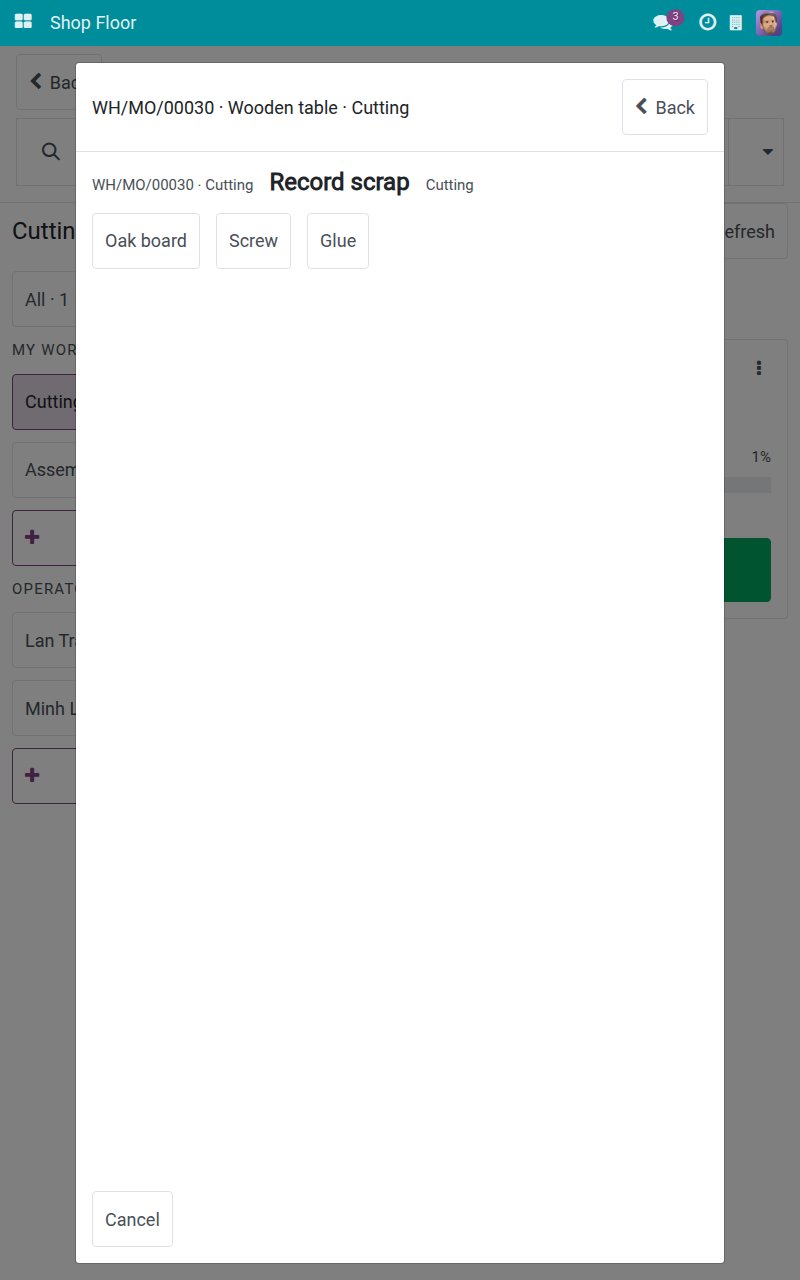
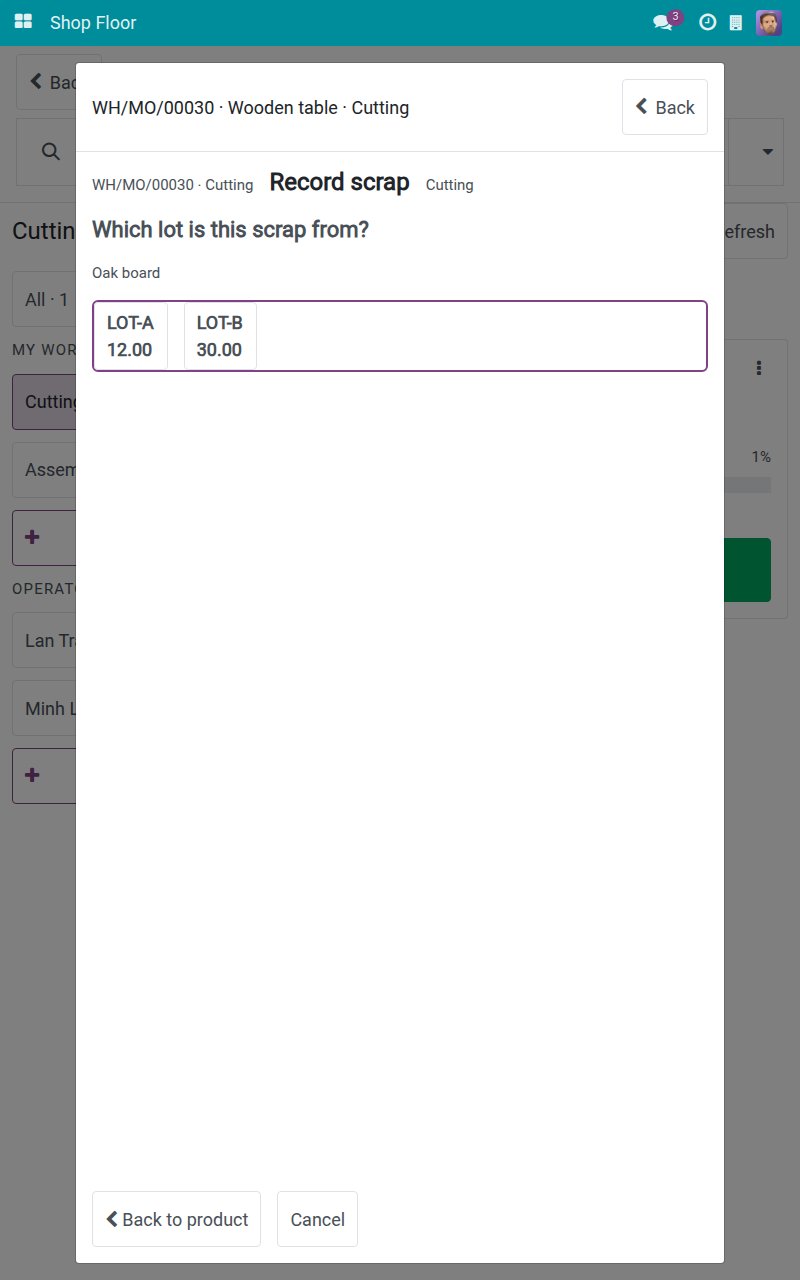
Because the product is tracked by lot, the screen asks "Which lot is this scrap from?". Tap the lot.
Read the warning: recording scrap cannot be undone from the shop floor, and the stock is deducted the moment you confirm.
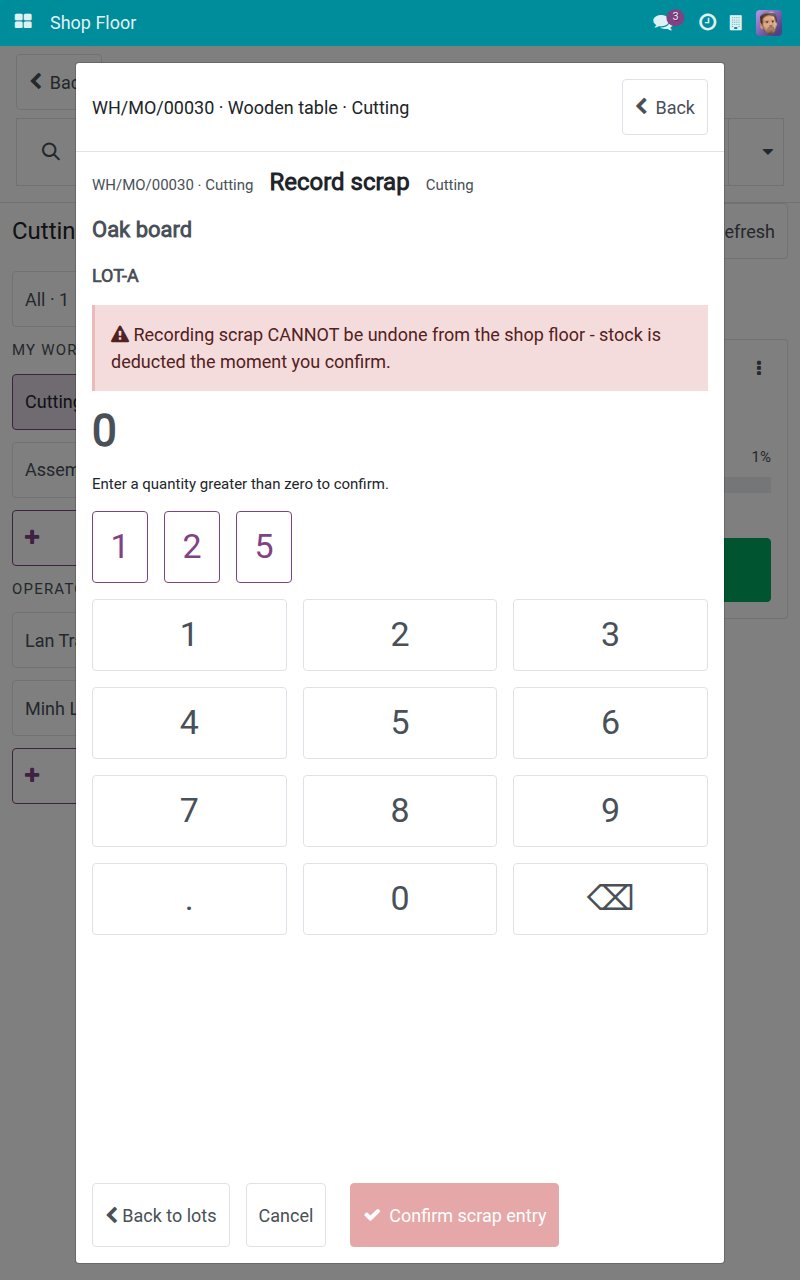
Tap the digits of the quantity, for example 2. The quick keys never exceed what the chosen lot holds.
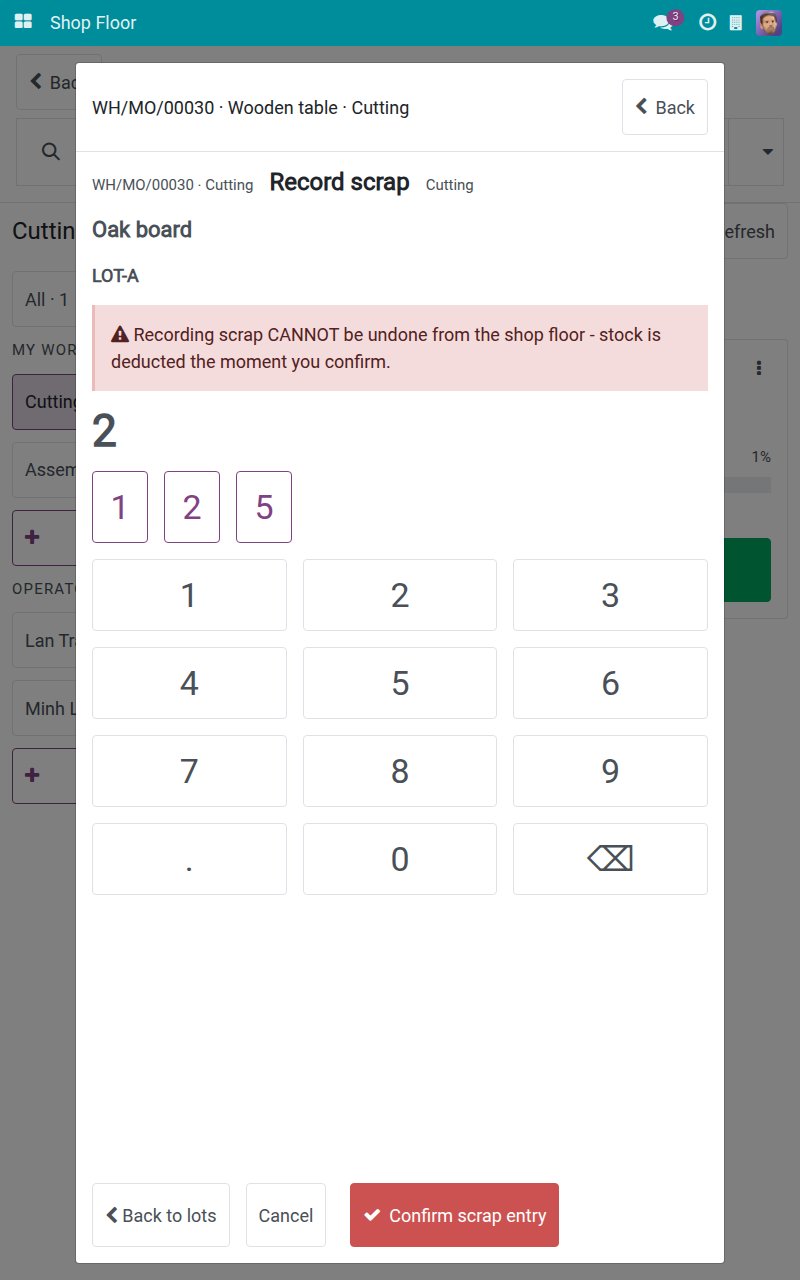
Tap Confirm scrap entry. The result screen confirms what was booked. Tap Done to go back to the operation.
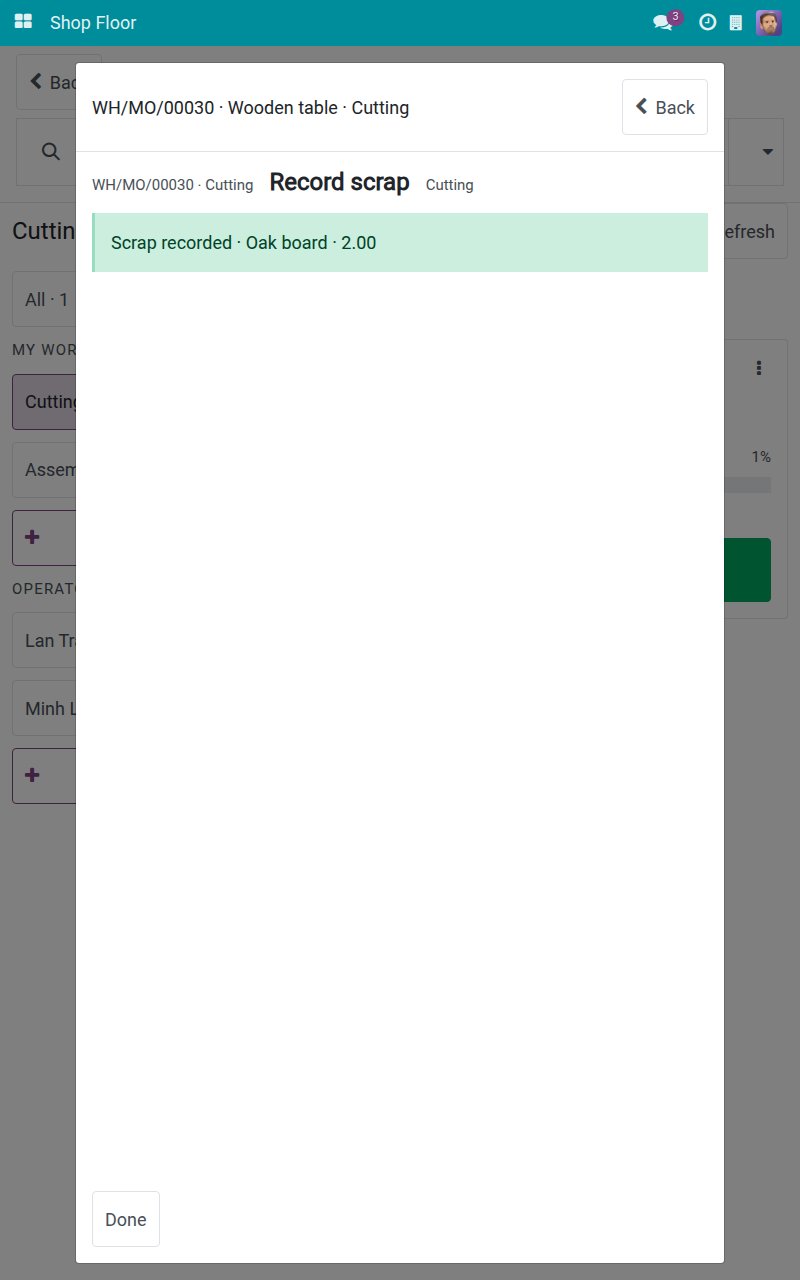
If the lot holds less than the quantity you enter, the tablet warns you and lets you discard the entry or confirm to scrap anyway.
Stop the machine
On the operation screen, tap Stop machine. The screen says "Tap a tile to report right away - there is no confirmation step".
Tap the tile of the reason, for example Equipment Failure. One tap stops the work center and ends every running timer at that moment. You can optionally tap a tile under ADDITIONAL DETAILS, or Type a description. The banner reads Station stopped: Equipment Failure and "Waiting for a supervisor".
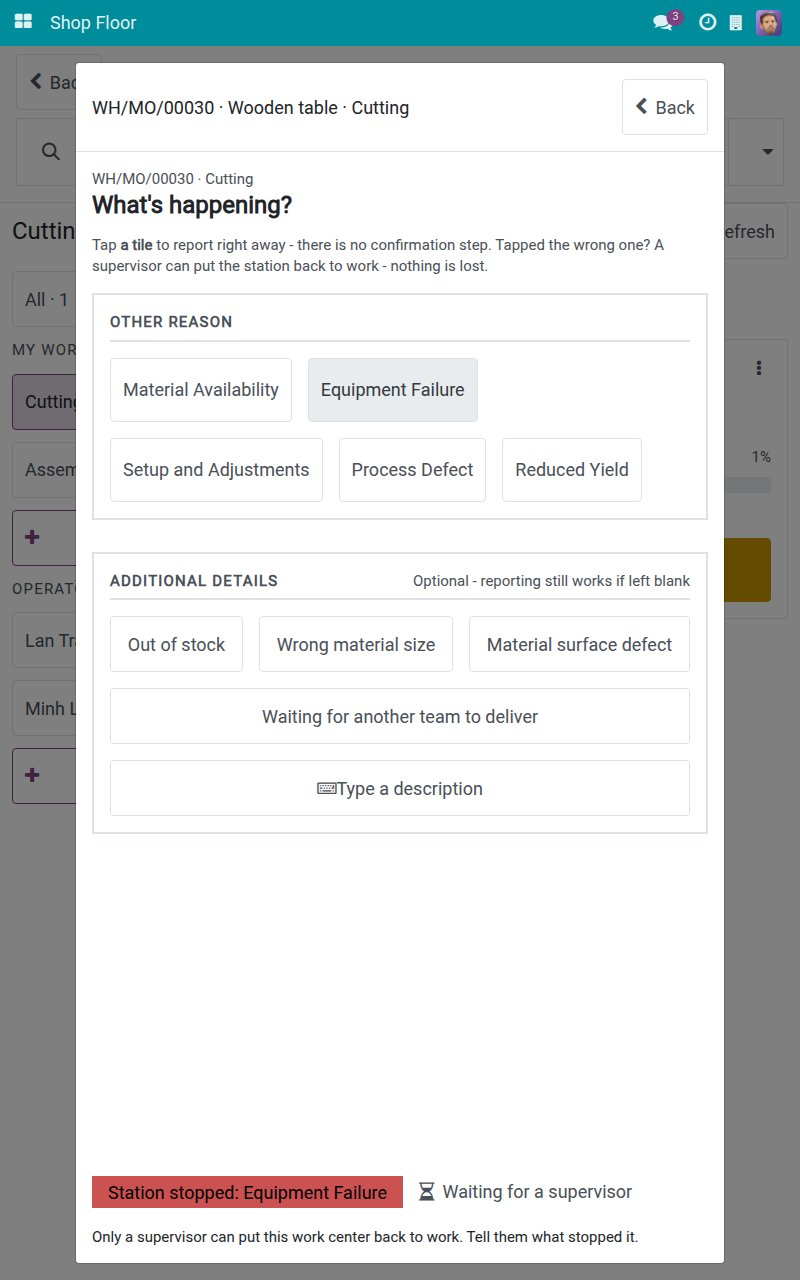
Only the reasons that really stop a station are offered. While the station is stopped, Start, Pause, Finish operation and Record output are refused and the screen shows why. Only a production lead can put the station back to work, so tell them what stopped it.
Finish the last operation and close the manufacturing order
Make sure the output and the materials are recorded. Here 4 of 5 pieces are recorded.
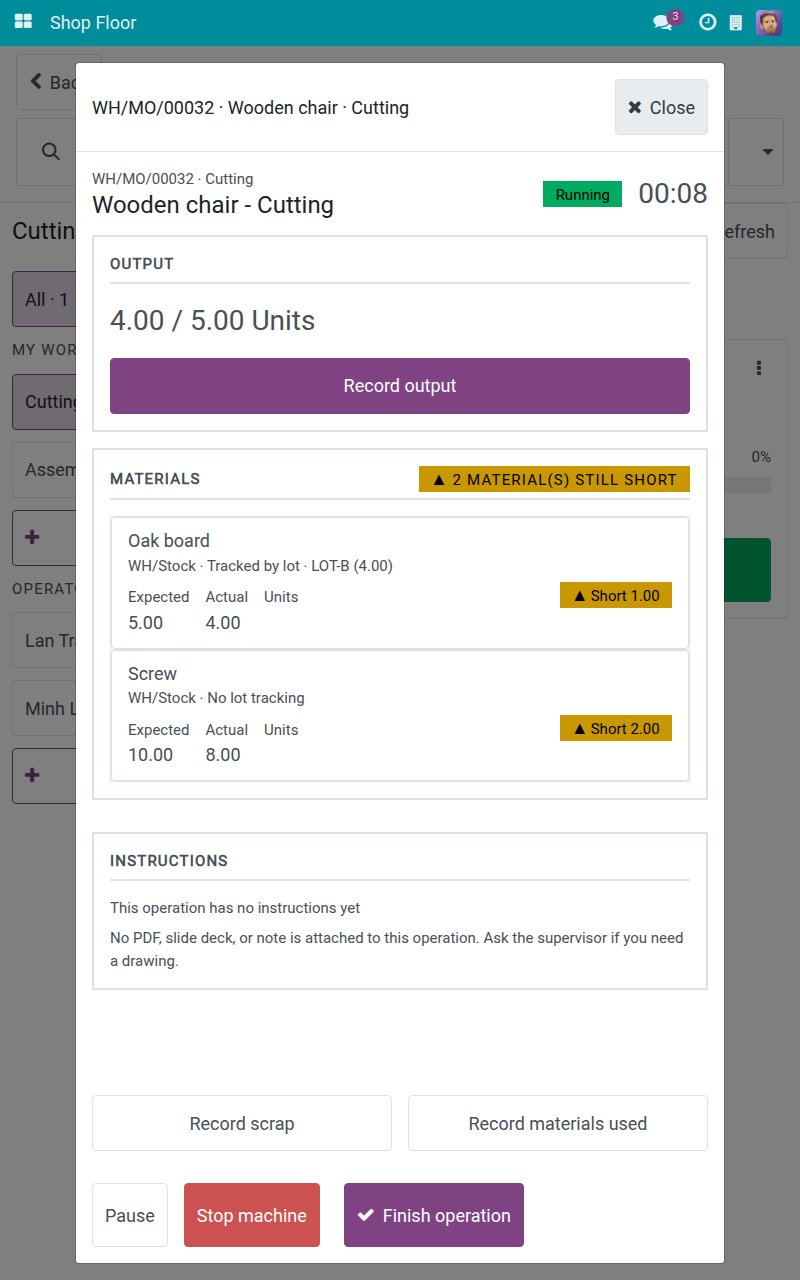
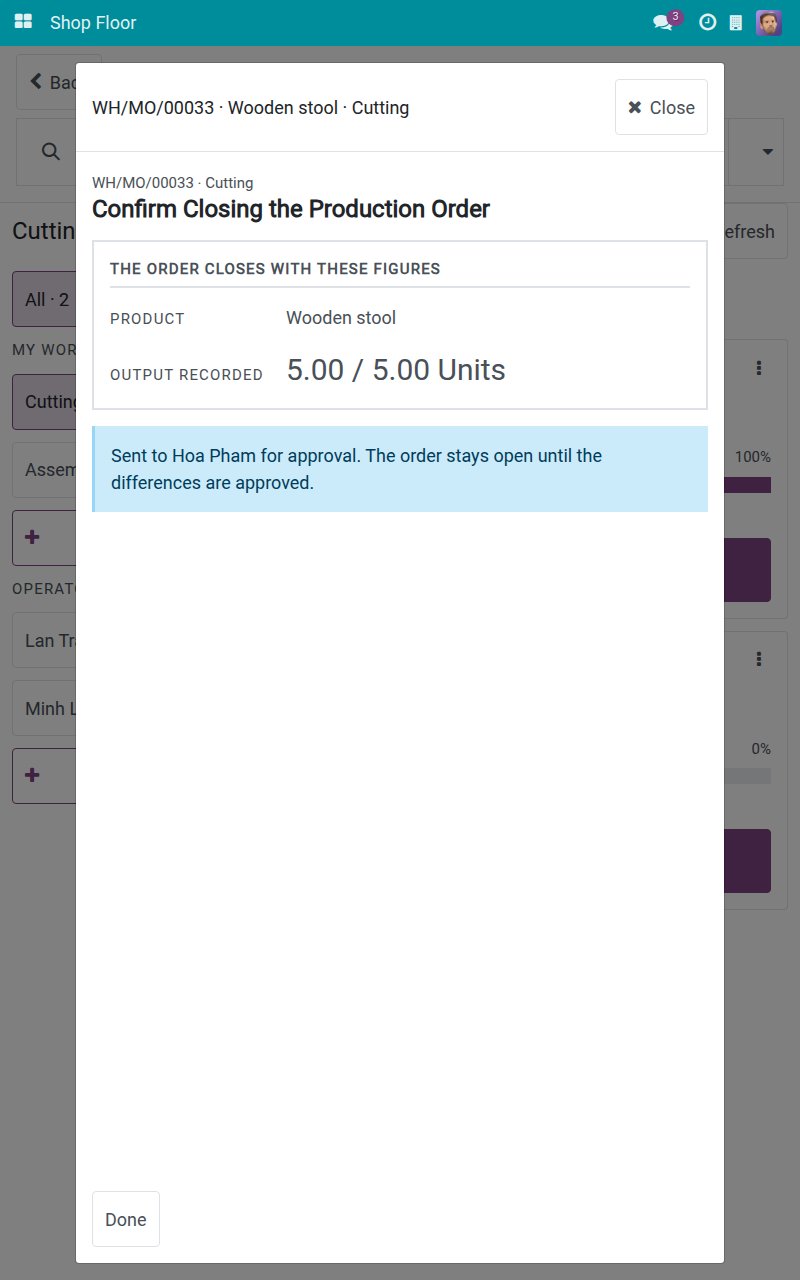
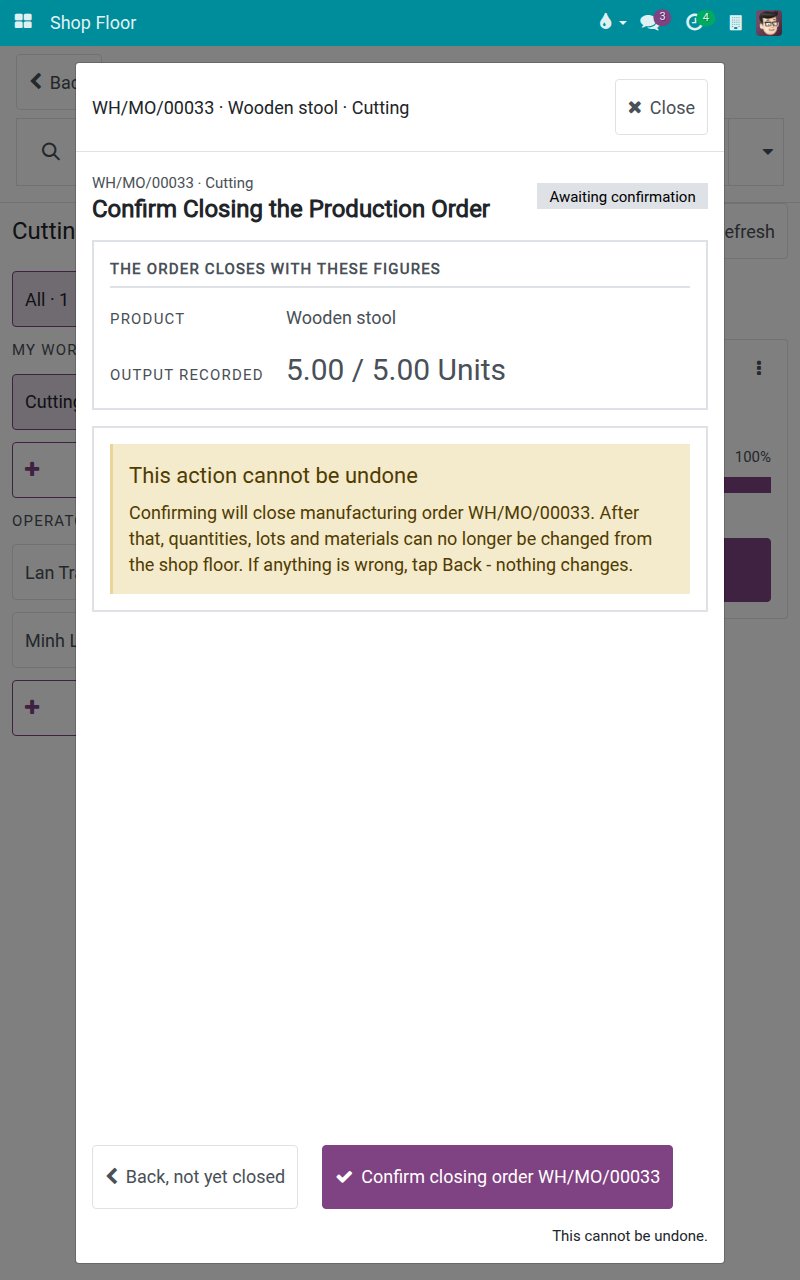
Tap Finish operation. It closes your timer and finishes the operation. Because it is the last operation, the tablet moves on to Confirm Closing the Production Order. The screen shows the product and the output recorded, and warns that this cannot be undone.
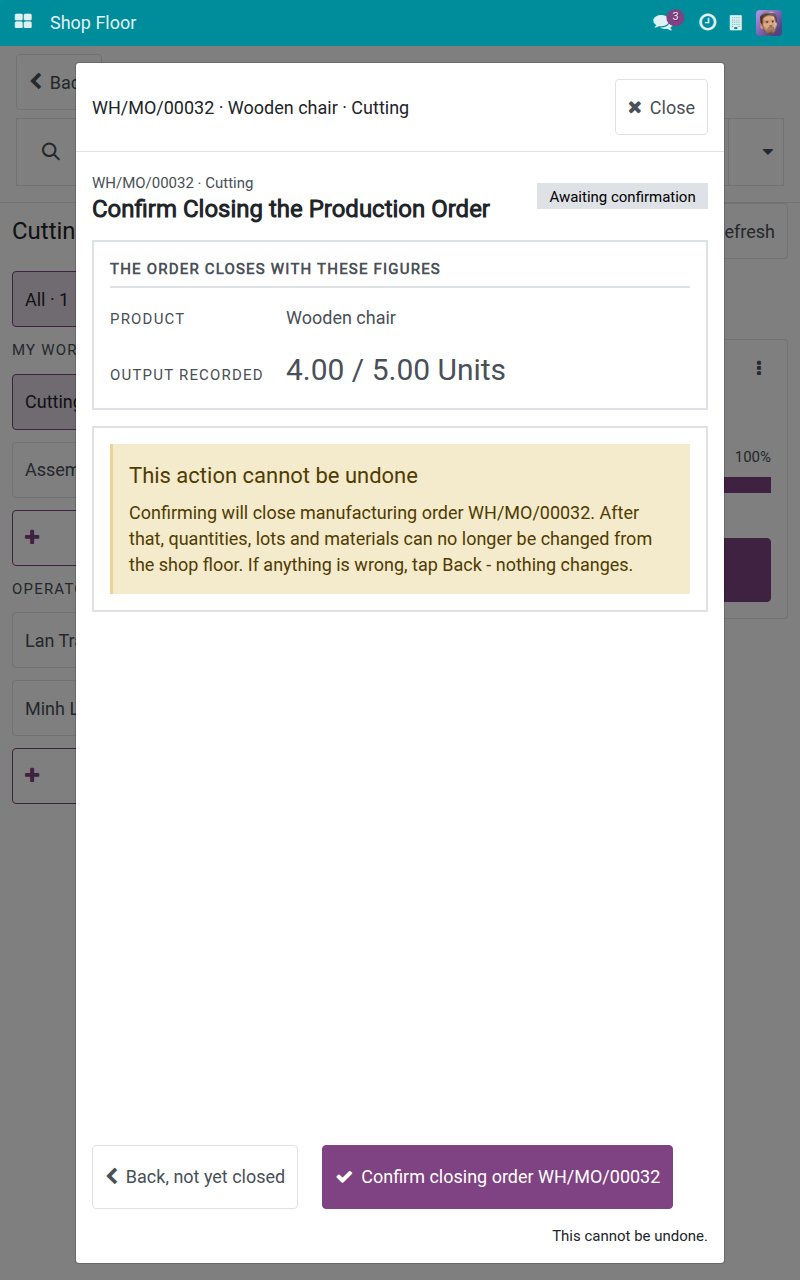
Tap Confirm closing order, followed by the order reference. The manufacturing order is closed through the standard rules, so every rule installed in your system still applies. When only part of the ordered quantity was produced, the screen asks what to do with the rest.
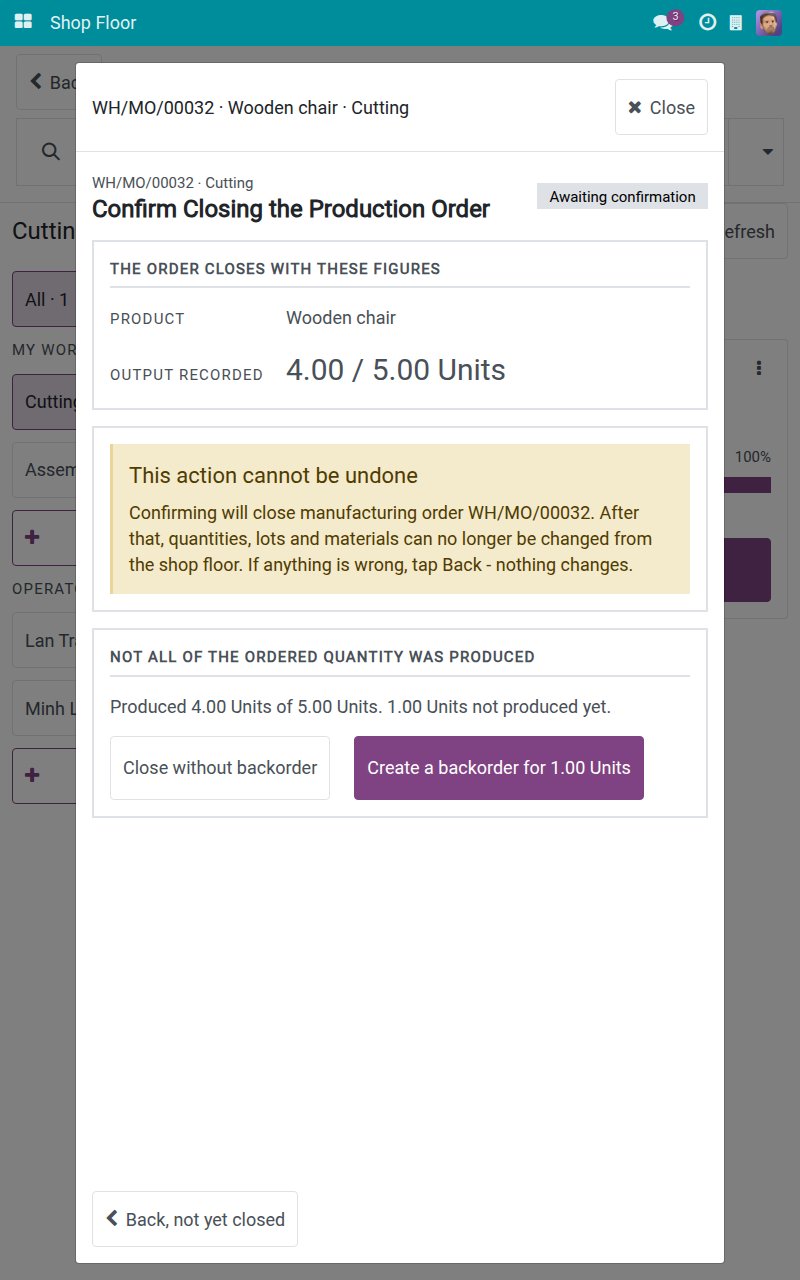
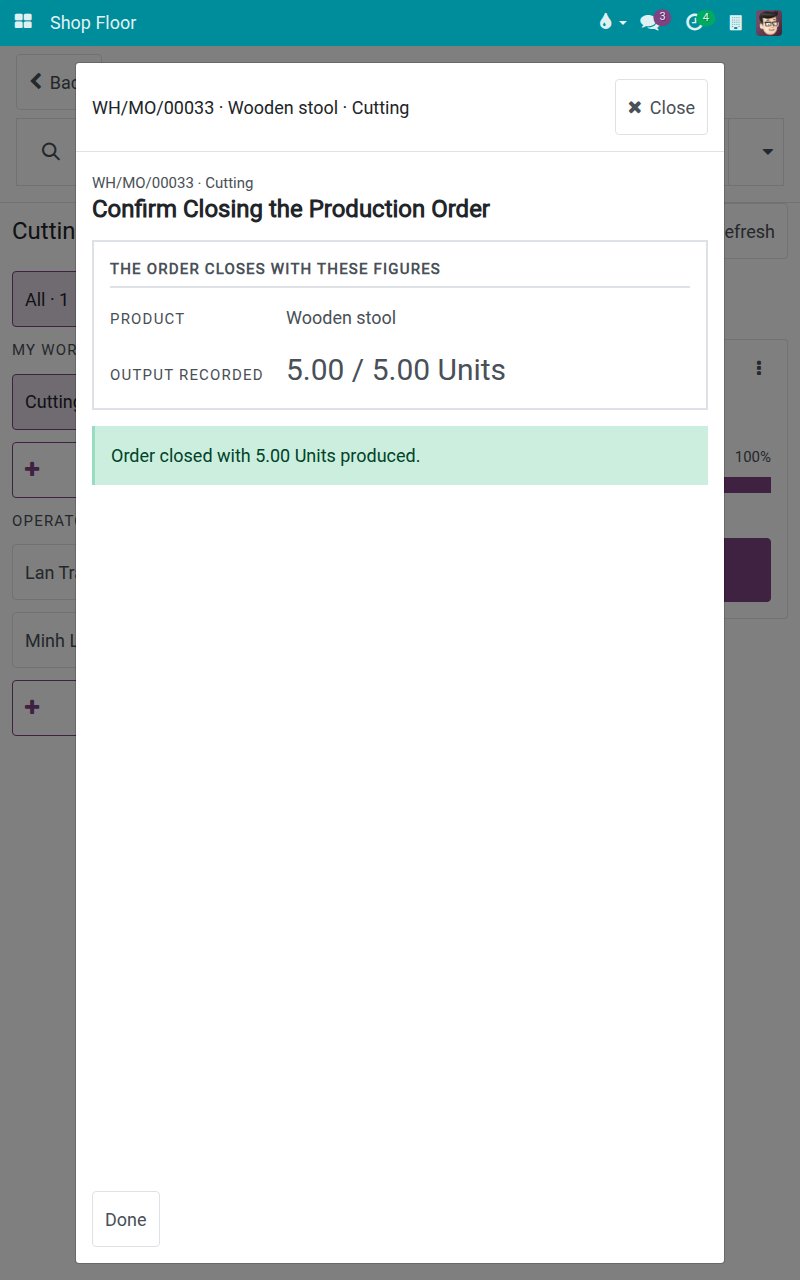
Tap Create a backorder for 1.00 Units to produce the rest later, or Close without backorder. The screen confirms "Order closed with 4.00 Units produced." and "A backorder was created for the remaining quantity."
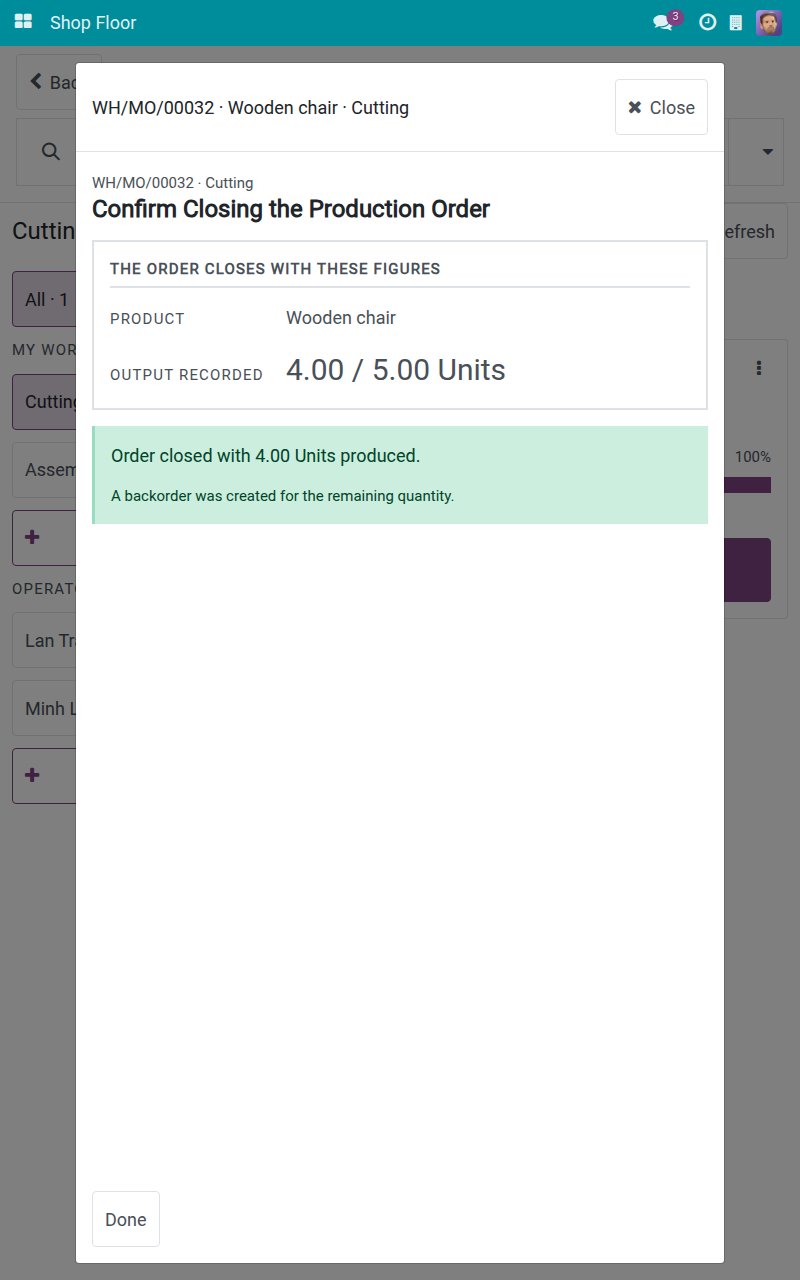
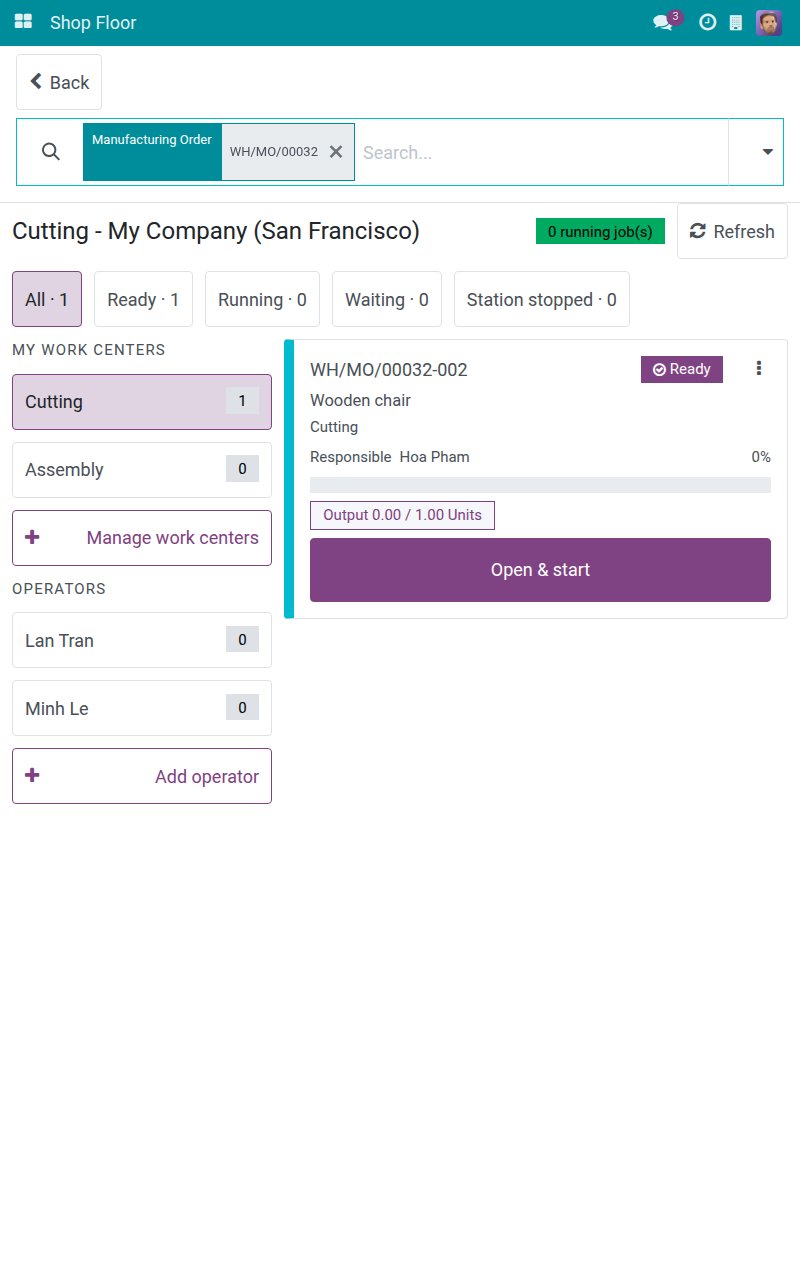
Tap Done to return to the board. The finished order is gone from the work to do, and the backorder shows up as a new Ready card.
If you are not sure, tap Back, not yet closed on the closing screens: nothing changes.
When the materials differ from the bill of materials
Some bills of materials do not allow consuming more or less than expected (Flexible Consumption set to Blocked). In that case an operator cannot close the order with a difference. The sample below records 11 of Oak board where the bill of materials expects 10.
Record the output and the materials as usual, then tap Finish operation. The last operation leads to the closing screen.
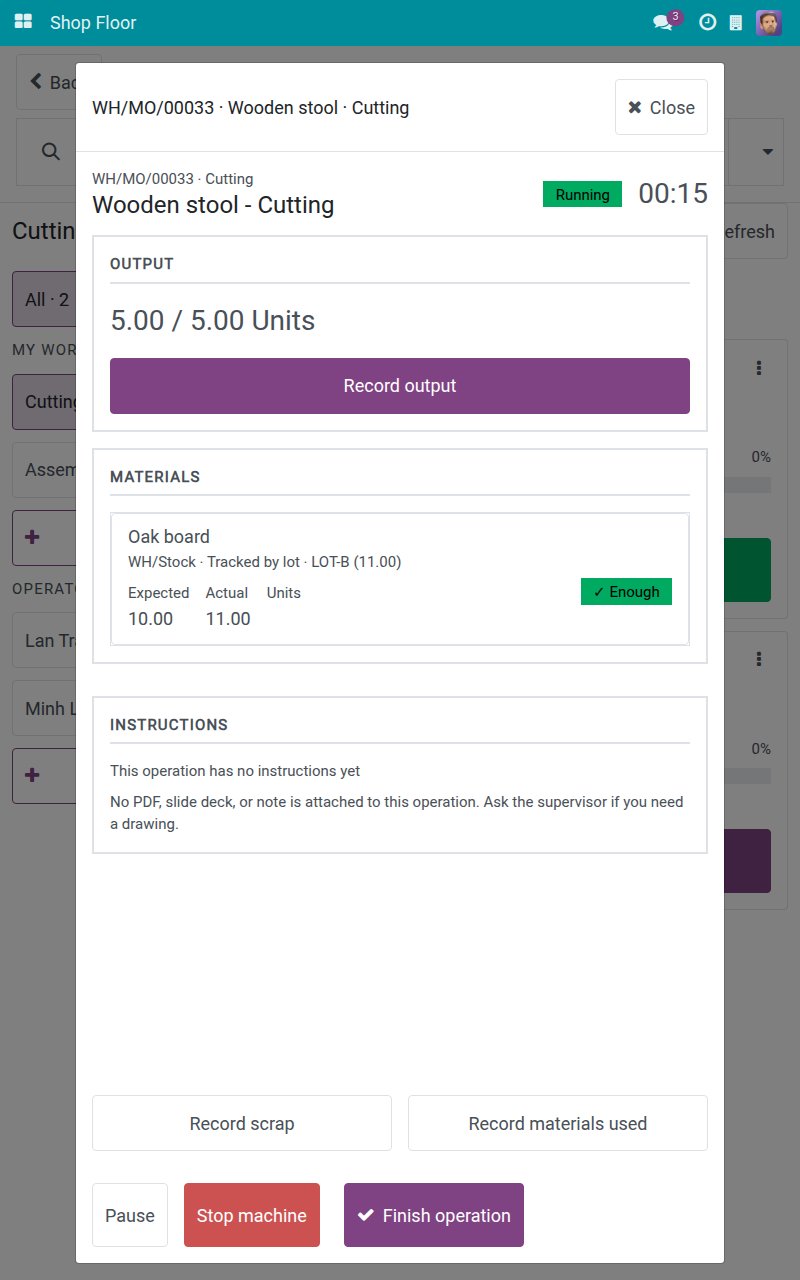
Tap Confirm closing order. The table THE MATERIALS USED DIFFER FROM THE BILL OF MATERIALS lists Product, Expected and Actual for each difference. You can tap Correct the figures to reopen the materials list, or Ask a manager to approve.
Tap Ask a manager to approve. A to-do is scheduled for the person responsible for the order (or a manager) and the differences are logged. The screen says "Sent to ... for approval. The order stays open until the differences are approved."
Tasks for production leads
The tasks below need the access right Manufacturing / Administrator. You work on a tablet or on the desktop.
Restart a stopped station
Open the Shop Floor and find the card of the job. Its badge reads Station stopped and its button reads Open to handle incident.
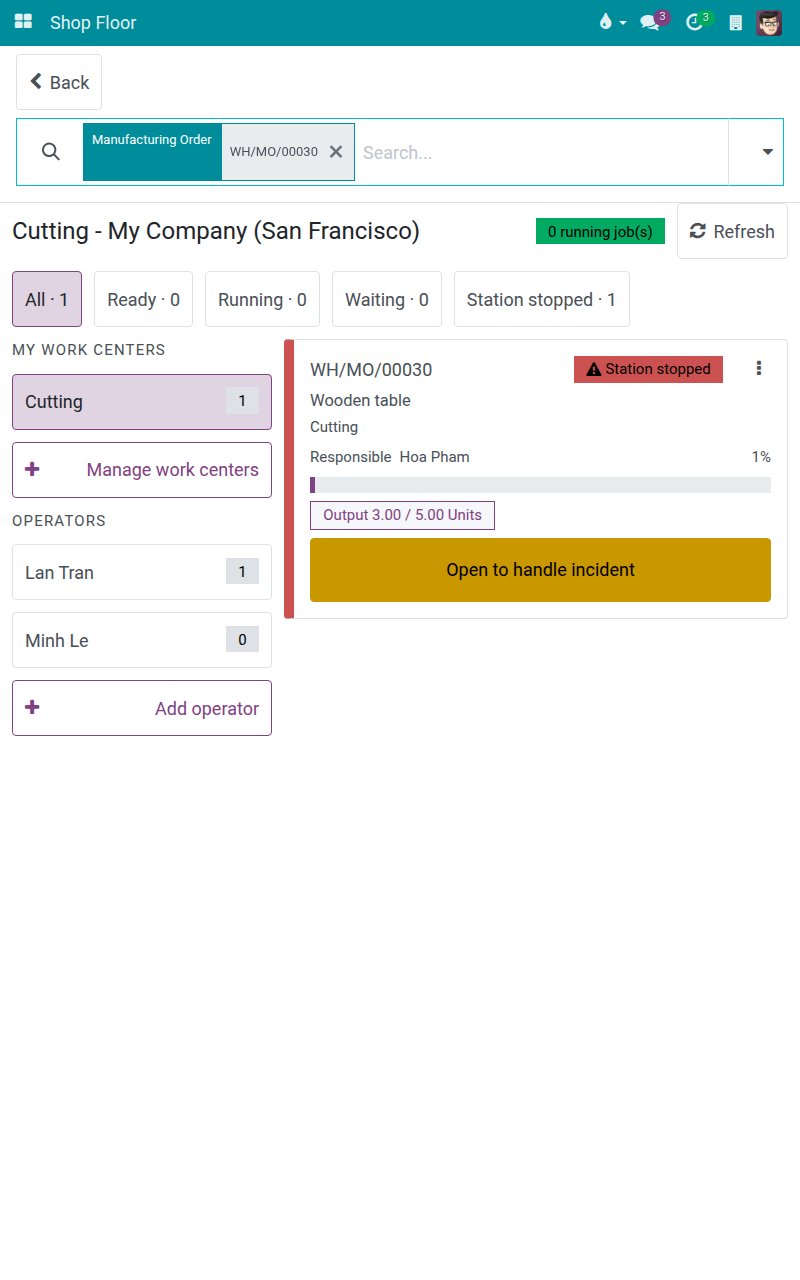
Tap Open to handle incident. The screen shows the reason of the stop in red, with Restart station. Start, Pause, Finish and Record output stay refused until the station restarts.
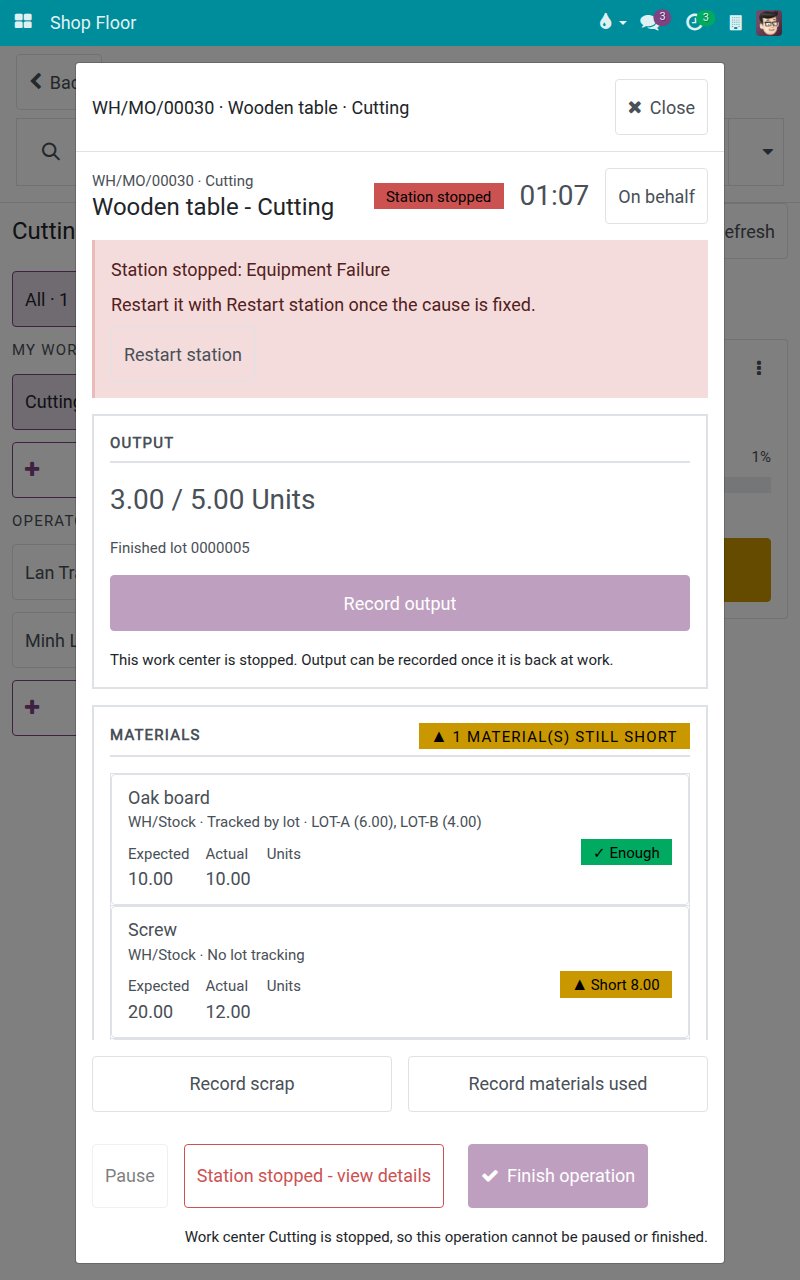
Tap Restart station. The question "Restart this station?" appears. Keep it stopped leaves things as they were.
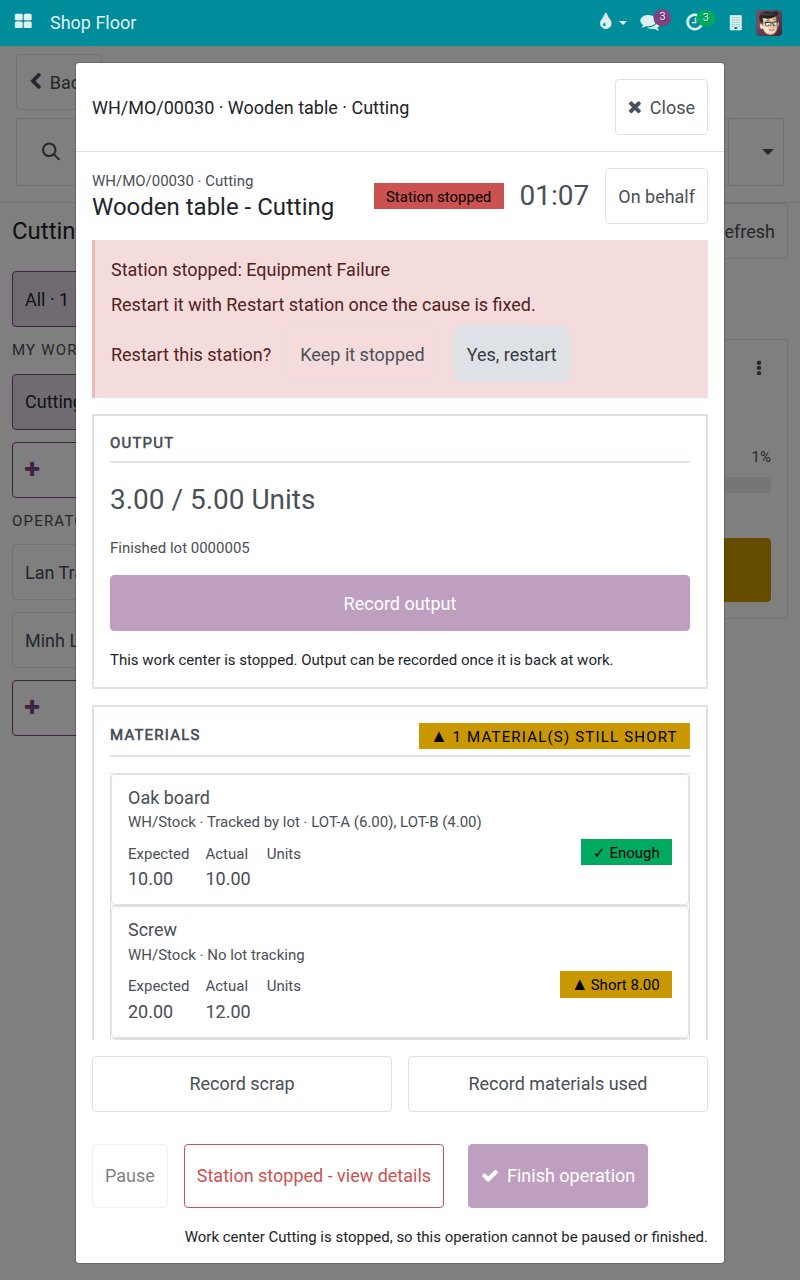
Tap Yes, restart. The work center works again. The stop is logged from the moment the operator tapped the reason until your restart, and no time is credited to anyone in between. The job shows Operation paused: the operator taps Resume to continue.
Approve a consumption difference
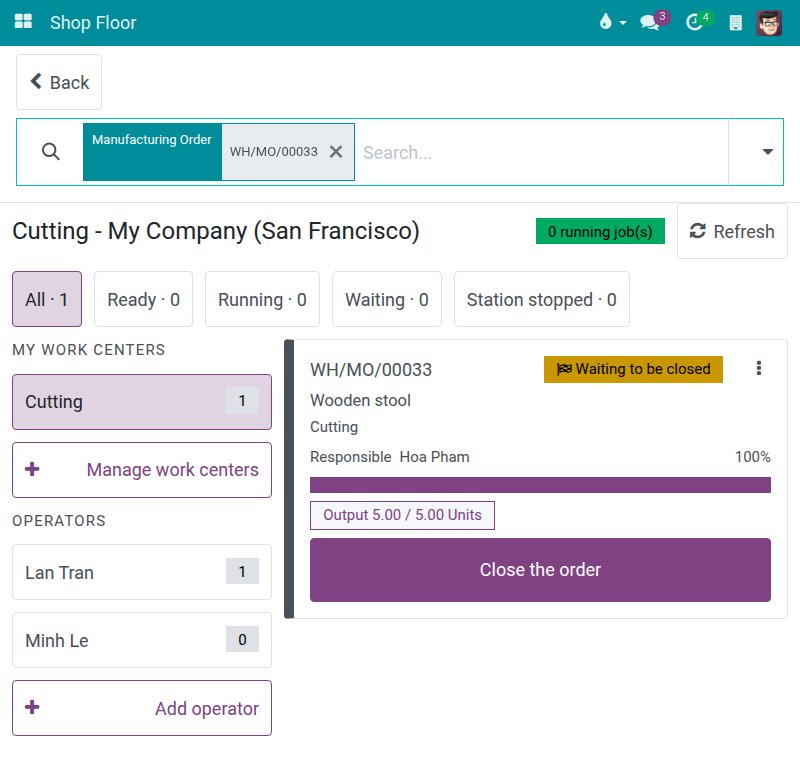
Find the card whose badge reads Waiting to be closed and tap Close the order.
On the closing screen, tap Confirm closing order, followed by the order reference.
Review the differences. As a manager you are offered Confirm and close, which an operator does not get on a bill of materials set to Blocked. Correct the figures reopens the materials list instead.
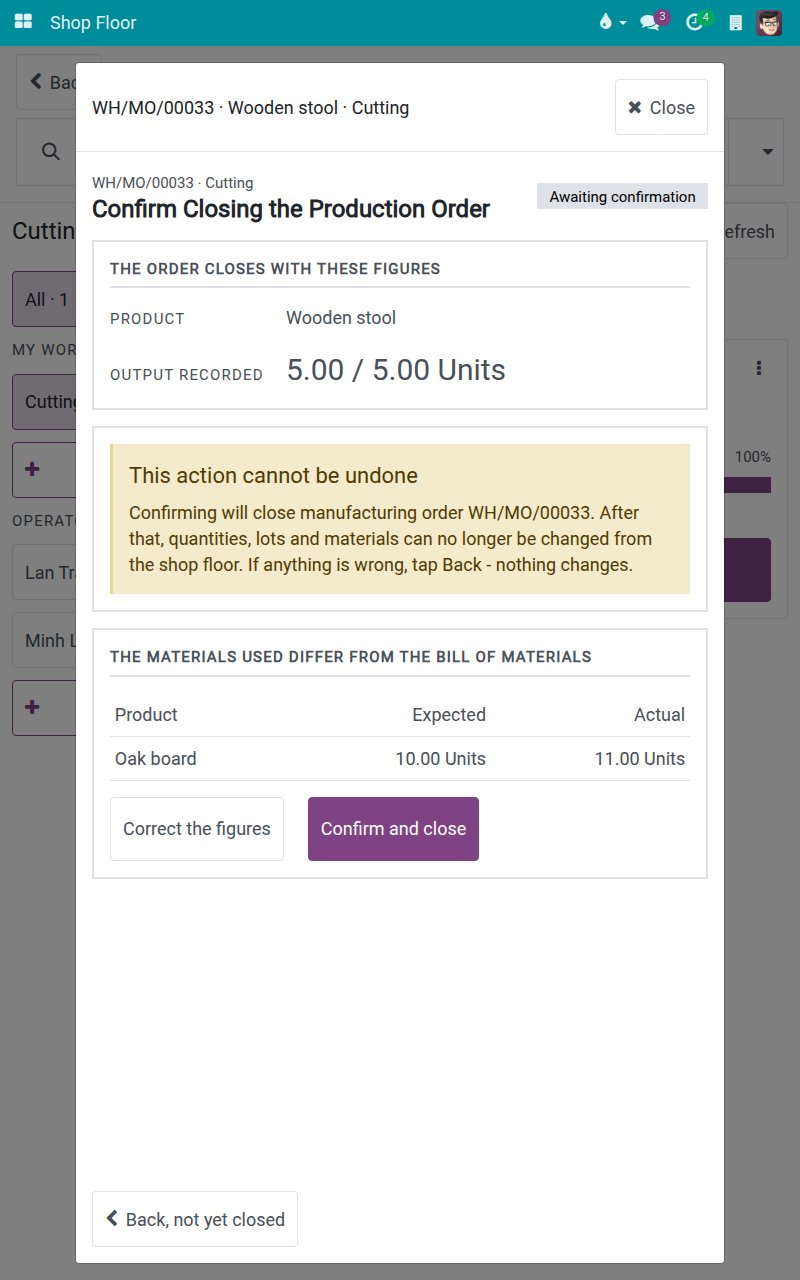
Tap Confirm and close. The extra consumption is accepted and kept, and the order is done. The approval request is recorded in the log of the order.
Credit an operation to another employee (On behalf)
Use this when someone else actually works the job at the station, for example because their own tablet is not at hand. The time and the labour cost go to that person's hourly cost, or to the Employee Hourly Cost of the work center when that person has none. You stay the User of the time line; the person you choose becomes its Employee.
Find the card of the job. Here the job is Ready.
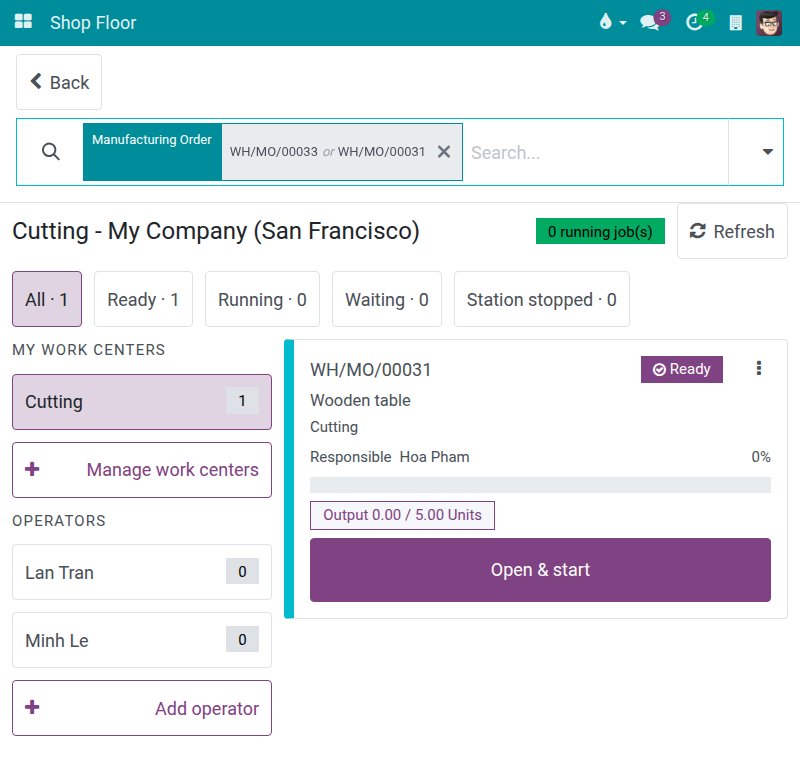
Tap the body of the card, not its labelled button: the operation opens without starting the clock. Tap On behalf. Only a Manufacturing Administrator sees this button.
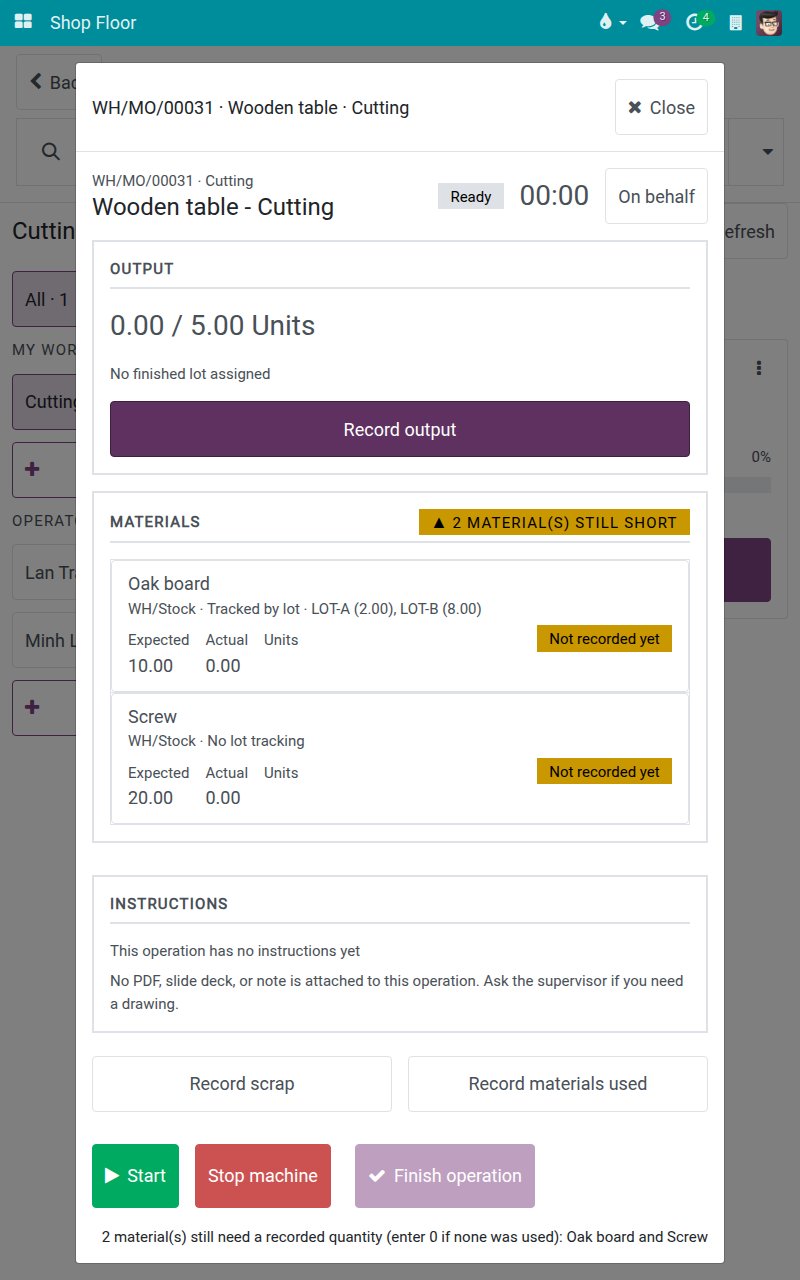
The screen Who is this operation credited to? carries the badge Team leaders only. It splits the people into This work center, Recently credited and All employees, each tab with its number of people. There is no search box; use the tabs to narrow the list.
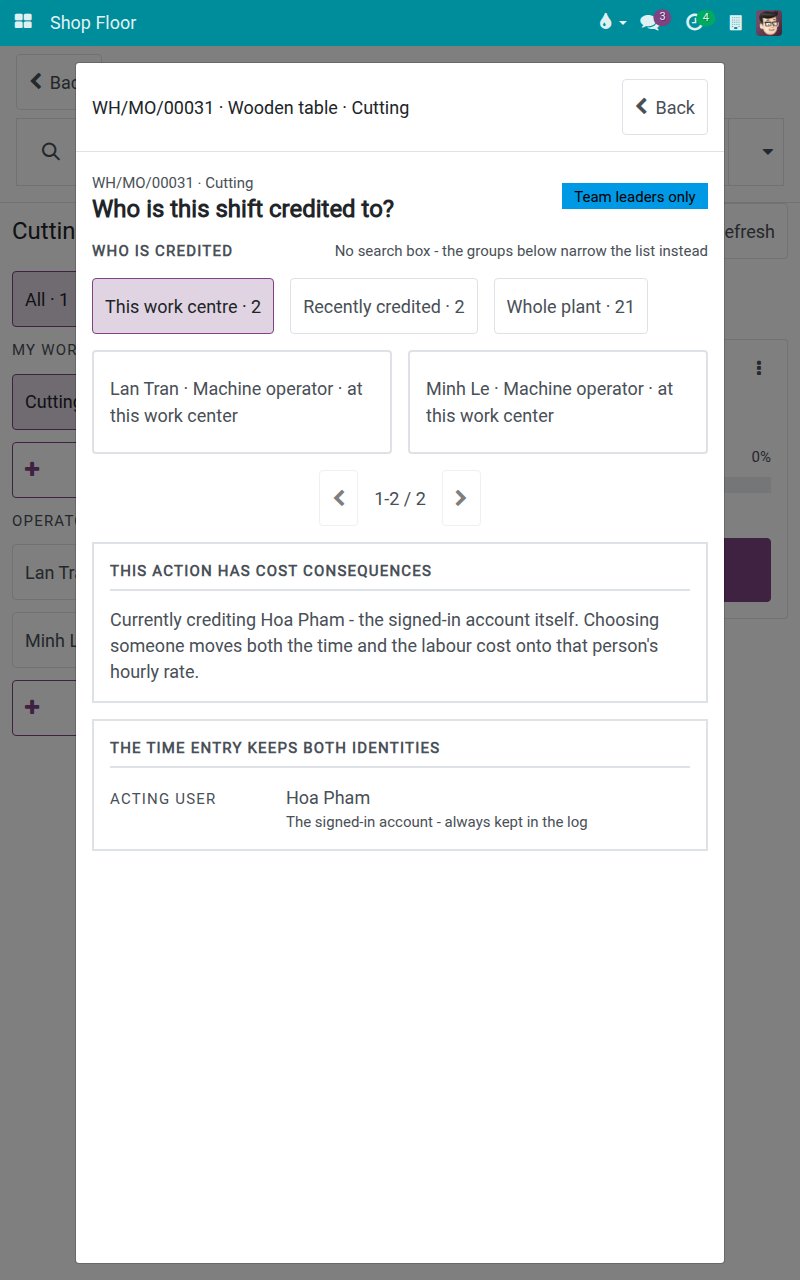
Tap the employee, for example Jamie Brooks. The card THIS ACTION HAS COST CONSEQUENCES states the effect: the operation time is credited to that person and the labour cost is computed from that person's hourly cost, not yours; when that person has no hourly cost, the per-employee rate of the work center is used. The box THE TIME ENTRY KEEPS BOTH IDENTITIES shows ACTING USER, the name of the account you are signed in with, and CREDITED TO, the person you chose. Back to me at the bottom undoes the choice.
Tap Back. Every screen carries the banner Recording for: with the name and the button Back to me. Nothing else is written until work is recorded.
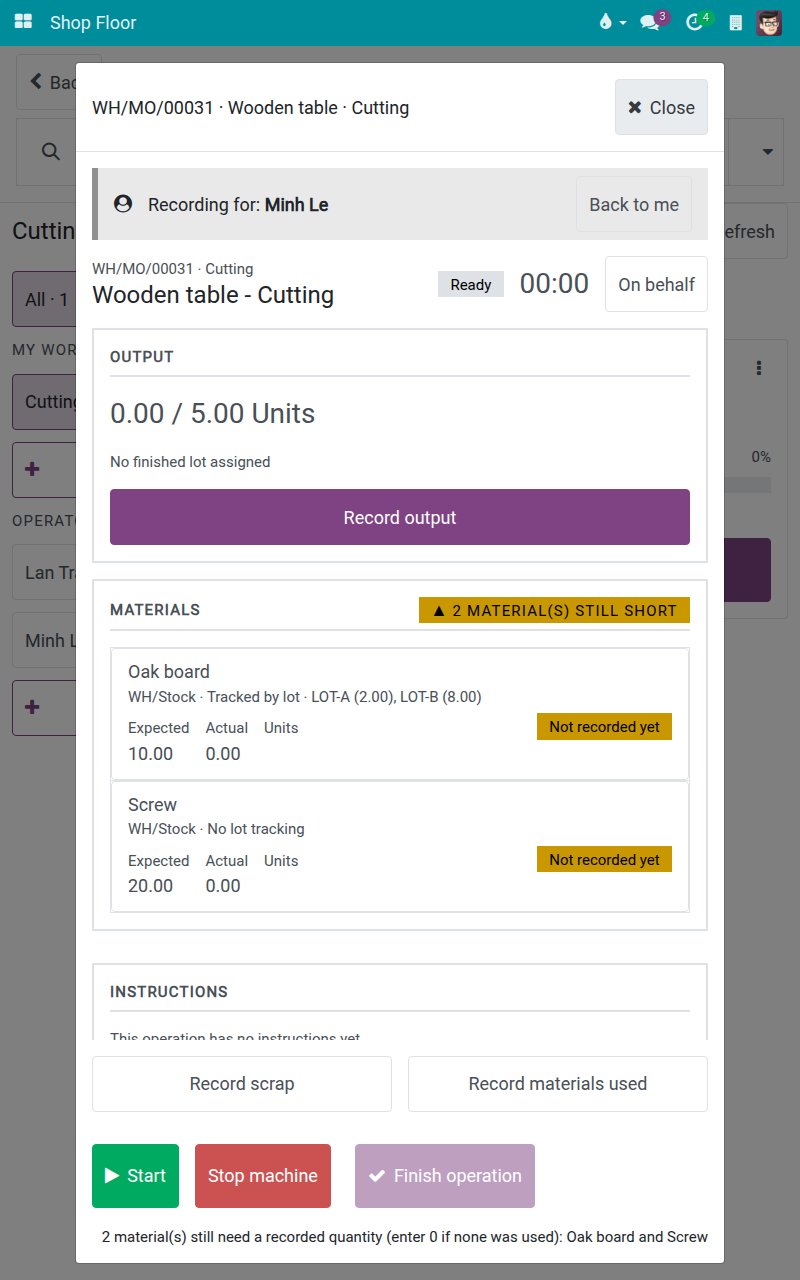
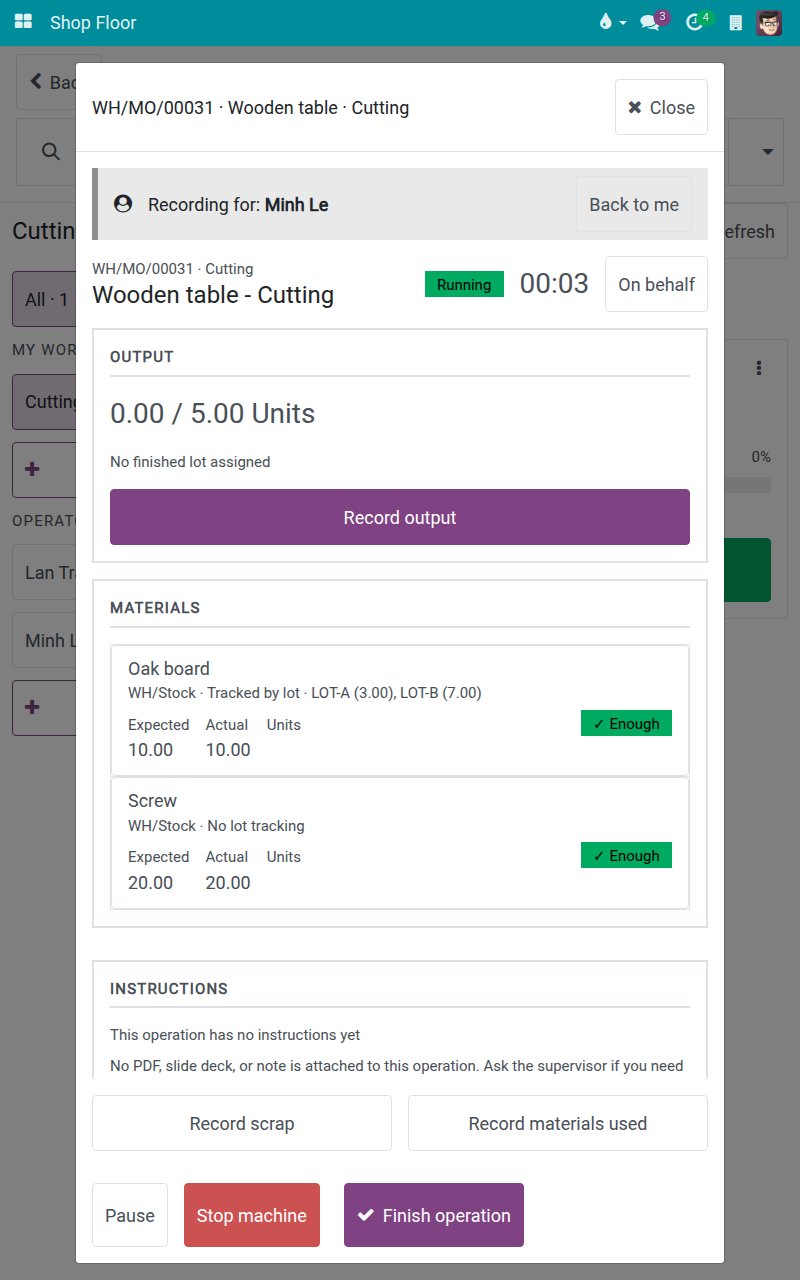
Tap Start. The time line is credited to the chosen employee, while your own account stays in the log as its user.
When you are done, tap Back to me to put the recording back on your own account. The banner is gone. The time you started stays with the person you chose, and the notice "The time you started on this operation is credited to ..." names them.
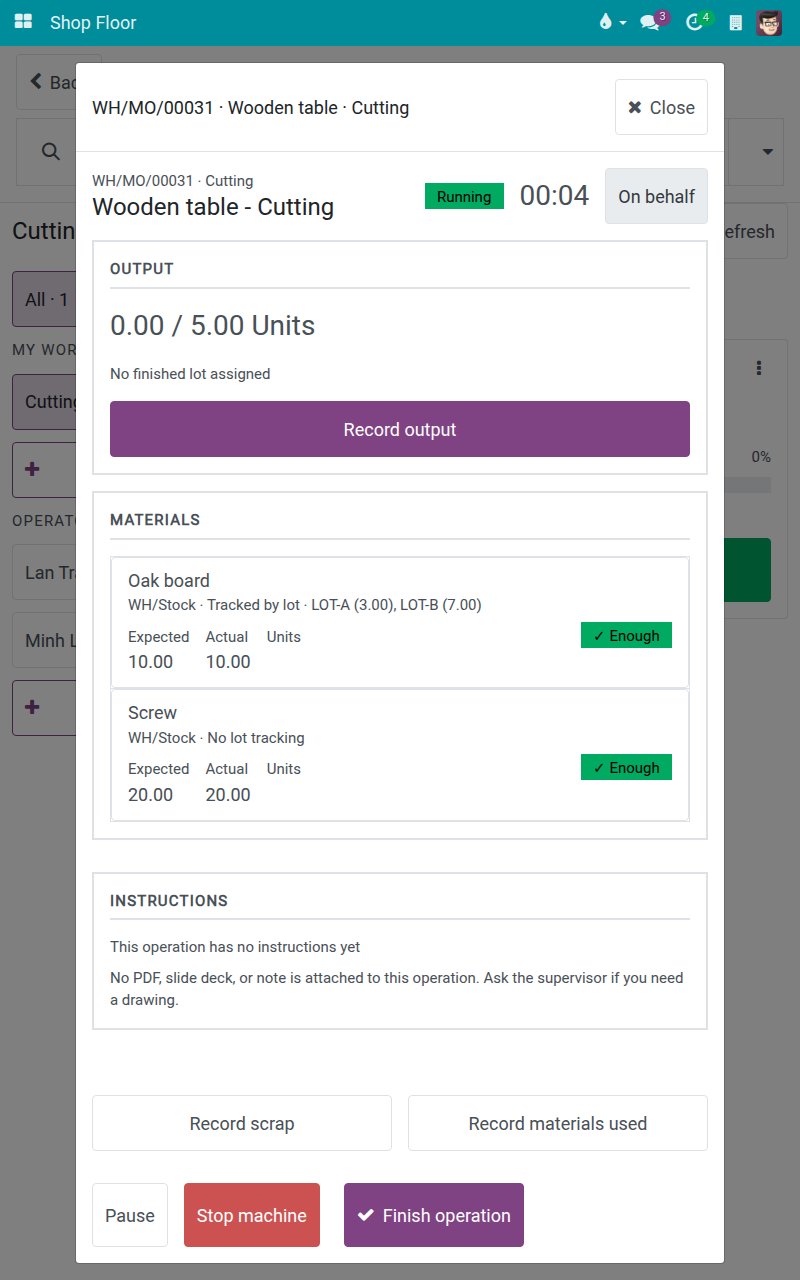
Started the job first? If you tapped Open & start before choosing, open On behalf on that operation and choose the person: the time running since you started goes to them, counted from its start, so no line stays on your name. The screen Who is this operation credited to? says so before you choose, with the time it started. Only time you started for yourself moves: time running for another worker keeps that worker, and time you already paused stays yours. If you worked part of the job yourself, tap Pause first, then choose the person and tap Resume. Back to me does not take the time back: it stays with the person you chose.
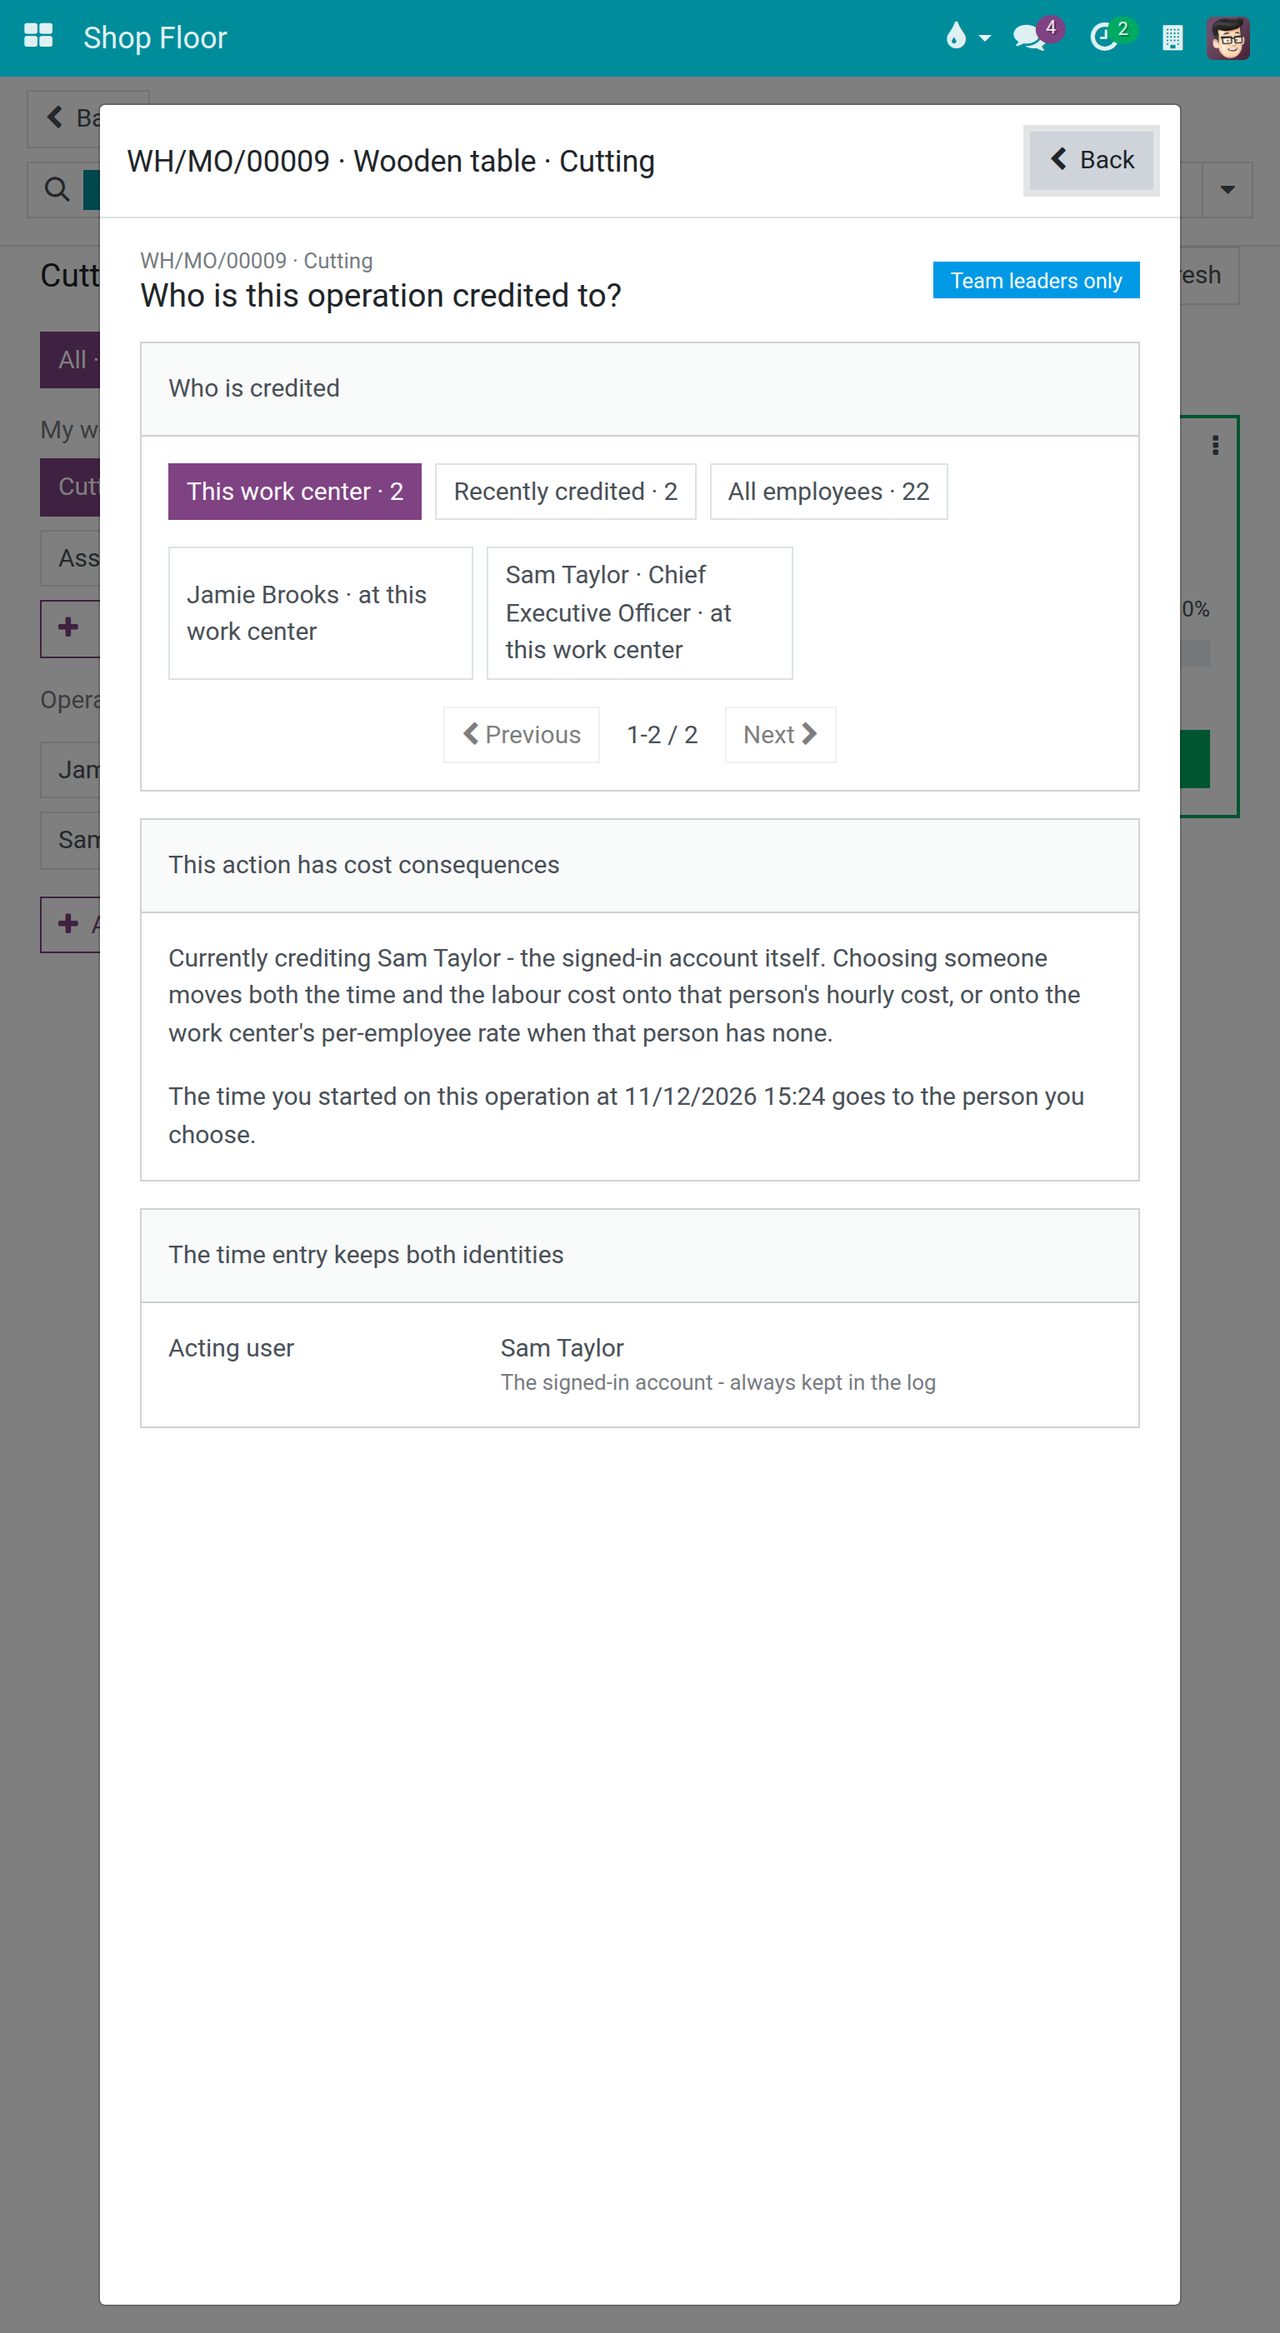
When the time you started on an operation is credited to someone other than the person the screen records for, the operation screen shows the notice "The time you started on this operation is credited to ..." with the name of who receives it, for example after Back to me.
Open the Shop Floor from the desktop
Open Manufacturing ‣ Overview. Each work center is a card. The small screen button next to the main button of the card is Open Shop Floor.
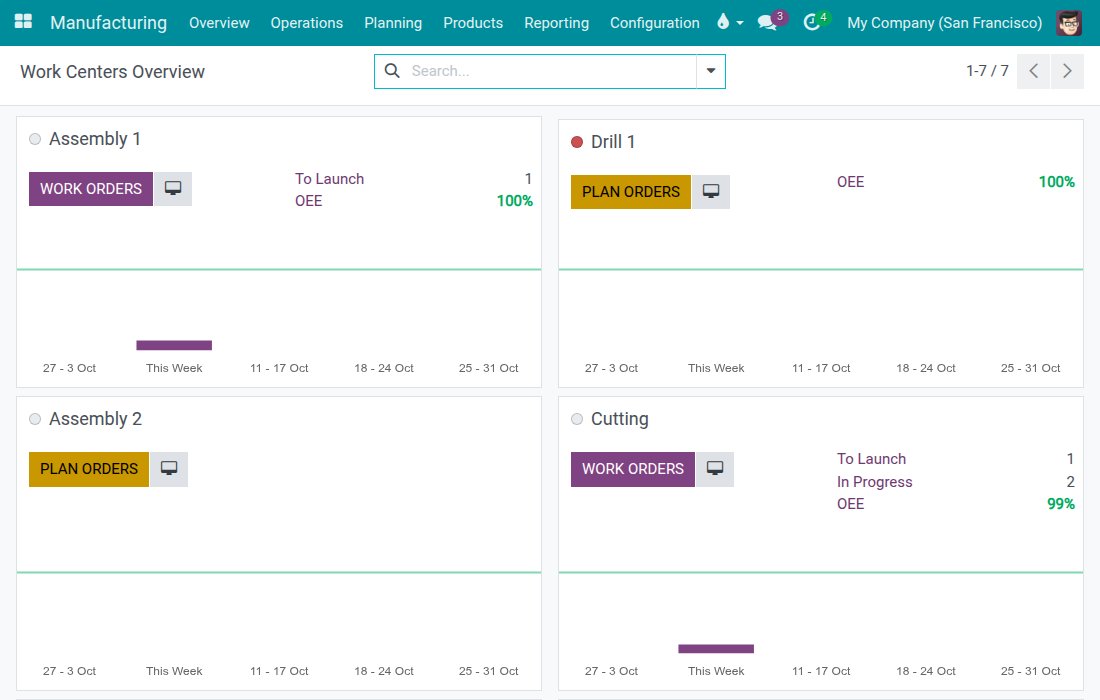
Click it. The Shop Floor opens on that station: the board shows your saved stations plus this one, focused on it, without saving it.
To jump to a single job, open Manufacturing ‣ Operations ‣ Work Orders.
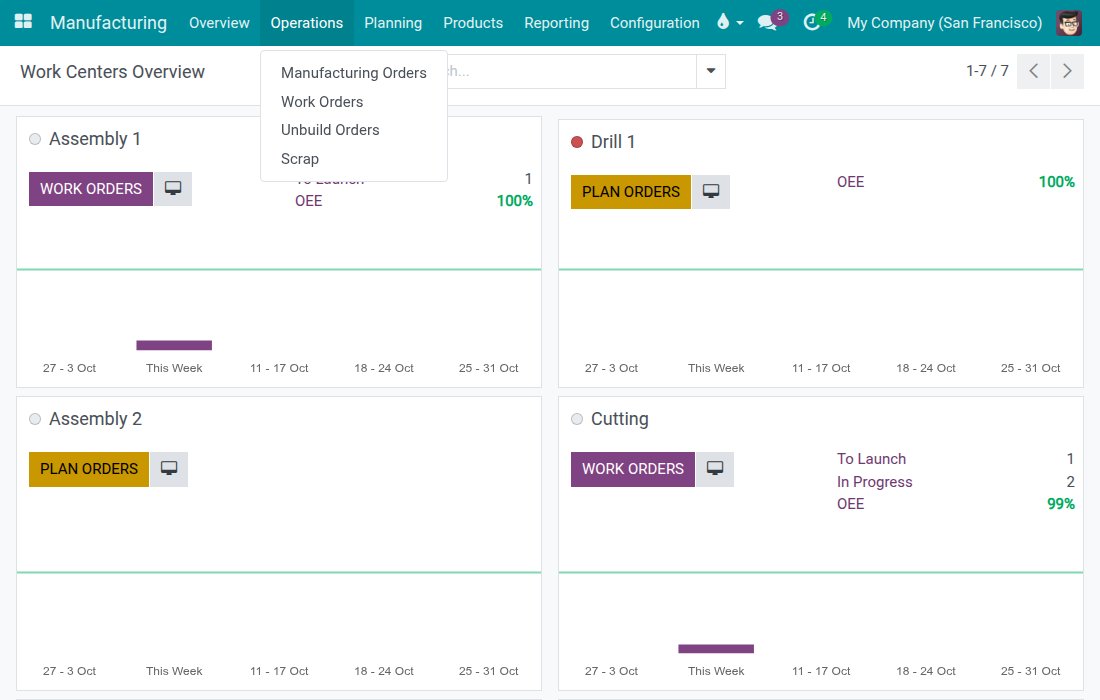
Switch to the Kanban view. Each work order is a card with an Open button.
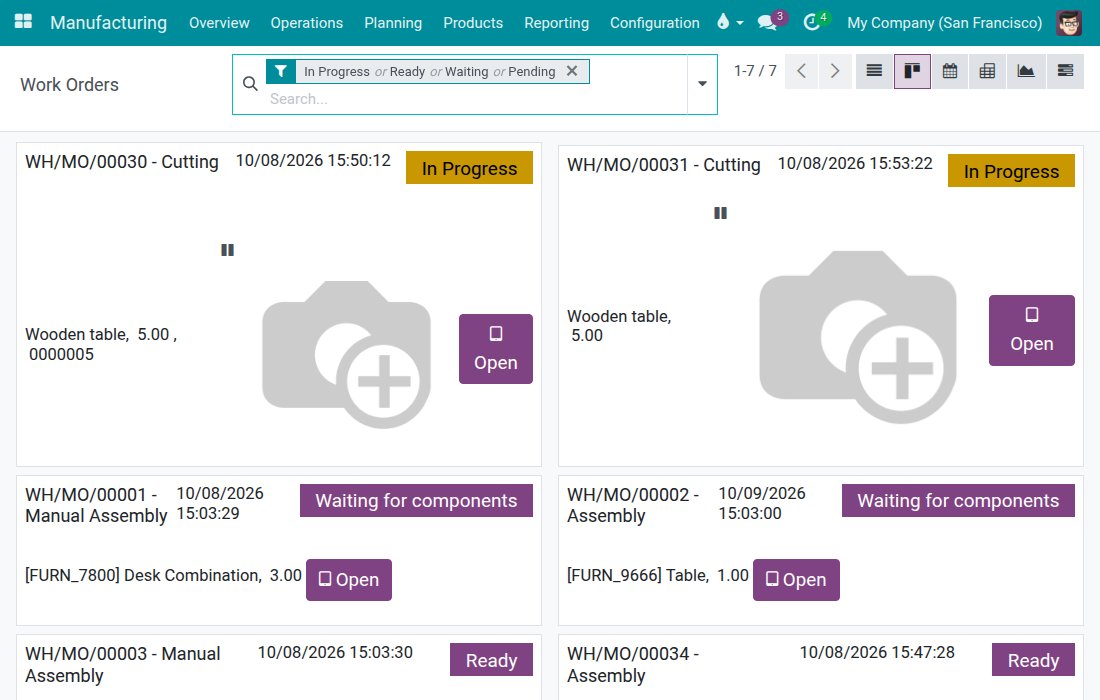
Click Open. The Shop Floor opens directly on the operation screen of that job, or on the closing screen when its order waits to be closed.
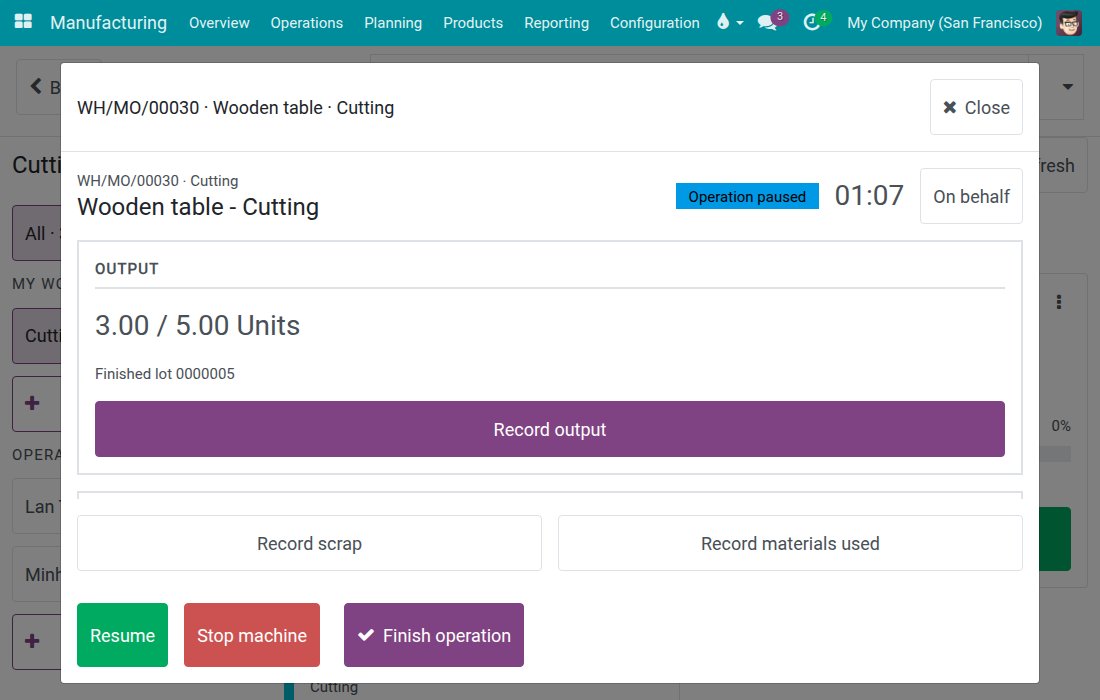
Post the consumption of components early
By default the consumption is booked when the order is closed. You can book it earlier from the work order form.
Open Manufacturing ‣ Operations ‣ Work Orders and open the work order. While it is in progress, the Components tab is editable.
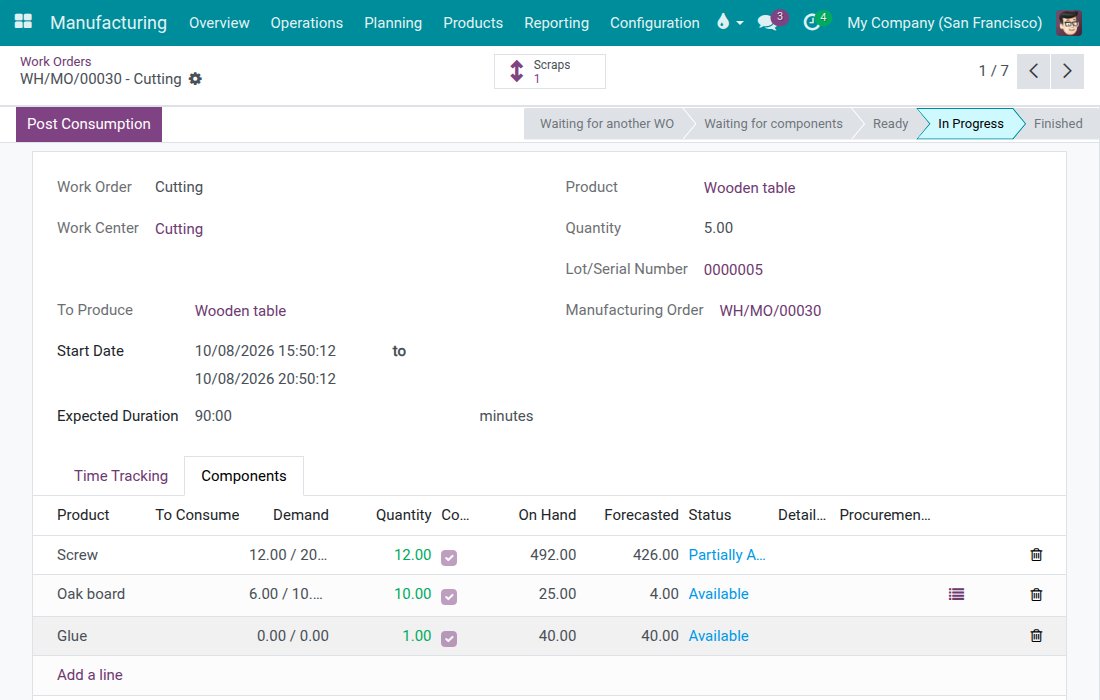
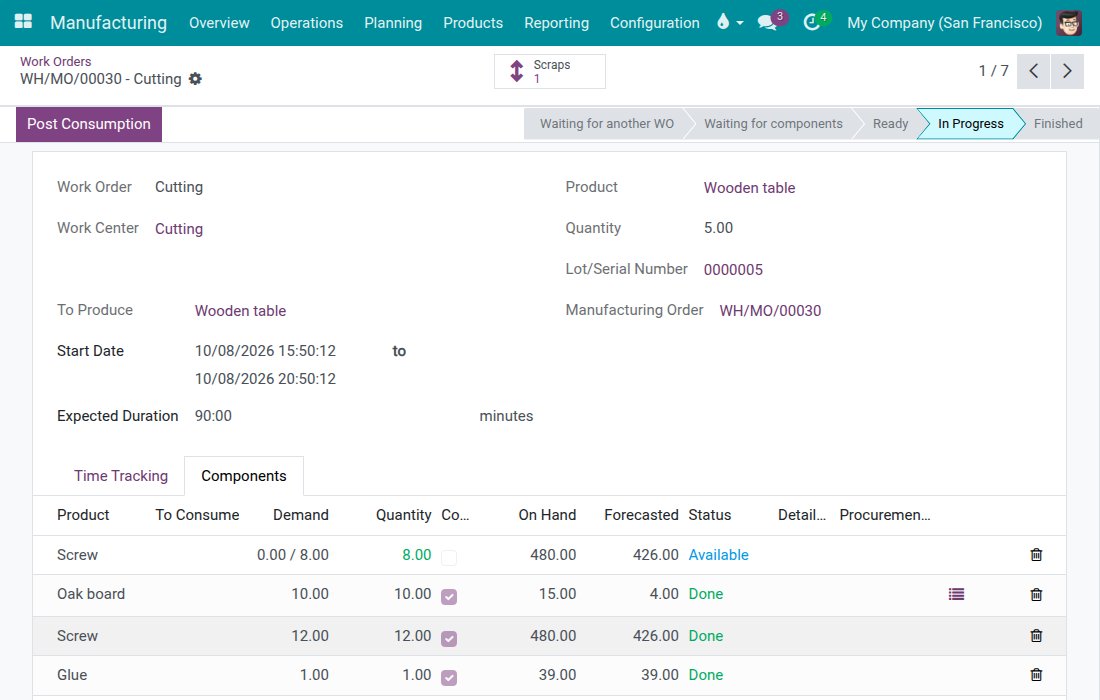
Click Post Consumption in the header. The button is shown only when there is consumption that can be posted. The consumed components move to Done and the stock is credited at once, not at order close. Output recorded later only consumes what is left of a partly posted component.
Audit what was recorded on the tablets
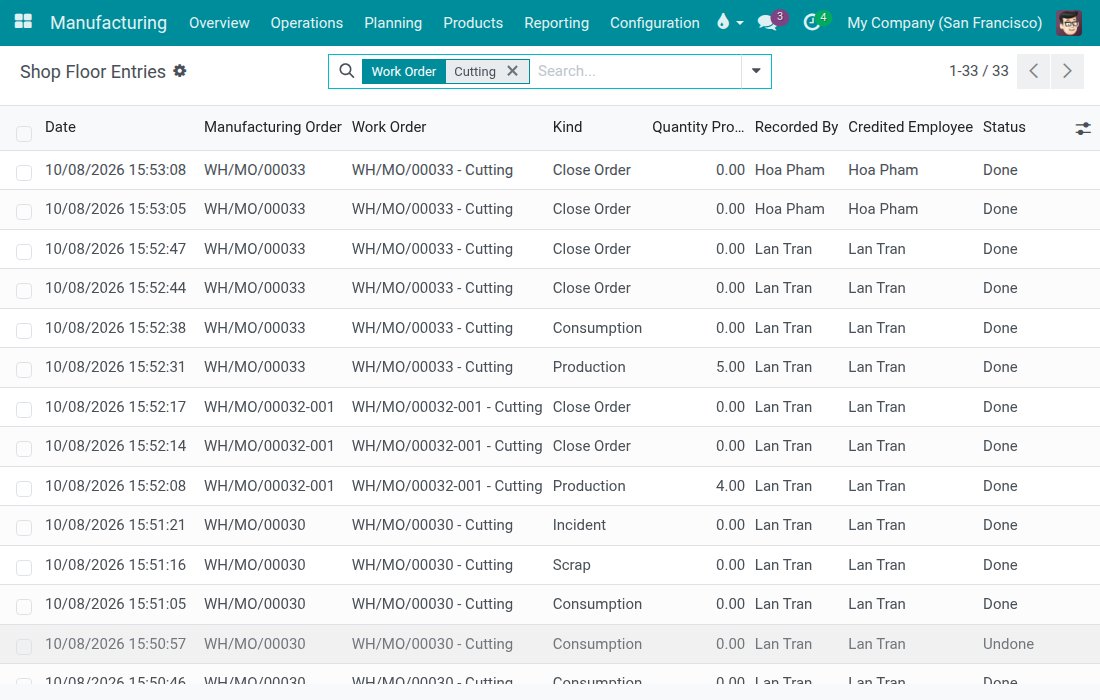
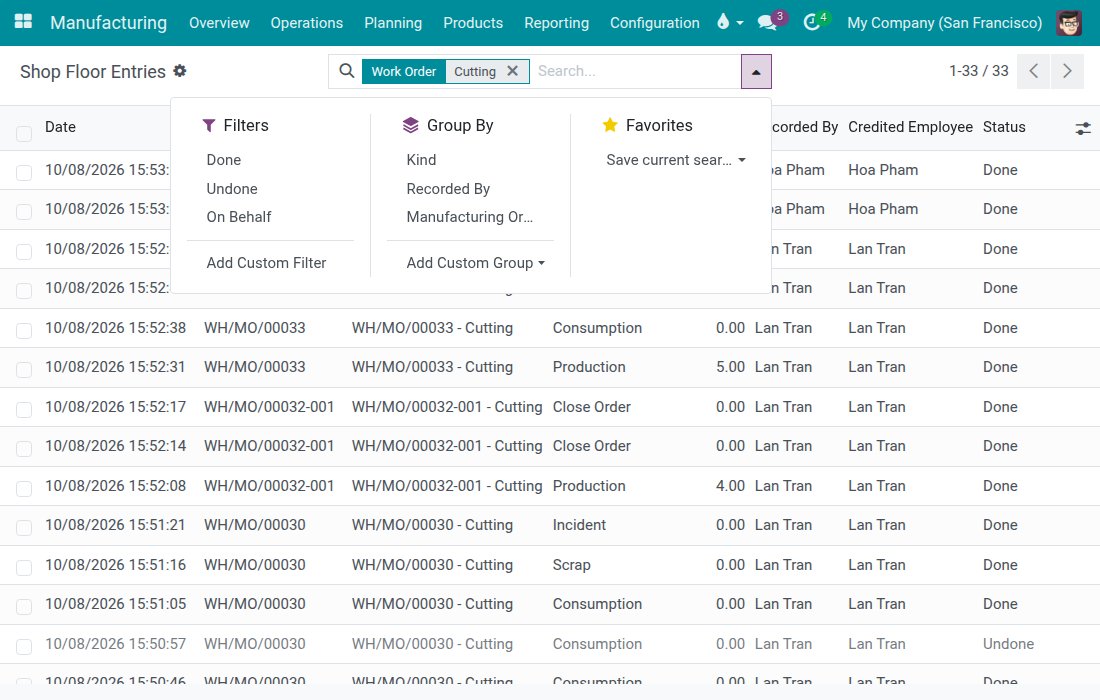
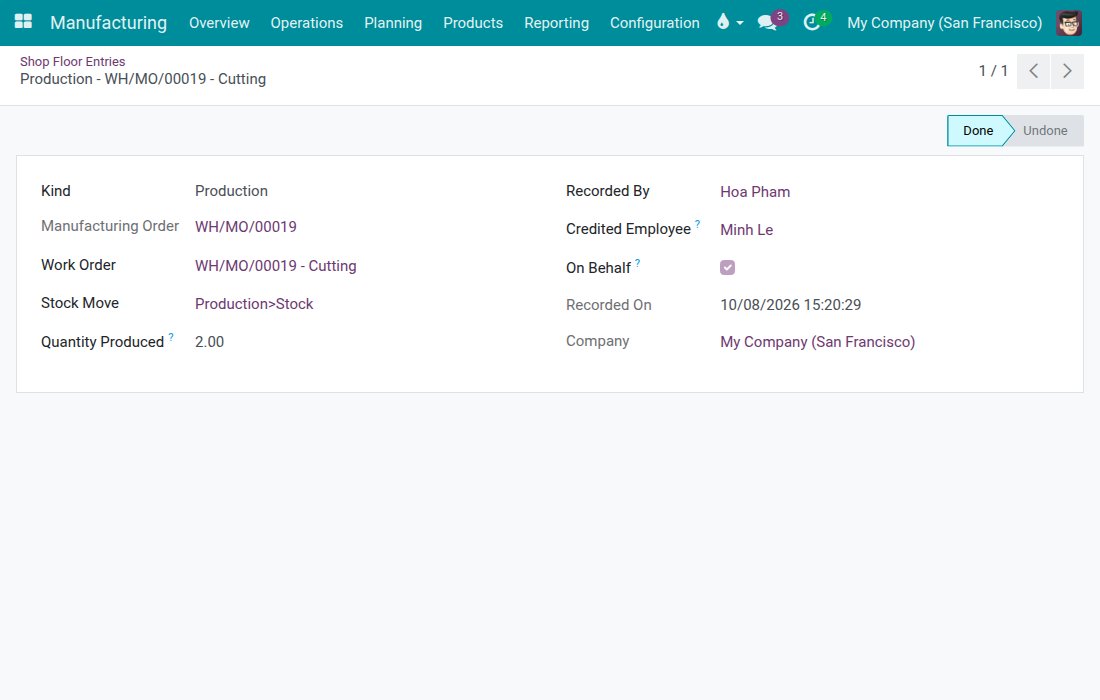
Open Manufacturing ‣ Reporting ‣ Shop Floor Entries. The read-only list shows every recording. A Manufacturing User sees own lines, a Manufacturing Administrator sees all of them.
Open the filter menu. Filters has Done, Undone and On Behalf; Group By has Kind, Recorded By and Manufacturing Order.
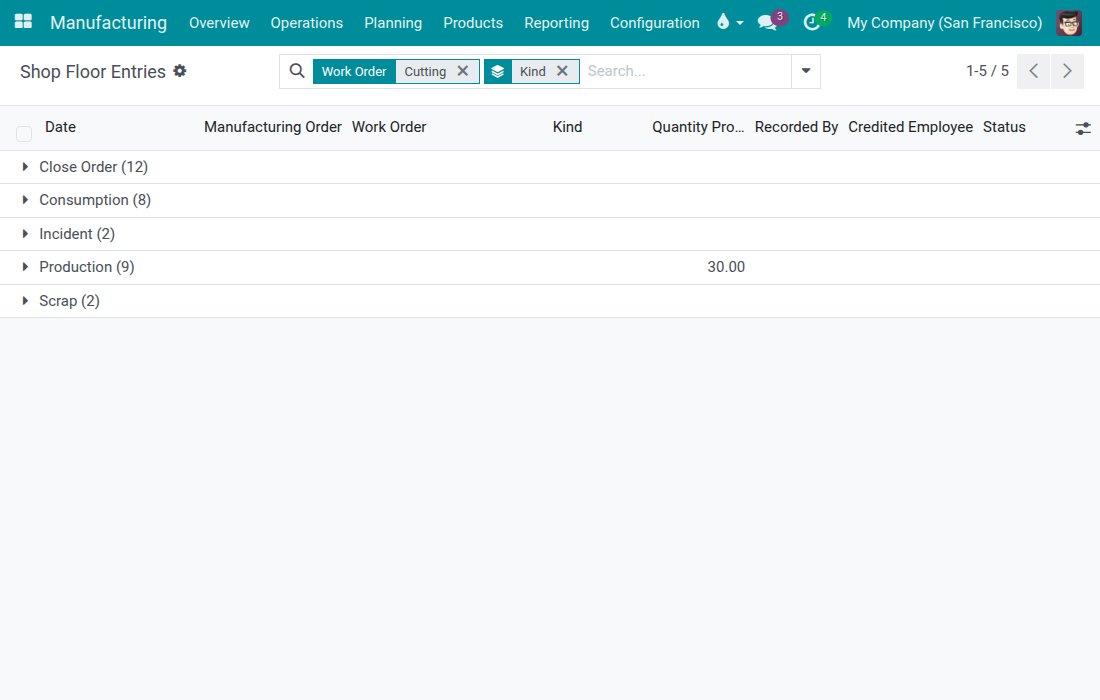
Choose Group By ‣ Kind to group the lines by production, consumption, scrap, incident, failure report, lot generation and order close.
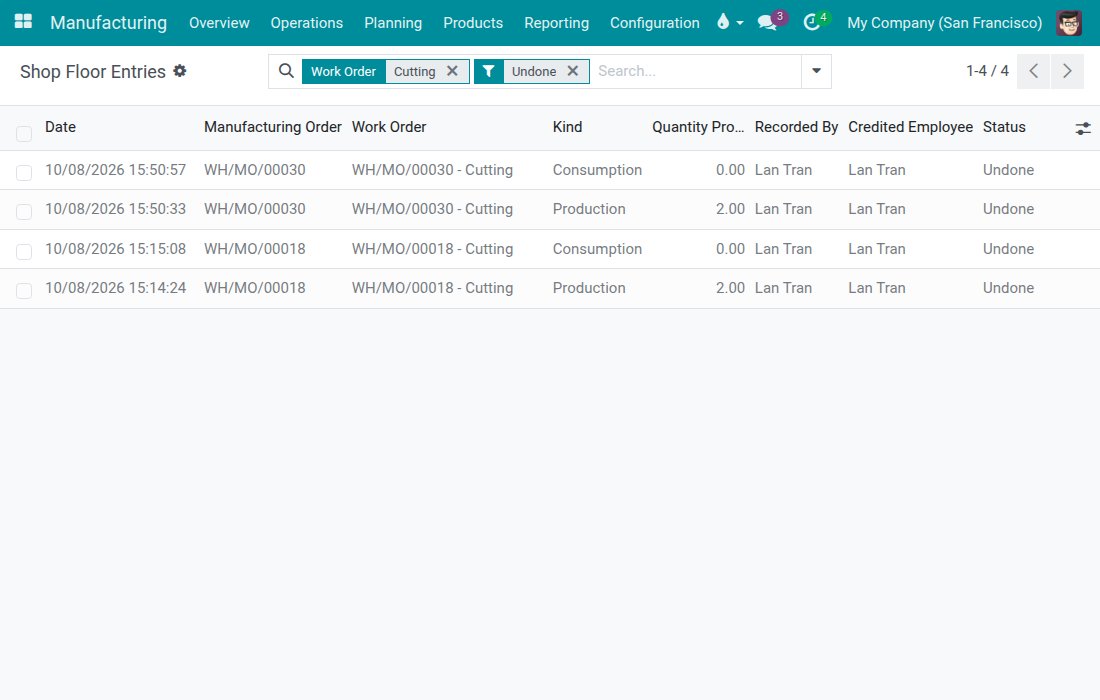
Choose the filter Undone to show only the recordings that were taken back.
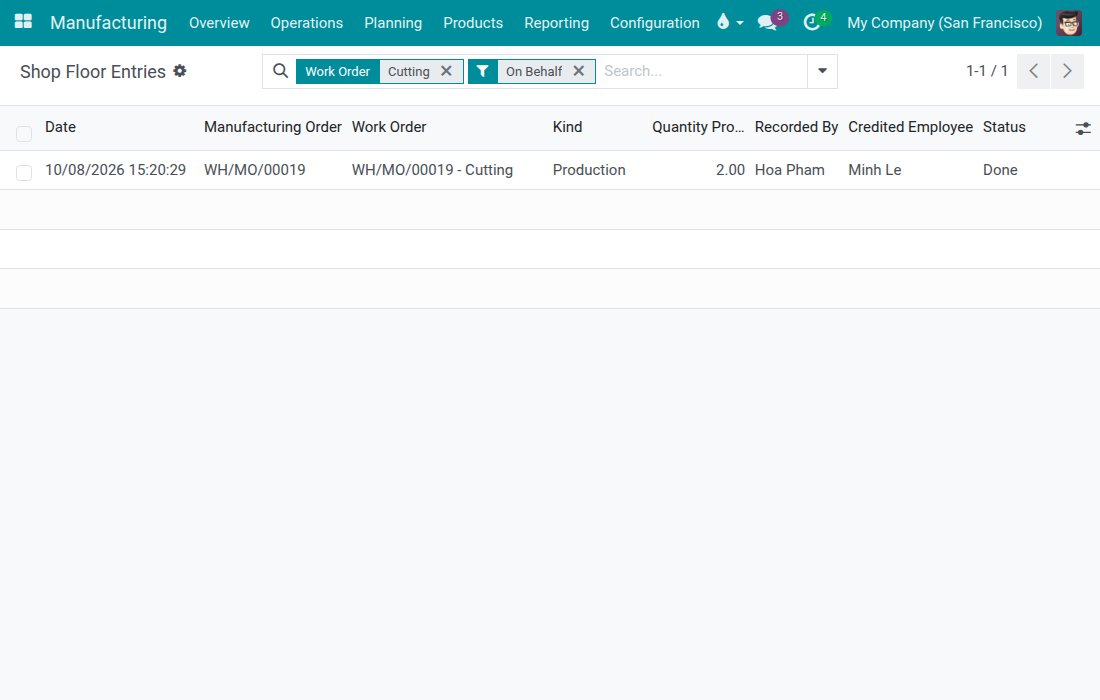
Choose the filter On Behalf to show the lines recorded for another employee.
Click a line to open it. The read-only form shows the kind, the order, the work order, who recorded it, the credited employee, whether it was on behalf and, for an undone line, who undid it and when. Lines can be neither edited nor deleted.
See who a time line is credited to
Open Manufacturing ‣ Operations ‣ Work Orders, open the work order and click the Time Tracking tab.
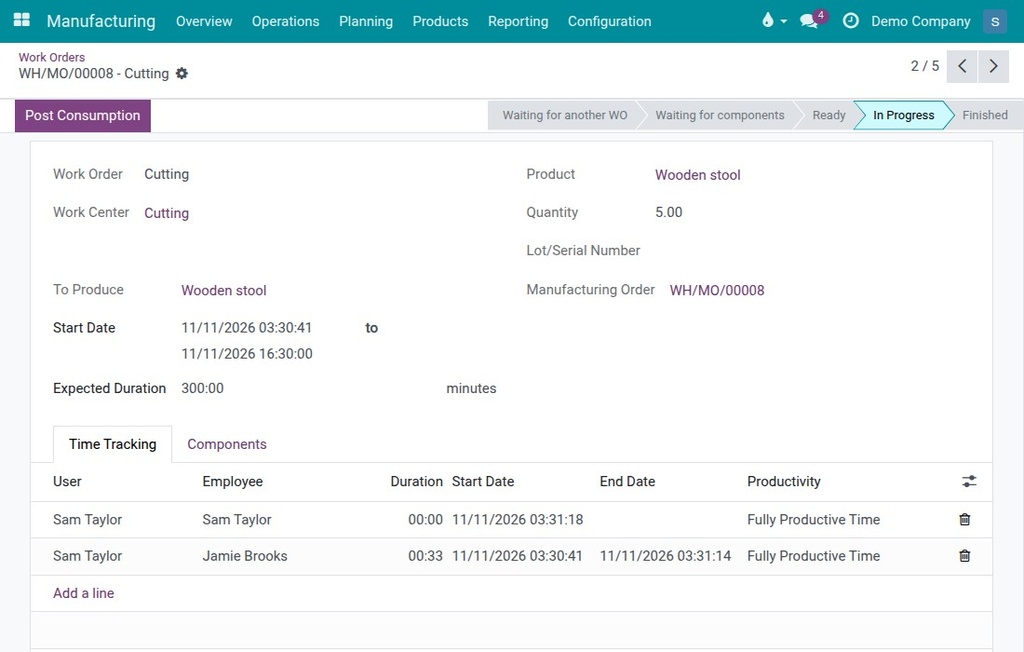
Each line shows two people. User is the account that recorded or started the line. Employee is the person who worked: the credit and the labour cost follow the Employee. When no employee is chosen, the Employee is filled from the User: that user's employee in the company of the line.
In the example, Jamie Brooks worked the job and Sam Taylor recorded on Jamie's behalf, so the line reads User Sam Taylor and Employee Jamie Brooks. A line that Sam started for Sam reads Sam Taylor twice.
Troubleshooting
- Tapping a card did not start the job. This is intended: tapping the body of a card only opens the job, so a hand resting on a card never puts you on the clock. Tap Open & start, Continue operation, Resume operation or the Start button of the operation screen.
- Start, Pause, Finish operation or Record output are refused. The work center is stopped. The screen shows the reason of the stop. Ask a production lead to restart the station.
- The screen says "Enter the quantity first. Tap 0 if none was used." A materials row needs a quantity before you can confirm. Enter 0 if nothing was used.
- "Every lot needs a quantity above zero." Remove the lot you do not use with the red bin button, or enter a quantity for it.
- I recorded scrap by mistake. Scrap cannot be undone from the shop floor. Ask a production lead or stock manager to correct it.
- I cannot close an order because of a difference in materials. Tap Correct the figures if a figure is wrong, or Ask a manager to approve when the bill of materials does not allow differences.
- I cannot see On behalf or Restart station. These controls are for Manufacturing Administrators only.
- There is no Auto-generate lot button. The operation type of the order does not allow creating new lots. Pick an existing lot, or ask the warehouse to create the lot first.
- "Output ... is already recorded under lot ..." and there is no Retry button. An order makes one finished lot. Undo the earlier output first, or close the order and continue on a backorder under the new lot.
- My connection dropped while I was recording. Tap again when the connection is back. A recording that is retried is applied once, never twice.
FAQ
Do operators need to type?
Rarely. Quantities go in on a number pad and choices are tiles. Only the search and a free description of a stop use the keyboard.
Whose labour cost does a job use?
The employee the time is credited to: the signed-in operator, or the employee chosen with On behalf. In the Time Tracking tab of a work order this is the Employee column; the User column is the account that recorded the line.
Can several people share one tablet?
Yes. Each person signs in with their own account, and the work centers and operators are remembered per account.
Can I undo a recording after the order is closed?
No. Undo works only while the operation and the order are open.
Where do I see who recorded what?
In Manufacturing ‣ Reporting ‣ Shop Floor Entries. See "Audit what was recorded on the tablets".
This software and associated files (the "Software") may only be used (executed, modified, executed after modifications) if you have purchased a valid license from the authors, typically via Odoo Apps, or if you have received a written agreement from the authors of the Software (see the COPYRIGHT file).
You may develop Odoo modules that use the Software as a library (typically by depending on it, importing it and using its resources), but without copying any source code or material from the Software. You may distribute those modules under the license of your choice, provided that this license is compatible with the terms of the Odoo Proprietary License (For example: LGPL, MIT, or proprietary licenses similar to this one).
It is forbidden to publish, distribute, sublicense, or sell copies of the Software or modified copies of the Software.
The above copyright notice and this permission notice must be included in all copies or substantial portions of the Software.
THE SOFTWARE IS PROVIDED "AS IS", WITHOUT WARRANTY OF ANY KIND, EXPRESS OR IMPLIED, INCLUDING BUT NOT LIMITED TO THE WARRANTIES OF MERCHANTABILITY, FITNESS FOR A PARTICULAR PURPOSE AND NONINFRINGEMENT. IN NO EVENT SHALL THE AUTHORS OR COPYRIGHT HOLDERS BE LIABLE FOR ANY CLAIM, DAMAGES OR OTHER LIABILITY, WHETHER IN AN ACTION OF CONTRACT, TORT OR OTHERWISE, ARISING FROM, OUT OF OR IN CONNECTION WITH THE SOFTWARE OR THE USE OR OTHER DEALINGS IN THE SOFTWARE.