
Pos IoT
by Viindoo
| Lines of Code | 1614 |
| Technical name | viin_iot_pos |
| License | OPL-1 |
| Website | https://viindoo.com/apps/modules/17.0/viin_iot_pos |
| Read description for | v 16.0 v 18.0 |
| Required Apps | Invoicing (account) Discuss (mail) Inventory (stock) |
| Included Dependencies | Internet Of Things |

The IoT box at the till: receipt printer, customer display, scanners, scale
Each point of sale picks its IoT box and the devices it uses; POS printers map to IoT printers; the session loads them for the POS screen.
Pos IoT (technical name viin_iot_pos) is an Odoo 17.0 app for Odoo Community and Odoo Enterprise and Viindoo Cloud, built for cashier.

At a Glance
The facts of Pos IoT, version 0.1.0, in one place. Published by Viindoo.
How It Works
Pick the box and devices in the POS settings.
Config
Box and devices.
Settings
IoT block.

Devices
The list.

Points of sale
Kanban.

What You Get
Box per point of sale
Printer, display, scanners, scale
POS printers on IoT
What This App Does Not Do
Read this before you buy. Everything below is something the app deliberately leaves to another app or to you.
Same network.
Works Well With
Apps from the same stack, built to fit this one:
Who Should Use Pos IoT?
Cashier
Receipt prints, display shows the total, scale weighs.
Frequently Asked Questions
What does Pos IoT do?
Each point of sale picks its IoT box and the devices it uses; POS printers map to IoT printers; the session loads them for the POS screen.
What does Pos IoT not do?
The POS screen needs the box reachable. Same network.
Who is Pos IoT for?
Cashier: Receipt prints, display shows the total, scale weighs.
Which Odoo version and editions does it support?
Odoo 17.0 - Odoo Community, Odoo Enterprise, Viindoo Cloud. Upgrades to a newer Odoo series are a separate purchase for that series.
What does it depend on?
It installs on top of: viin_iot, point_of_sale. Odoo installs them with it.
How do I set it up?
Pick the box and devices in the POS settings.
What works well with it?
IoT (viin_iot): Required. Point of Sale (point_of_sale): Required.
Can I try it before buying?
Yes - the Live Preview button at the top of this page opens the module's own screen on a working database.
How do I get support?
Write to apps.support@viindoo.com with your Odoo version and the technical name viin_iot_pos; pre-sales questions go to sales@viindoo.com.
See Pos IoT in Action
The IoT box at the till: receipt printer, customer display, scanners, scale
Need help with Pos IoT?
For questions, implementation support, or consulting services, contact Viindoo.
Pre-Sales & Partnership
sales@viindoo.comWhen contacting us, please include:
- Odoo/Viindoo version (Odoo CE / Viindoo Editions).
- Number of users and business scope.
- Other modules currently in use.
Technical Support
apps.support@viindoo.comFor faster troubleshooting, please provide:
- Order number or app reference.
- Odoo/Viindoo version & edition.
- Steps to reproduce the issue.
- Screenshots/logs if available.
Upgrades to a newer Odoo series are a separate purchase for that series.
Technical Requirement
Changes log
0.1.0 - Latest on the 17.0 line
- Aligned with the 17.0 models and views.
Overview
Note
Extends viin_iot - see its documentation.
Pos IoT connects the receipt printer, barcode scanner, customer display and electronic scale on a paired IoT box to one specific Point of Sale, so a shop can run several tills off a single box without their hardware getting in each other's way.
Setting the hardware up is a one-time job for a Point of Sale manager or an IoT administrator. A cashier holding only the ordinary Point of Sale cashier role never opens any of the screens below - once the hardware is assigned, it is simply there the next time they open their shift.
Installation
Pos IoT has no menu of its own. It depends on both Point of Sale and Internet Of Things, and Odoo installs it automatically the moment both of those are already installed - there is nothing to install by hand in that case.
To confirm it is installed, or to install it directly:
- Open Apps.
- Remove the Apps filter shown in the search bar, then search for Pos IoT (technical name viin_iot_pos).
- Click Install if it is not already installed.
Configuration
Roles
Two different people touch this module, and only one of them needs any special access:
- A Point of Sale manager or an IoT administrator picks which IoT Box and which devices a till uses - a one-time setup step, done from the screens below.
- A cashier holding only the ordinary Point of Sale cashier role never opens these screens at all - once the hardware is assigned, it is just there the next time they open their shift.
Assigning hardware to a till
Open Point of Sale ‣ Configuration ‣ Point of Sales, then open a till's own form. Its IoT Box section is where the hardware for this specific till is picked:
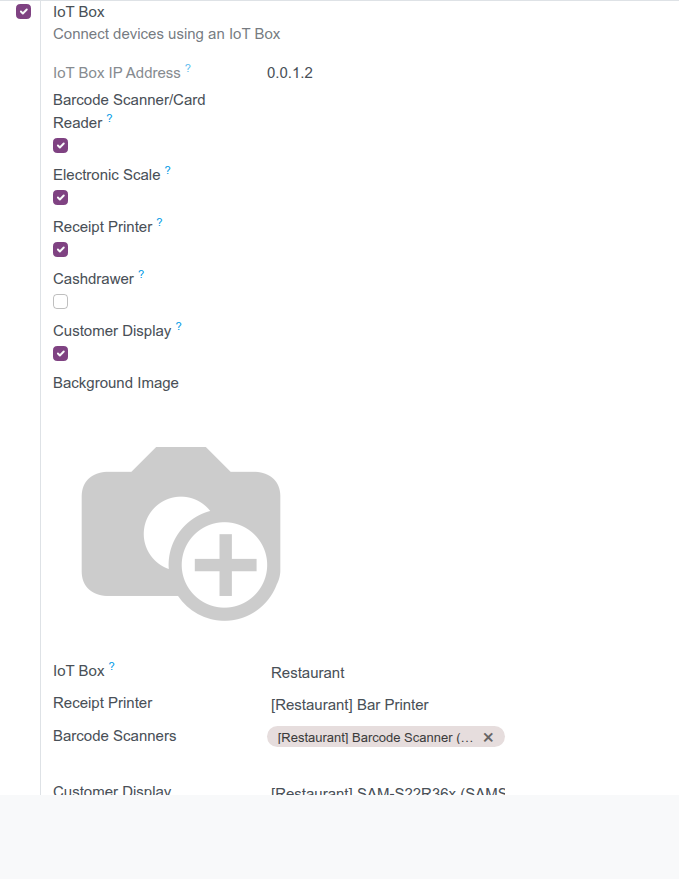
- IoT Box - the paired box this till talks to. Its IP address fills in automatically the moment you pick it, and stays read-only afterwards.
- Receipt Printer - the one printer on the box that prints this till's receipts and opens its cash drawer.
- Barcode Scanners - every scanner on the box that should feed scans into this till. A till can use more than one.
- Customer Display - the screen that shows the running order to the customer.
- Electronic Scale - the scale this till reads a weight from.
- IoT Devices button - jumps to the full device list for this till's box.
A barcode scanner or a customer display can only be picked on one till at a time - if you try to assign one that is already in use elsewhere, Pos IoT stops you and asks you to free it up first. The receipt printer and the electronic scale are more relaxed: several tills may share the same one off the same box.
Your IoT Box's own address and credentials never leave the back office - the till only ever receives the specific devices you assigned to it here.
Assigning hardware from Settings
The same pickers are also reachable from Settings ‣ Point of Sale, under Connected Devices ‣ IoT Box. Pick the till at the top of the page first, then fill in the same fields:
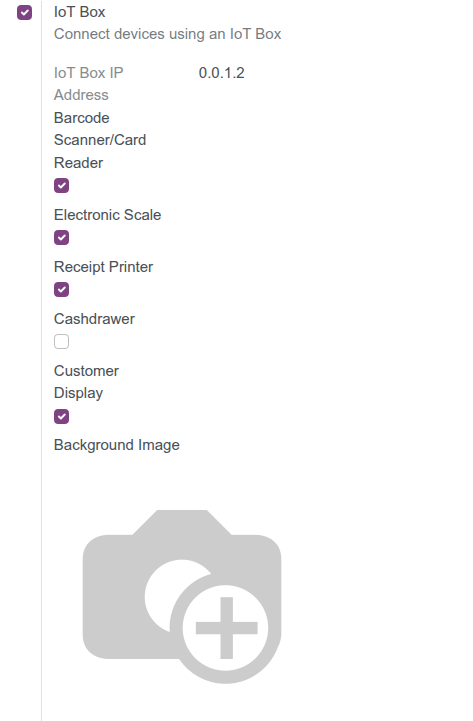
Switching to a different box here clears the four device pickers, so a till is never left running on a device that actually belongs to another box.
Linking a kitchen or bar printer to a device
Open Point of Sale ‣ Orders ‣ Preparation Printers and open (or create) a printer that prints orders to the kitchen or the bar. Set its Printer Type to Use a printer connected to the IoT Box, then pick the exact device in IoT Device:
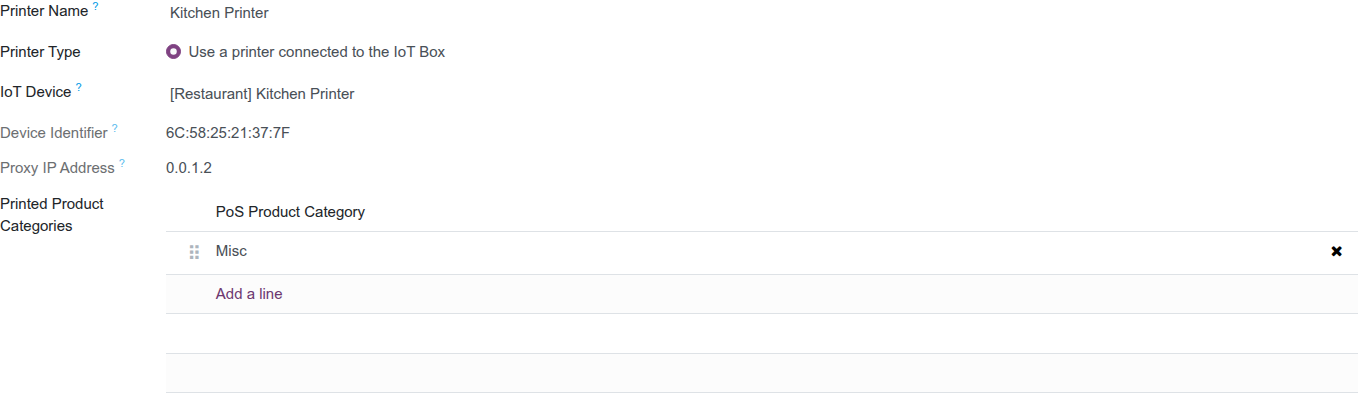
Device Identifier fills in on its own from the device you picked. Naming the device this way lets one box drive more than one order printer - useful the moment a shop needs a separate kitchen printer and a separate bar printer off the same box. A cashier can see how a printer is set up; only a Point of Sale manager can change it.
Checking which till a device is assigned to
Open IoT ‣ Devices, then open a device's own page and click its Point of Sale tab:

The list is read-only - it exists so you can trace where a device went the moment it stops showing up on the till you expected.
Usage
Opening a session on a configured till
A cashier opens Point of Sale, then clicks New Session on the till's own card. No IoT access is needed for this - the ordinary Point of Sale cashier role is enough.
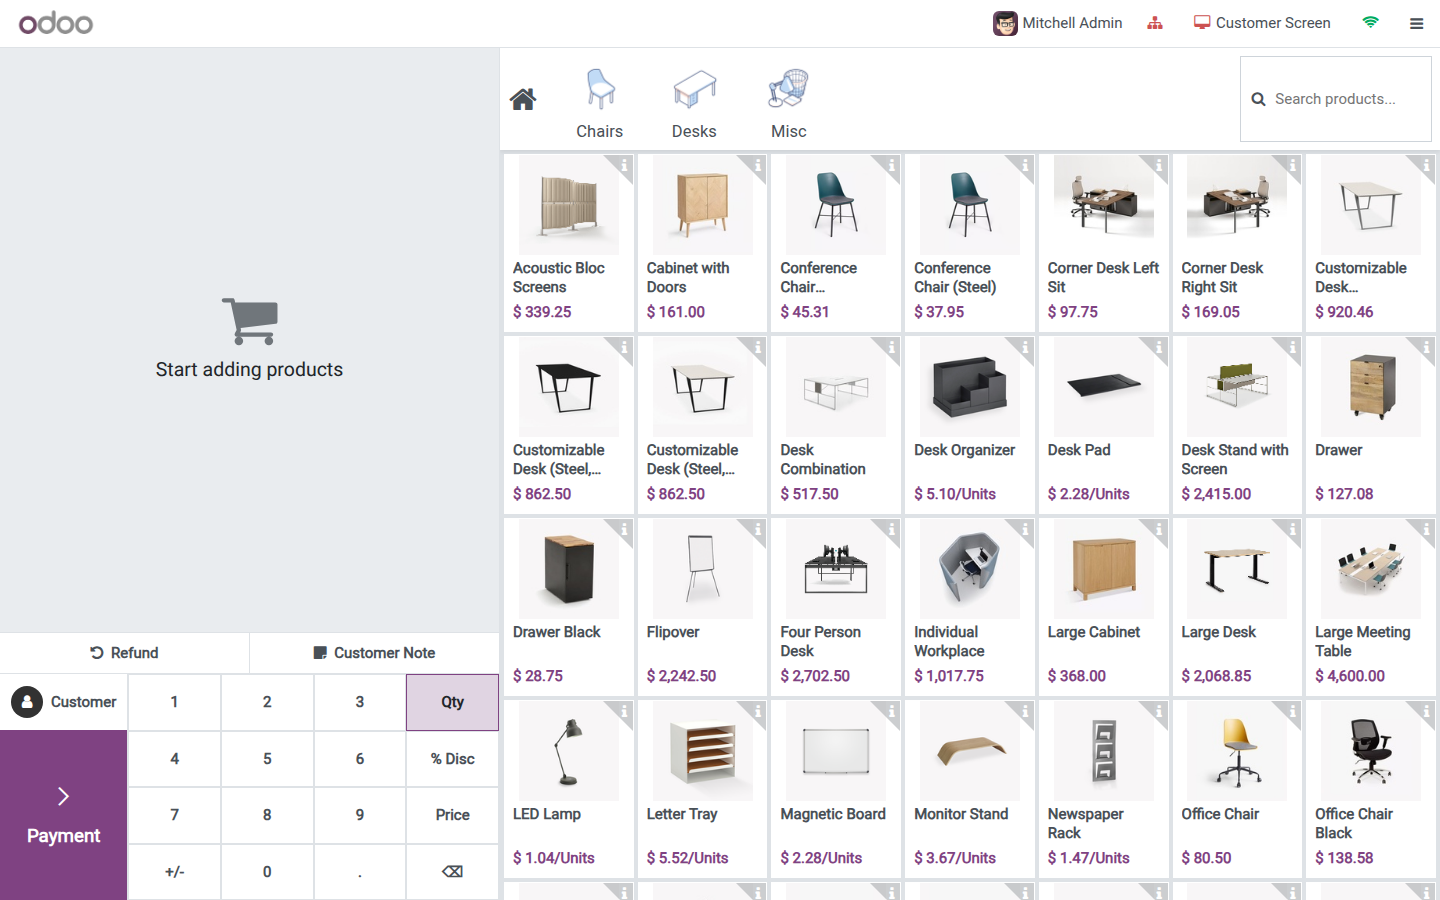
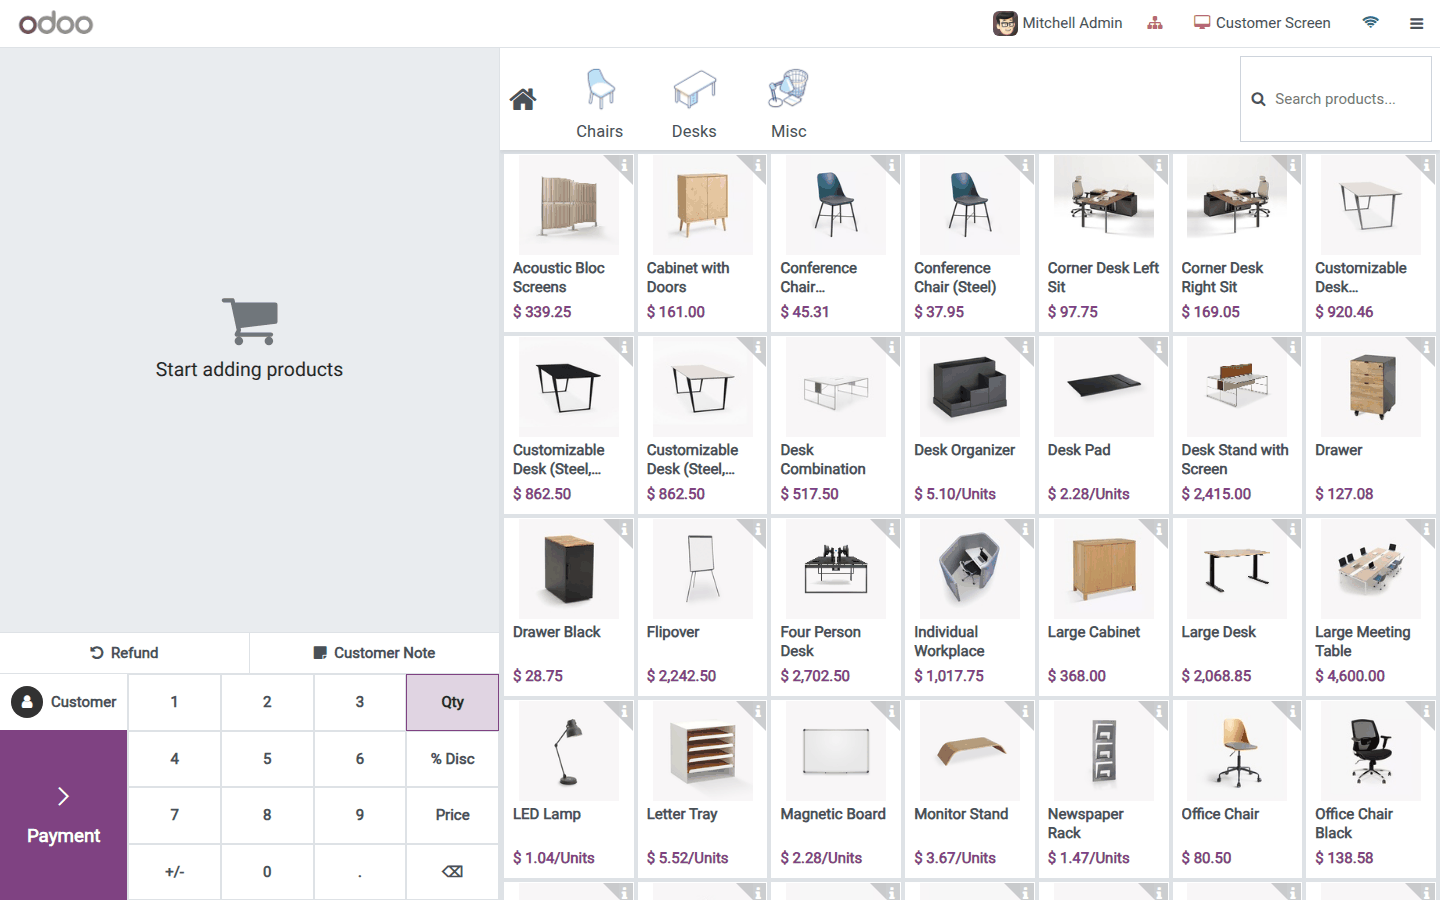
Hardware status while selling
The till's own header shows whether its assigned hardware is reachable, right next to the cashier's name:

- A Proxy badge shows whether the till can currently reach its IoT Box at all. Click it to retry the connection.
- A Customer Screen badge shows whether the assigned customer display is connected, separately from the box itself.
None of this depends on real hardware to keep working: on the machine this guide was written from, no physical IoT box was connected and every device showed Disconnected - the till still opened normally and sold products, it simply reported the hardware as unreachable instead of pretending it was there.
What a cashier sees at the till itself once a printer, scanner, display or scale actually answers is specified behaviour this guide could not demonstrate on real hardware:
- A configured receipt printer prints the receipt and opens the cash drawer for this till.
- A configured barcode scanner feeds every scan straight into the current sale.
- A configured customer display shows the running order to the customer.
- A configured electronic scale supplies a weight without freezing the sale if it does not answer.
Troubleshooting
A barcode scanner or customer display cannot be picked on this till. It is already assigned to another till. Free it from that till's own IoT Box section (or from the device's own Point of Sale tab) before assigning it here.
A till's Proxy badge shows Disconnected. The till cannot currently reach its IoT Box. Click the badge to retry, and check that the box itself is powered on and reachable on the network - see the Internet Of Things (IoT) module's own Troubleshooting section for the box side of this.
Switching a till's IoT Box does not keep the old printer, scanner, display or scale. This is expected: changing the box clears the four device pickers, since a device from the previous box is very unlikely to also exist on the new one.
A kitchen or bar printer never receives orders. Confirm its Printer Type is set to Use a printer connected to the IoT Box and that IoT Device points at the exact device meant to print that order.
FAQ
Does a cashier need any IoT access to use the till's hardware? No. Once a Point of Sale manager or an IoT administrator has assigned the devices, an ordinary cashier just opens their shift and the hardware is there.
Can one IoT Box serve more than one till? Yes for the receipt printer and the electronic scale - several tills may share one. A barcode scanner or a customer display, however, can only belong to one till at a time.
Where do I pair the IoT Box itself? That happens in the Internet Of Things (IoT) module, before this module's own screens are used - see its documentation.
Can more than one order printer run off the same IoT Box? Yes - link each order printer to its own device under IoT Device in Preparation Printers.
This software and associated files (the "Software") may only be used (executed, modified, executed after modifications) if you have purchased a valid license from the authors, typically via Odoo Apps, or if you have received a written agreement from the authors of the Software (see the COPYRIGHT file).
You may develop Odoo modules that use the Software as a library (typically by depending on it, importing it and using its resources), but without copying any source code or material from the Software. You may distribute those modules under the license of your choice, provided that this license is compatible with the terms of the Odoo Proprietary License (For example: LGPL, MIT, or proprietary licenses similar to this one).
It is forbidden to publish, distribute, sublicense, or sell copies of the Software or modified copies of the Software.
The above copyright notice and this permission notice must be included in all copies or substantial portions of the Software.
THE SOFTWARE IS PROVIDED "AS IS", WITHOUT WARRANTY OF ANY KIND, EXPRESS OR IMPLIED, INCLUDING BUT NOT LIMITED TO THE WARRANTIES OF MERCHANTABILITY, FITNESS FOR A PARTICULAR PURPOSE AND NONINFRINGEMENT. IN NO EVENT SHALL THE AUTHORS OR COPYRIGHT HOLDERS BE LIABLE FOR ANY CLAIM, DAMAGES OR OTHER LIABILITY, WHETHER IN AN ACTION OF CONTRACT, TORT OR OTHERWISE, ARISING FROM, OUT OF OR IN CONNECTION WITH THE SOFTWARE OR THE USE OR OTHER DEALINGS IN THE SOFTWARE.